Big Bud Auto Cannabis Strain Week-by-Week Guide

- 1. Grow specifications
- 2. Grow set up
- 3. Germination and seedling stage | week 1
- 4. Early veg | weeks 2-3
- 5. Mid veg | weeks 4-5
- 6. Transition (pre-flower) | weeks 6-7
- 7. Early flower | weeks 8-9
- 8. Mid flower (bulk phase) | weeks 10-11
- 9. Ripening and harvest | week 12
- 10. Yield and smoke report
- 11. Big bud auto faqs
- 12. In conclusion
Big Bud Auto is one of the stars in our “Originals” collection. Like many other tried-and-true classics, she’s stable, totally reliable, and hardy which makes her a perfect choice for beginners. Nevertheless, if you’re still nervous about your first-time grow, you get a chance to follow this autoflower’s week-by-week progress and see for yourself how easy she is.
1. Grow Specifications
Like the name suggests, Big Bud Auto produces huge, bloated colas and yields as much as 500 g/m2(1.6 oz/ft2). She’s one of the faster varieties and takes only 8–9 weeks from seed to harvest while reaching a moderate height of 90–120 cm (35–47 inches). Thanks to her strong Indica heritage, Big Bud Auto is also a terrific outdoor variety, tolerating cool and even rather cold climates but still capable of bringing respectable yields — 50–150 grams (2–5 ounces) per plant.
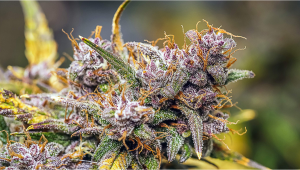
Trimming your harvest will be a breeze thanks to an excellent calyx-to-leaf ratio, and you’ll be left with lots of super-dense nuggets that have a pleasantly sweet, fruity, and floral smell.
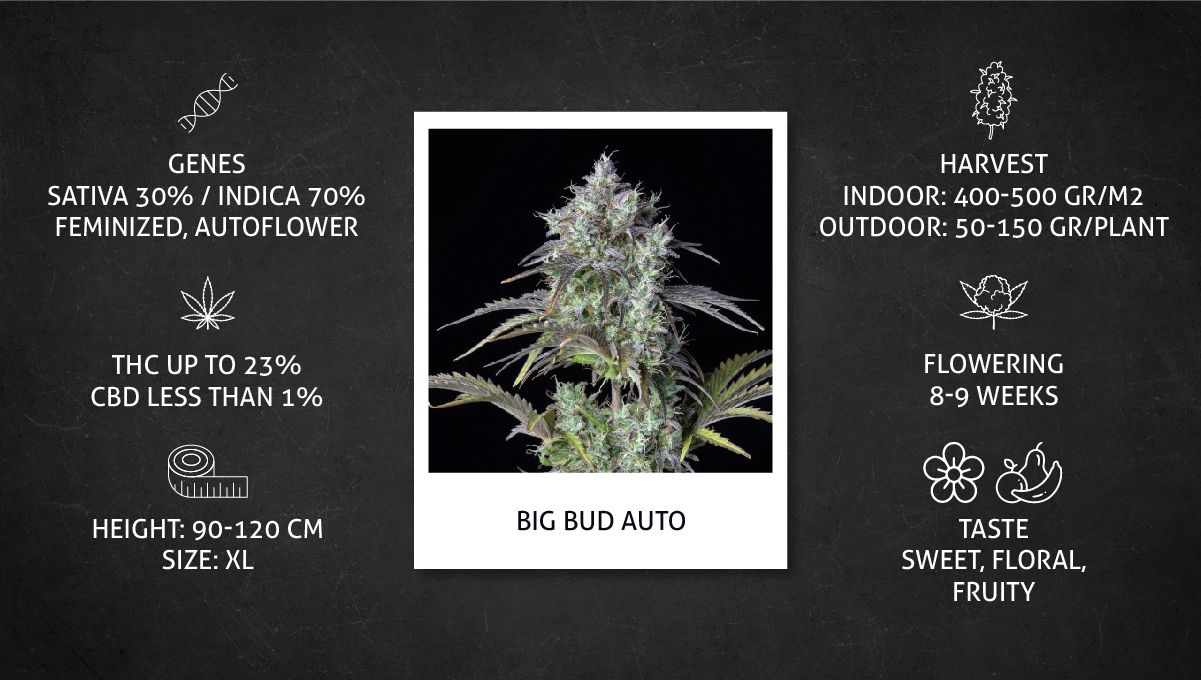
The THC content can reach 23%, and it means that you’ll only need a couple of hits to get a relaxed floating sensation in the body with a mildly stimulating head high. This is exactly the kind of effect that you’ll need to wind down after a long busy day.
2. Grow Set Up
Our version of the autoflowering Big Bud has been introduced only recently, and we could find only five finished grow cycles. However, the strain is so predictable, that one can take any of those reports and get a perfect idea of what to expect.
We chose the diary by JohnnyBlaze who grows his autoflowers in a small 1m2 nook in his bedroom, using a 150W Mars Hydro TS 1000 LED light and some basic ventilation. But this setup is sophisticated enough to maintain a steady day temperature of 26°C (79°F) and keep the relative humidity at a comfortable 60%.
| Grow Space: | 1 m2 (10.76 ft2) | Pot Size: | 11 l (2.91 gal) |
|---|---|---|---|
| Seed to Harvest: | 12 weeks | Medium: | 100% coco coir |
| Flowering: | 7 weeks | Nutrients: | Synthetic/Organic |
| Light Cycle: | 19/5 → 20/4 | pH Levels: | 6.1 |
| Light Type: | LED | Day Temperature: | 26°C (79°F) |
| Watts Used: | 150 | Humidity: | 60% |
3. Germination And Seedling Stage | Week 1
The grower used the Easy Start kit for germination. It’s basically a tray of tiny pots where each is pre-filled with soil. Also, there is a small packet of a bacterial root stimulant. But all this isn’t really necessary.
If you’re a beginner gardener, you can simply pre-soak the seed in a glass of water for 12 hours or so, then put it between wet paper towels, and keep it there until the taproot reaches 0.5–1cm (¼–½ in). Then the seed goes straight into the medium, and we recommend planting it into the final pot—the one that you’re going to use till harvest. This way you’ll spare the plant the risk of shock when re-potting.
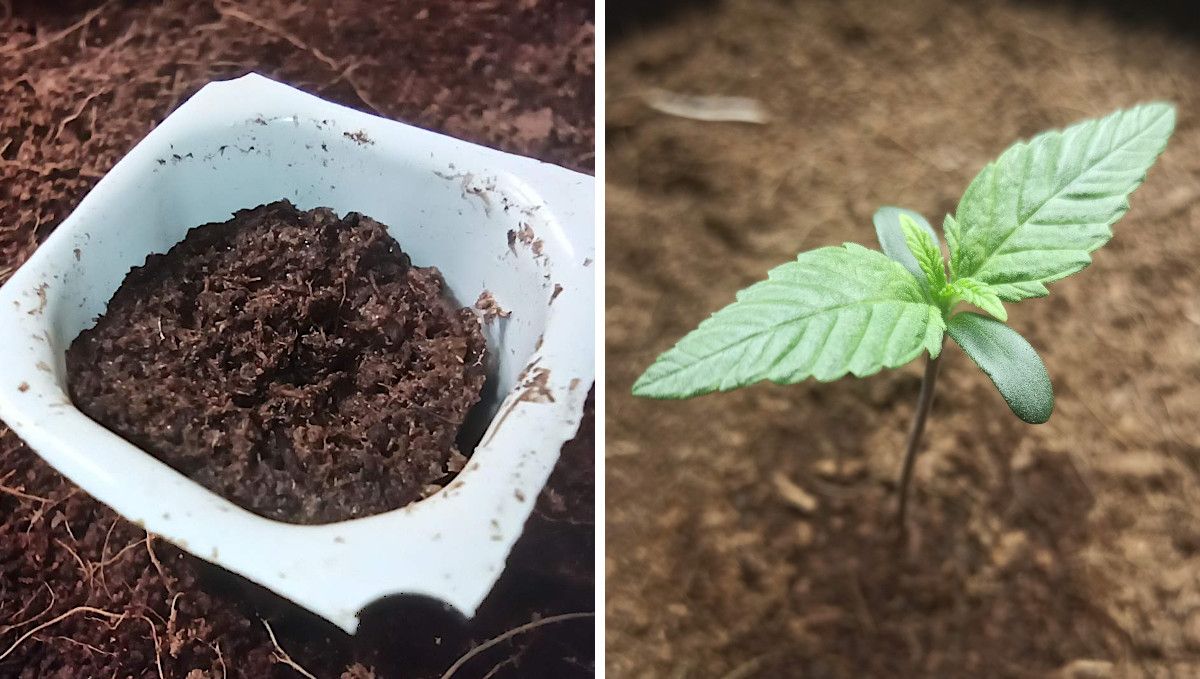
In this case, the pot that the grower used from seed to harvest contained 11 liters (2.91 gallons) of 100% coco coir. This is a medium that has no nutrients for a plant to feed on. Moreover, coco requires extra amounts of calcium and magnesium. So, when you water your seedling, you’ll need to mix in some nutrients from day one. At first, the dose should be very small. Otherwise, a too strong solution would harm the little one.
| Plant Height: | 2.5“ (6 cm) | Humidity: | 60% |
|---|---|---|---|
| Distance to Light: | 23.5“ (60 cm) | Water per Day: | 0.05 gal (0.2 l) |
| Day Temp: | 79°F (26°C) | pH: | 6.1 |
| Night Temp: | 66°F (19°C) | TDS: | 300 ppm |
The first couple of weeks are also the right time to inoculate the medium with living organisms—bacteria and mycorrhizal fungi. What these little creatures do is help the roots of the plant split complex organic molecules into simpler nutrients. In this particular instance, the grower used the following two inoculants by Advanced Nutrients:
- Voodoo Juice (microbes),
- Piranha (beneficial fungi).
He would go on adding them throughout the vegetative phase to increase the root mass and improve the water and nutrient uptake.
4. Early Veg | Weeks 2-3
The second and third weeks from seed is the time when cannabis continues developing the root system, while the progress “upstairs” is moderate at first but then begins to pick up the pace. The young plant may get a bit thirstier than before, but the appetite remains the same—around 300 ppm should be enough before the rapid vegetative growth kicks in.
| Plant Height: | 4-4.7“ (10-12 cm) | Humidity: | 60% |
|---|---|---|---|
| Distance to Light: | 23.5“ (60 cm) | Water per Day: | 0.05-0.08 gal (0.2-0.3 l) |
| Day Temp: | 79°F (26°C) | pH: | 6.1 |
| Night Temp: | 66°F (19°C) | TDS: | 300 ppm |
This Big Bud Auto was growing vigorously and without any signs of stress, so the grower decided to top her on day 20. This potentially stressful procedure didn’t slow down the progress for more than a day or two, and now that the top shoot was gone, the side branches at lower nodes began to develop faster.
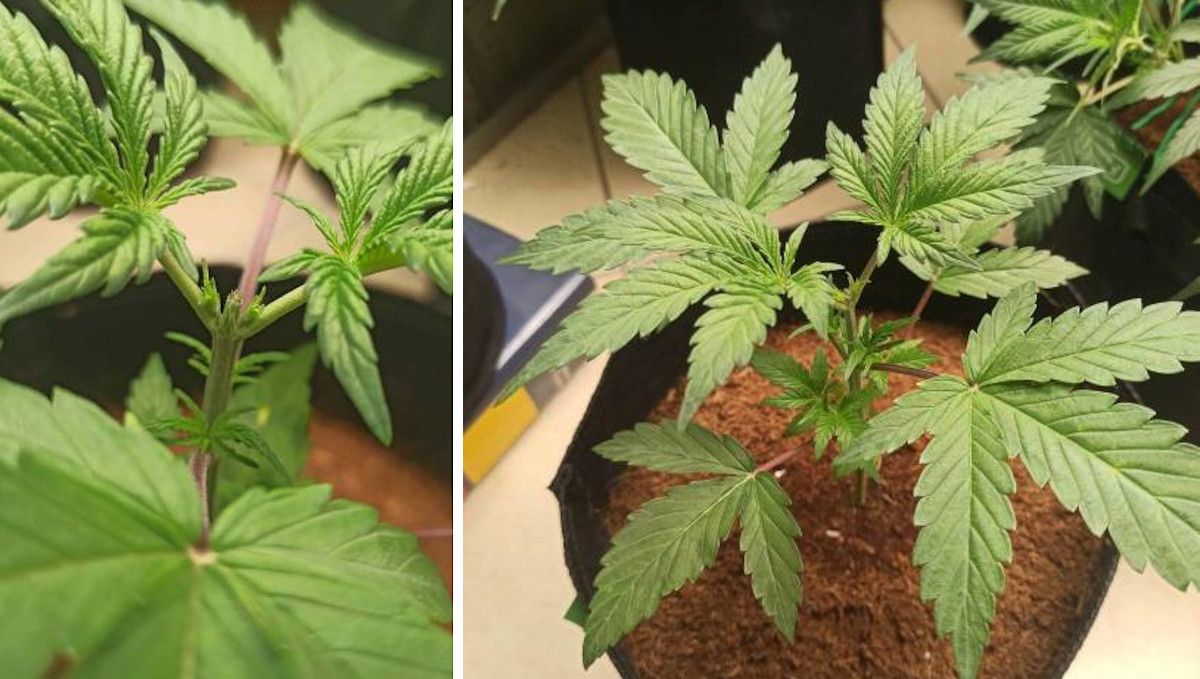
Topping autoflowers is becoming a standard technique for experienced growers because modern autos are much more resilient than the first generations were. However, if you’re only dipping your toes into cannabis cultivation, you better stick to the less invasive LST method. It’s enough to keep the canopy low and flat and will increase the yield without the risk of stress.
5. Mid Veg | Weeks 4-5
The latter part of the vegetative phase marks the moment when cannabis suddenly “explodes”, seemingly overnight. The appetite for plant food increases, and the plant can also handle more light. So you may lower your LED or turn up the dimmer to full power.
| Plant Height: | 19-24“ (48-61 cm) | Humidity: | 60% |
|---|---|---|---|
| Distance to Light: | 50“ (127 cm) | Water per Day: | 0.08-0.11 gal (0.3-0.4 l) |
| Day Temp: | 79°F (26°C) | pH: | 6.1 |
| Night Temp: | 66°F (19°C) | TDS: | 400 ppm |
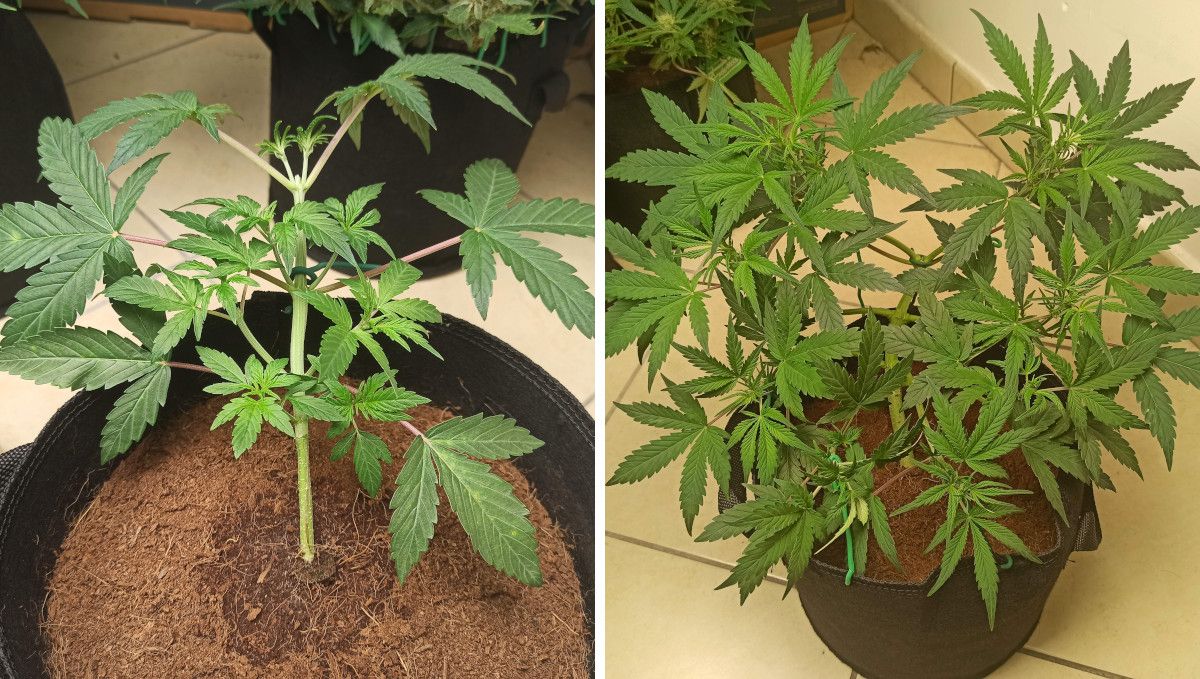
Whatever stress (from topping) Big Bud Auto experienced in the previous week, she was over it now. The girl handled LST beautifully and became a wide and bushy plant.
this plant has fully recovered from the topping i did on her and now growing in size very fast.. She has a very nice green colour meaning she's very healthy and now forming a very nice shape...
JohnnyBlaze
And here is the complete schedule for the vegetative phase. Please note how much the doses of nutrients increased for the last two weeks before the pre-flowering stage.
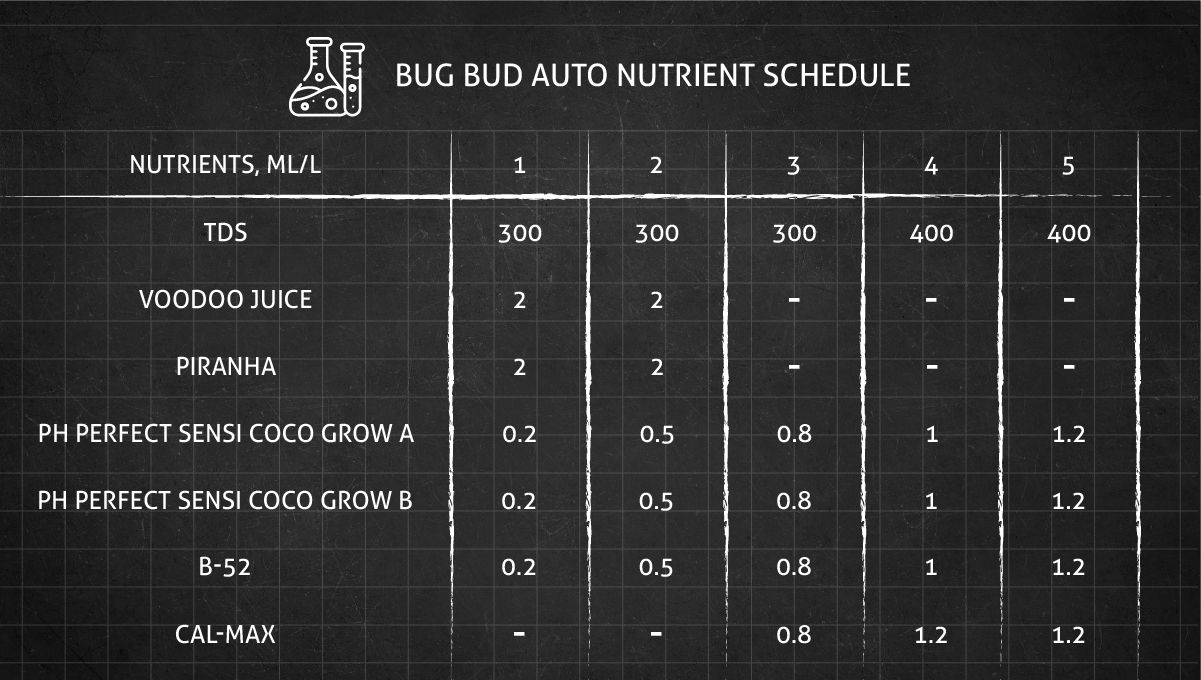
We already mentioned the first two of the amendments in the list—Voodoo Juice and Piranha. Their mission is to colonize the root zone with millions of beneficial microbes.
Then comes the 2-component liquid fertilizer pH Perfect Sensi Coco Grow A and B. It contains all the nutrients that cannabis needs, and since it’s a formula for the growth stages, it contains more nitrogen (N) than phosphorus (P) and potassium (K).
The B-52 supplement is a bunch of vitamins and plant growth regulators extracted from seaweed. It helps marijuana grow stress-free. Finally, Grotek Cal-Max is a source of calcium, magnesium, and iron. As we have explained, the first two get especially easily depleted in coco. Those gardeners who switch from soil sometimes learn the hard way how much more Ca and Mg they need to use in coco.
Magnesium deficiency makes the lower leaves get yellow between the veins, and in calcium-deficient plants, the leaves in the middle and upper part become spotted, dry, and twisted. So keep your eyes open.
6. Transition (Pre-Flower) | Weeks 6-7
The pre-flowering stage is the time when cannabis begins to have first pistils at the nodes and on every top, and in autoflowers, this process happens automatically. Meaning that for autoflower flowering stages, you can keep the same light schedule as you had during the vegetative stage. It was 20/4 in this cycle.
| Plant Height: | 24-35“ (61-89 cm) | Humidity: | 60% |
|---|---|---|---|
| Distance to Light: | 40“ (102 cm) | Water per Day: | 0.2 gal (0.75 l) |
| Day Temp: | 79°F (26°C) | pH: | 6.1 |
| Night Temp: | 66°F (19°C) | TDS: | 400-1000 ppm |
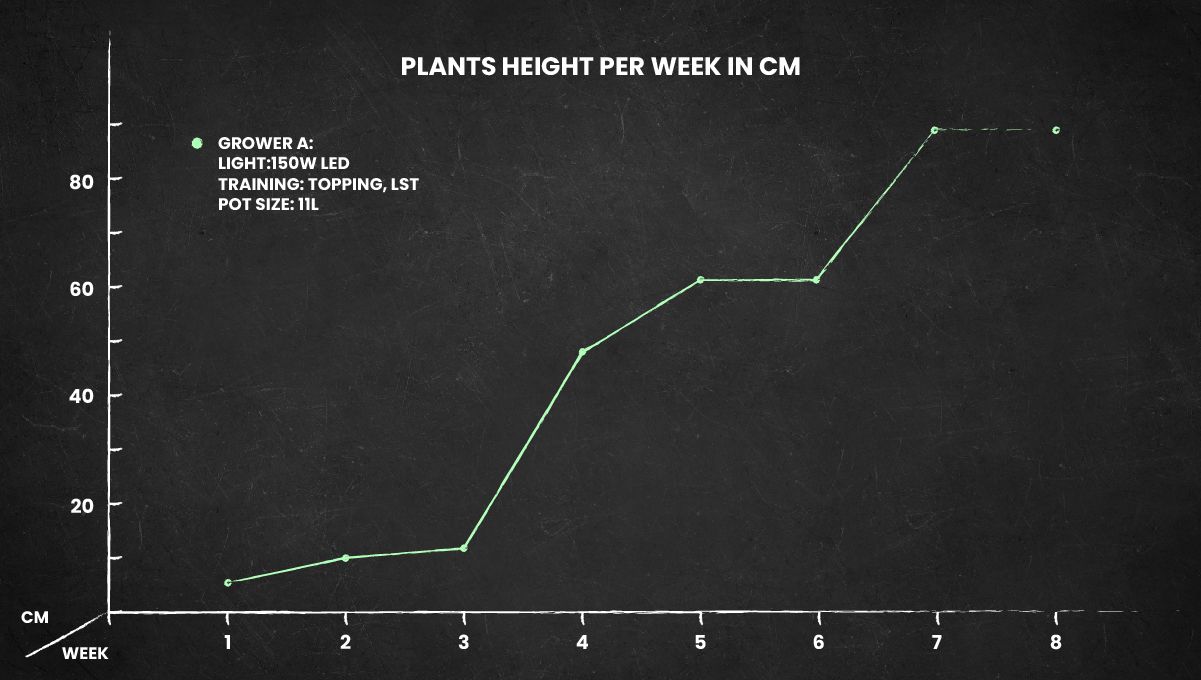
The start of flowering doesn’t mean that the vegetative growth stops or even slows down. You can see in the table above just how much height Big Bud Auto gained at the beginning of her second month.
Only when the buds start to fill out, does this flowering stretch, as we call it, stop. You should always keep this in mind, or otherwise, you can get out of vertical space really fast. For photoperiod varieties, you can control the final height by switching to 12/12 in time. With autoflowers, control the size of the plant by choosing the right-sized container. The smaller the pot, the smaller the root ball which directly determines the size of the visible (above-surface) part of the plant.
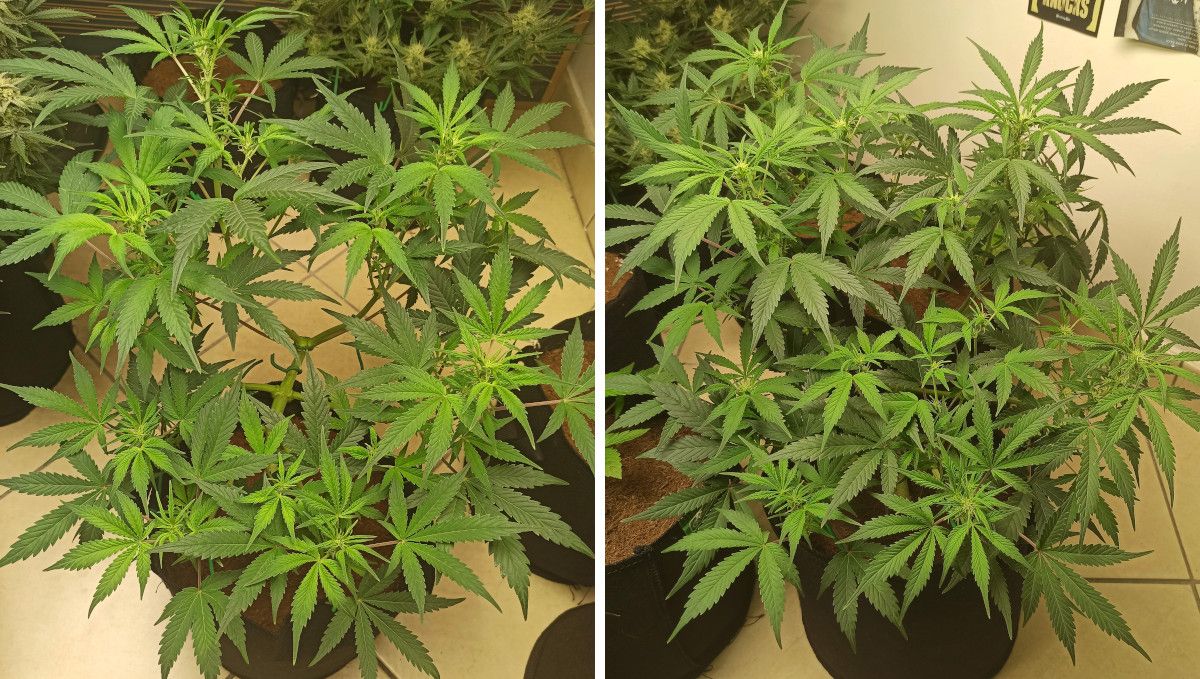
In this case, the girl grew quite big, but the topping and LST increased her girth and decreased height. In the chart below, you can get an idea of how big a Big Bud Auto can get in an indoor grow:
7. Early Flower | Weeks 8-9
Over the previous two weeks, the grower had been gradually raising the dose of nutrients until the readings on his TDS meter reached 1000 ppm. And this level he would keep for the next two weeks as well.
| Plant Height: | 24“ (60 cm) | Humidity: | 60% |
|---|---|---|---|
| Distance to Light: | 40“ (102 cm) | Water per Day: | 0.26 gal (1 l) |
| Day Temp: | 79°F (26°C) | pH: | 6.1 |
| Night Temp: | 66°F (19°C) | TDS: | 1000 ppm |
The standard advice for cannabis flowering stages is to use nutrients where N plays only a minor part and P and K come centerstage. The reason is that N is necessary for the growth of foliage while the development of flowers requires more P and K.
It’s easy to achieve this goal by simply switching from a grow fertilizer to a bloom formula, as was in this case where the grower stopped giving his autoflower pH Perfect Sensi Coco Grow A and B and replaced it with pH Perfect Sensi Coco Bloom A and B. But being a very experienced gardener, his diet was much more sophisticated than that, and he would tweak it for different stages of flowering.
Let’s have a look at the complete list:
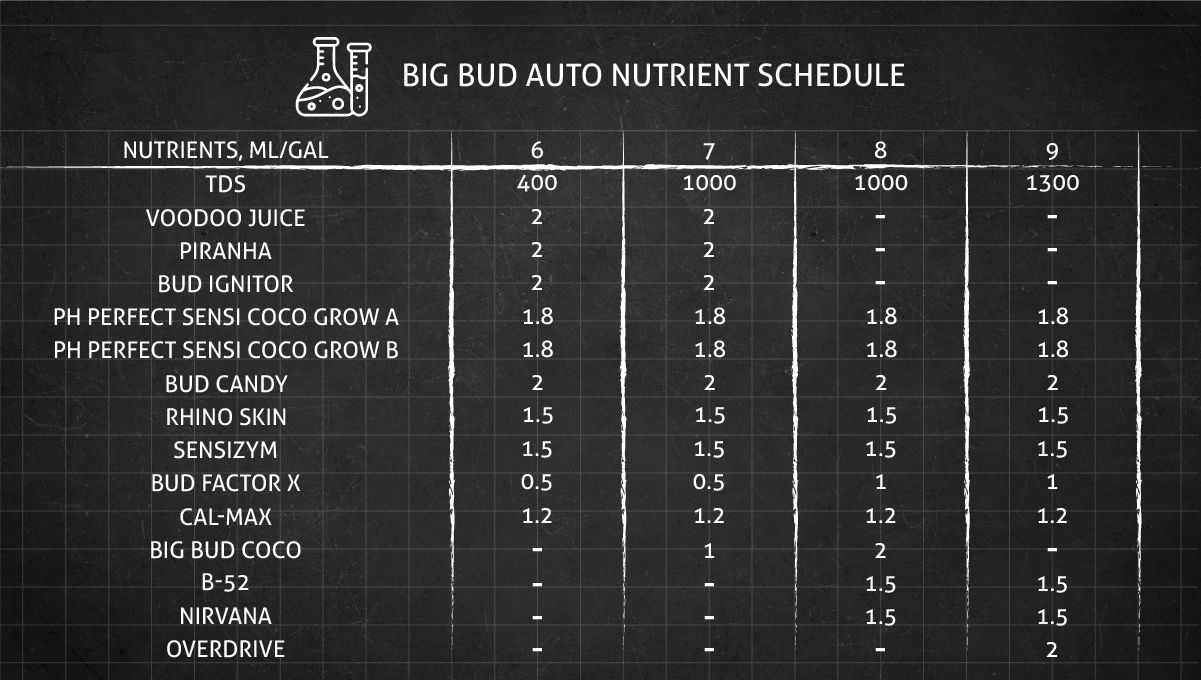
When you make a decision about your own feeding schedule, it doesn’t have to be so complicated. It can be very hard juggling so many components at once, especially for novices. However, we’ll describe briefly what different items in the table above are for and when to use them.
- Bud Ignitor. A PK formula to jumpstart the process of budding; use it for only the first two weeks of the flowering stage.
- Bud Candy. Cranberry and grape extracts to load your buds with sweet aromas and flavors.
- Rhino Skin. A source of silicone that will toughen cell walls and prevent branches from snapping under the weight of buds.
- Sensizym. Contains enzymes and small amounts of P and K and turns the root zone into an organics bonanza; apply it throughout cannabis flowering stages.
- Bud Factor X. A bio-active blend to boost photosynthesis and increase the production of resin and terpenes in cannabis.
- Big Bud Coco. One of many Big Bud supplements, this one is for those growing in coco coir. It contains a lot of P and K and is used throughout the early and middle flower but gets replaced by Overdrive for the last couple of weeks before the final flush.
- Nirvana. A high-potassium organic supplement for middle to late flower; makes your buds extra large.
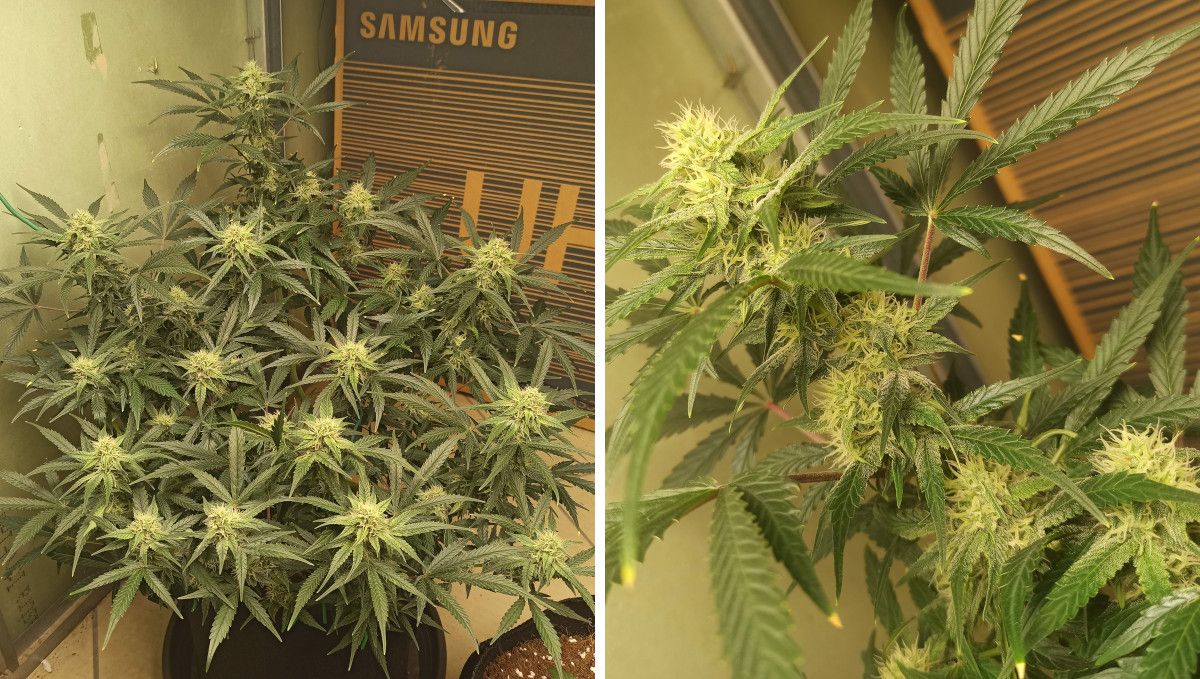
The grower chose not to subject his Auto Big Bud to much defoliation. We recommend that you should do the same because leaving the foliage intact usually leads to bigger yields than heavy defoliation.
8. Mid Flower (Bulk Phase) | Weeks 10-11
We can call this point in the timeline a home stretch because buds now look more and more like they are ready to be harvested and smoked. By this time, an autoflower usually stops stretching and all of its energy goes into stacking up flowers. She is also at her hungriest and can handle very high PPM levels (1300 in this case).
We also recommend lowering the day temps a bit (73–77°F, or 23–25°C, would be just fine) and keeping the relative humidity down to 35–40% because, at higher readings, you risk problems with mold and bud rot.
| Plant Height: | 24“ (60 cm) | Humidity: | 60% |
|---|---|---|---|
| Distance to Light: | 40“ (102 cm) | Water per Day: | 0.26 gal (1 l) |
| Day Temp: | 79°F (26°C) | pH: | 6.1 |
| Night Temp: | 66°F (19°C) | TDS: | 1300 ppm |
This is also the time in the life cycle of an autoflower when you should begin to watch for signs of approaching harvest. It’s important because it’ll allow you to choose a perfect moment to stop feeding your plant any nutrients and begin the final flush.
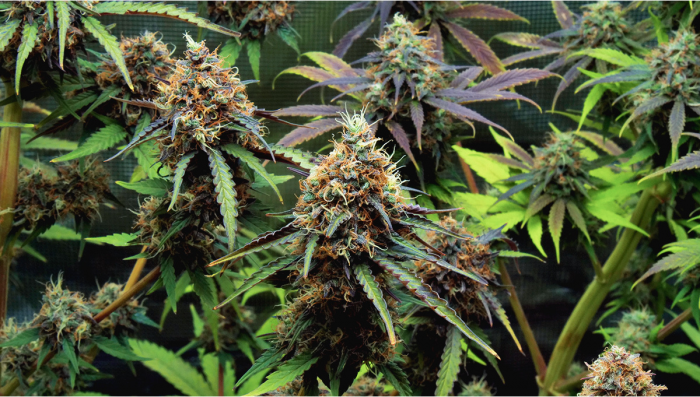
Start with watching the daily progress of your buds. When they stop fattening, it’s time to watch for the second sigh of maturity: the pistils, female hairs on the buds, will turn amber. Or maybe some other more exotic hue, like purple or pink. The main thing is that they change their color from greenish-white (immature) to something else (mature). It means you have mere days now before the harvest.
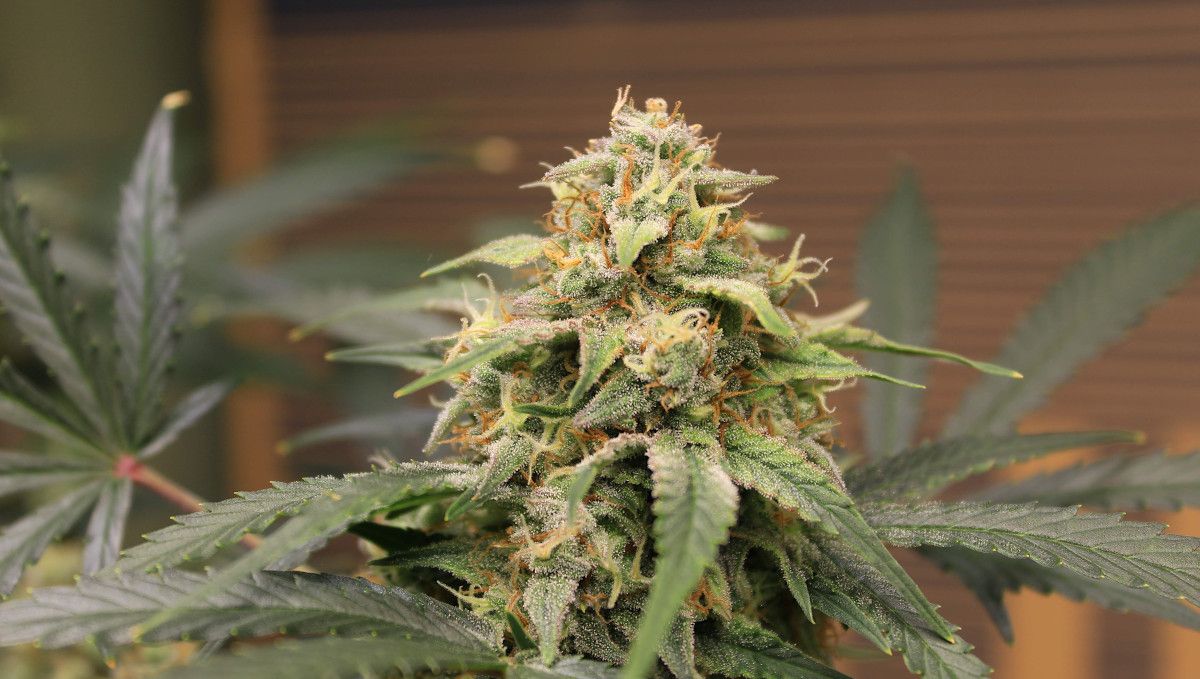
Finally, when there are no more white hairs growing from the buds, it’s time to take a hand microscope and watch the color of trichomes. Trichomes are tiny transparent glands that look like mushrooms when magnified. They cover both the buds and the small “sugar” leaves sticking out from them.
Watch the trichs on the buds, not leaves, and when most of them turn from clear to cloudy, you have just enough time to flush your auto for up to one week and then chop it. Trichomes in cannabis contain cannabinoids and terpenes, and when they become cloudy, the levels of these compounds are at their peak.
Later, some of the trichomes will start to turn amber which means that THC begins to degrade and the effect from smoking the buds will be less mind-warping and more sedating. It’s up to you to decide at what cloudy-to-amber proportion to harvest your buds.
9. Ripening And Harvest | Week 12
Not every autoflower in your garden will take 12 weeks from start to finish. Some are 2 or even 3 weeks faster than that. But with longer flowering time come bigger plant sizes and more generous harvests. And this was the case with Big Bud Auto here.
| Plant Height: | 24“ (60 cm) | Humidity: | 60% |
|---|---|---|---|
| Distance to Light: | 40“ (102 cm) | Water per Day: | 0.26 gal (1 l) |
| Day Temp: | 79°F (26°C) | pH: | 6.1 |
| Night Temp: | 66°F (19°C) | TDS: | 150 ppm |
The grower was flushing his autoflower for a little more than a week, using Advanced Nutrients Flawless Finish. He hadn’t done much defoliating, so the extra foliage had a lot of nitrogen stored in it, and the plant didn’t look hungry till the very end.
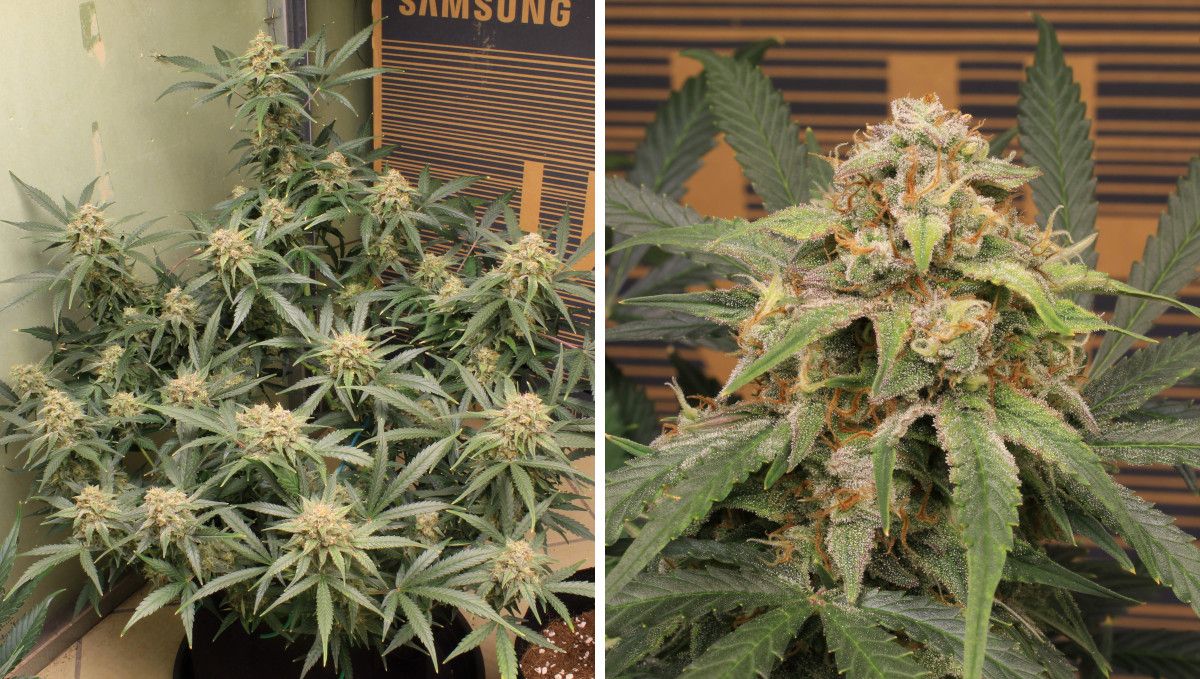
If you DO defoliate a lot, your plant gets depleted of nitrogen much faster, leading to a beautiful fade. The leaves begin to yellow, starting from the lower ones. In this case, the only signs of fade were the purple hue at some of the leaf edges.
The smell was kinda loud too, with piercing musky and skunky notes. With strains like Auto Big Bud, you should always use a carbon filter for odor control because even one plant will definitely smell a lot throughout flowering stages.
When the grower was done flushing and thought both the medium and the plant tissues were free of built-up salts, he kept his Big Bud Autoflower for 48 hrs in total darkness and without water.
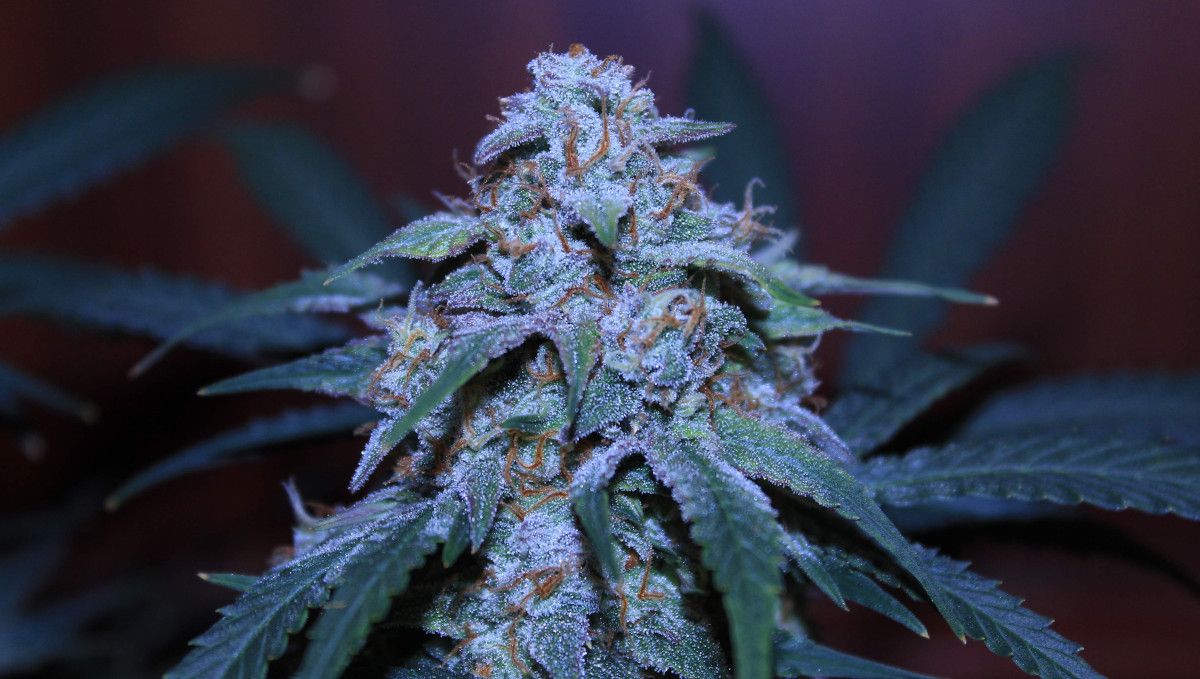
Many gardeners use this technique to trick their cannabis into producing some extra resin. The jury’s still out on the efficiency of this method, but at least it doesn’t hurt.
10. Yield and Smoke Report
The grower harvested just over 19 ounces (540g) wet from this one plant and found it very easy to trim because there were only so many sugar leaves sticking out the fat and dense Indica-type buds. After 6 days of drying, he got 3.81 ounces (108 grams) of dry tightly trimmed nuggets.
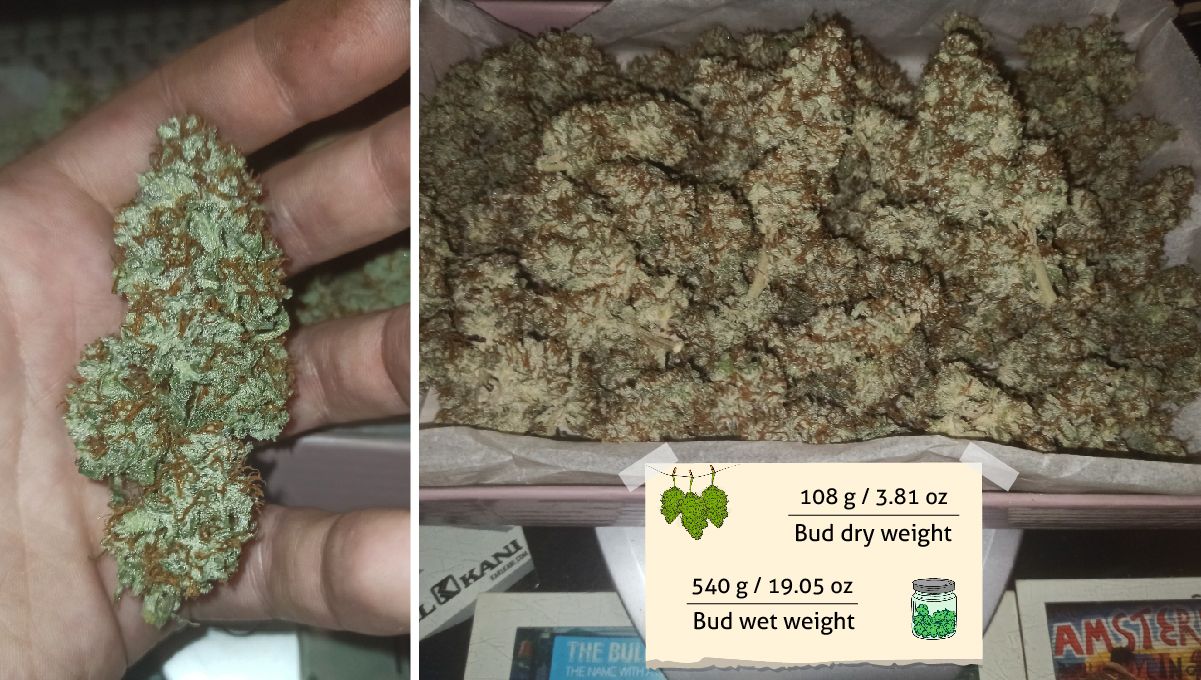
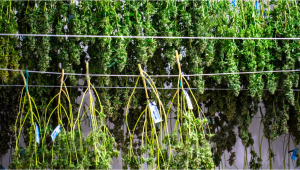
Drying is never enough to bring buds to the peak of their quality in terms of potency and flavor. You also need to cure them for at least 2-3 weeks so that all the chemical processes finish within the flowers: chlorophyll (with its vulgar hay taste) degrades and so do sugars and starches. It all contributes to a smooth, mellow taste of your smoke.
This particular Big Bud Auto had an awesome earthy flavor with creamy and kushy undertones, perfect for Indica lovers. In contrast, the high was a hybrid one. It started on the Sativa side, inducing a talkative and super euphoric mood. And after about an hour, the relaxation kicked in, sending one straight to the couch for the rest of the evening. The effect was also heavy enough to make you space out if you took a hit too many.
11. Big Bud Auto FAQs
So, there you have it. Our full guide for cultivating Big Bud Auto. And while we have done our best to ensure that no stone has been left unturned, there will always be some lingering questions that have gone unanswered. Growing weed is a pretty tricky business, and if you are new to the game, there will inevitably be some question marks floating around in your head. Let's take a quick look at the most frequently asked questions, and see if we can answer them in the easiest-to-understand terms.
What is The Best Substrate for Growing Big Bud Auto?
There are two main options (with a bunch of subcategories in the middle) when it comes to growing Big Bud Auto, and they are soil and hydroponics. The questions you really need to be asking yourself is - what kind of growing environment will best suit the strain? How much effort and cash do you want to drop into your grow room or area? And what outcomes are you aiming for? Big Bud Auto is an easy-to-grow strain, so you can get away with growing this one in pretty much any environment. However, if you want the biggest yield and most potent buds possible, then hydro is your best bet. Hydroponics allows for the most precise control of nutrient levels and environmental factors which leads to better results. it also means you don’t have to worry about soil-borne diseases or pests, but it doesn't rule out the possibility of other problems occurring - mainly mold.
Hydro also comes at a cost, with the initial outlay for the system being quite high (depending on which setup you go for), so it's worth considering if you are just starting out. If the idea of growing organically appeals to you, and you are looking to get the best possible terpene profile out of those juicy nuggets then you are going to want to go down the soil route. Not only does organic soil cultivation offer the best in flavor and aroma, it's also easier to get going for beginner growers - especially if you have no previous horticulture experience. But, if you are looking for the best of both worlds (who isn't?), then we recommend checking out coco-coir.
What's Coco-Coir?
Coco-coir is a hydroponic medium made from the ground-up husks of coconuts, and it's rapidly becoming the go-to growing medium for aspiring growers and long-term cultivators. It's a lot easier to manage than soil and offers the same level of control as hydro. What's more, you can easily add organic amendments into the mix, which will help you to get the best possible results, flavor, and aroma-wise, out of your Big Bud Auto crop.
What Type of Lights Should I Use For Growing Big Bud Auto?
LED lights are, without a shadow of a doubt, the top dogs. It was only a few short years ago that HID option still reigned supreme, but thanks to a huge jump in the technology and subsequent drop in the price, LEDs are now seen as the go-to lighting source for indoor growers. LEDs offer lots of advantages over HID lights, notably in the energy efficiency department and also in terms of heat management. LEDs produce far less heat than their HID counterparts, meaning that you don't need to invest in expensive ventilation and cooling rigs. that's not to say that you don't need a top-level air exchange system when setting up an indoor grow area, just that you won't need something as powerful as you would with traditional HID lighting.
LEDs also come with a wider spectrum of light. This means more of it is usable by the plants and as such, you can expect bigger yields. All of the newest LED panels come with tuneable spectrums, allowing you to switch the light up and fine-tune it for different stages of growth. In terms of wattage for your Big Bud Auto, you will probably want to opt for something in the range of 600 to 1000 W per 4 square feet. Any less than this and you run the risk of not getting enough light for your plants.
How Do I Maximize YIields with Big Bud Auto?
There are a bunch of methods that growers use to help boost the yield possibilities of Big Bud Auto. If yield is your number one goal, then you will definitely wanna run a hydroponic system, and use LED lighting. As mentioned earlier, this type of setup allows for the most precise control over nutrient levels and environmental factors, resulting in bigger yields. Plant training is also key for yield maximization. Autos in general do not take kindly to HST (high-stress training) methods such as topping, fimming, and super cropping - but that doesn't mean you have to leave them to their own devices totally.
What we suggest is to either use the tie-down method or set up a ScrOG net. The tie-down method involves literally tying down the main stem and branches of your plants so that they stay low and wide. This encourages all bud sites to get equal nutrient and growth hormone levels, and also allows for much better light penetration and more airflow throughout the entire canopy. ScrOGging works in the same way, but instead of tieing the plant down, you use a net or screen to direct the growth in a more horizontal than a vertical plane. As the plant structure develops, you carefully train the plant and tie it to the net, which again opens the plant up so the bud sites get a more even amount of light and more airflow.
By using either of these methods during the vegetative phase, and then continuing to monitor your Big Bud Auto crop throughout flower, you should be able to maximize the yield potential of this amazing auto-flowering strain. Good luck!
What Are The Best Nutrient Brands for Growing Big Bud Auto?
When it comes to nutrients for Big Bud Auto, there's no single brand that stands out. In saying that, there are the big dogs like Advanced Nutrients, House and Garden, Fox Farms, Botanicare, Canna, etc. that you can rely on to provide top-shelf results.
It's important to remember that each nutrient line has its own idiosyncrasies, so you may find one brand works better than another, depending on the strain you're growing and the climate of your grow room. Another thing to keep in mind is that autos need a lighter nutrient solution than photoperiodic strains. Start out with 1/4 of the bottle dosage and slowly work your way up for the best possible results.
Is Big Bud Auto a Good Strain to Grow Outdoors?
Big Bud Auto is a great strain for outdoor growers - as long as you can provide it with the right environment. The main factor with outdoor growing is temperature. Big Bud Auto prefers a slightly warmer climate, but (as with most autoflowering strains) she will do well in a temperate climate also, as long as the sun is in the sky for more than 14 hours per day.
Humidity can also play a pretty big role in the success of your outdoor grow, but as long as it doesn't stay higher than 75% for long periods then you should be totally fine.
12. In Conclusion
As you can see, Big Bud Auto is a completely low-maintenance strain. If you know what you’re doing, the whole life cycle can be totally uneventful. Just watch your girl grow and admire how healthy she looks. But while growing Big Bud may be boring, smoking it is not. It’s top-notch stuff, and you’ll appreciate its buzzy euphoria followed by happy relaxation.
External References
- A new ESI-LC/MS approach for comprehensive metabolic profiling of phytocannabinoids in Cannabis, Scientific Reports, Sept 2018
- Comparative Genetic Structure of Cannabis sativa Including Federally Produced, Wild Collected, and Cultivated Samples, Front. Plant Sci., 29 September 2021




Comments