Cherry Cola Auto Cannabis Strain Week-by-Week Guide
- 1. Grow specifications
- 2. Grow set up
- 3. Germination and seedling stage | week 1
- 4. Early veg | week 2
- 5. Mid veg | weeks 3-4
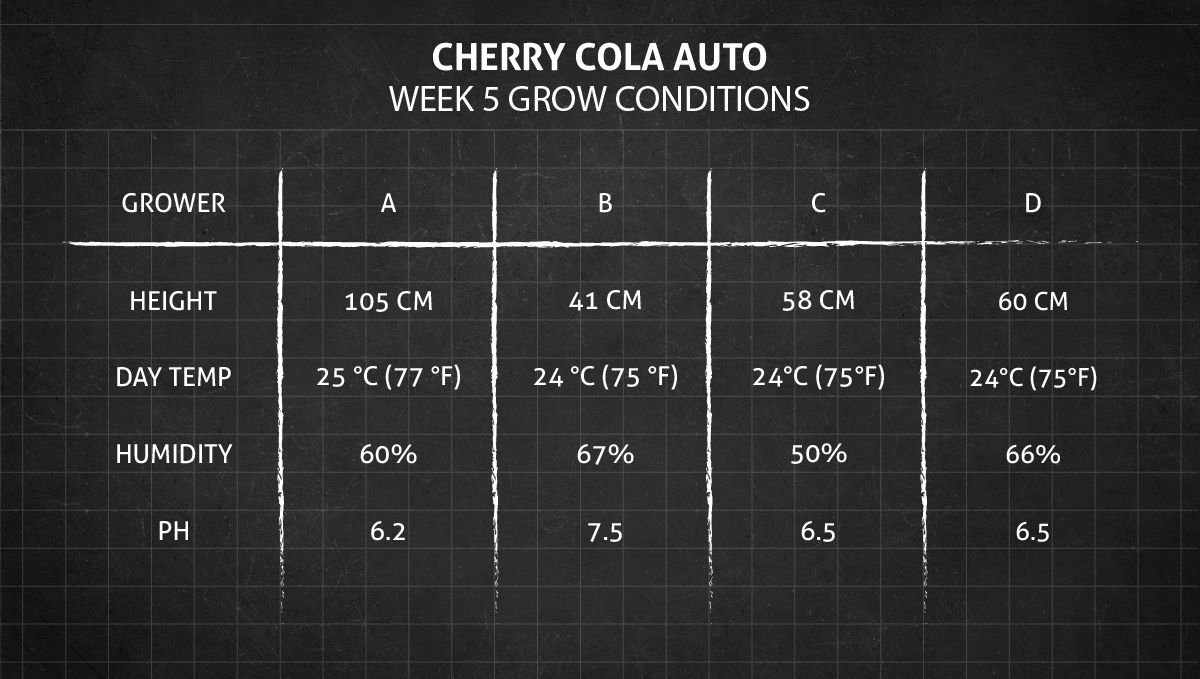
- 6. Transition (pre-flower) | week 5
- 7. Early flower | weeks 6-7
- 8. Mid flower (bulk phase) | weeks 8-9
- 9. Ripening and harvest | week 10 (and beyond)
- 10. The outcome
- 10. a. Cherry cola auto yield
- 10. b. Cherry cola auto smoke report
- 11. In conclusion
Cherry Cola Auto is a well-balanced hybrid strain that is easy to grow and produces high yields of potent buds. With a delightful aroma and flavor profile, this autoflower strain delivers a cerebral high that stimulates creativity and focus, while also relaxing the body. Its high resin content makes it an excellent choice for extraction, producing high-quality concentrates with its unique terpene profile. Cherry Cola Auto is a low-maintenance strain, resistant to pests and diseases, making it an excellent option for novice growers. Overall, this strain is the best choice for cannabis enthusiasts seeking a unique and well-rounded experience.
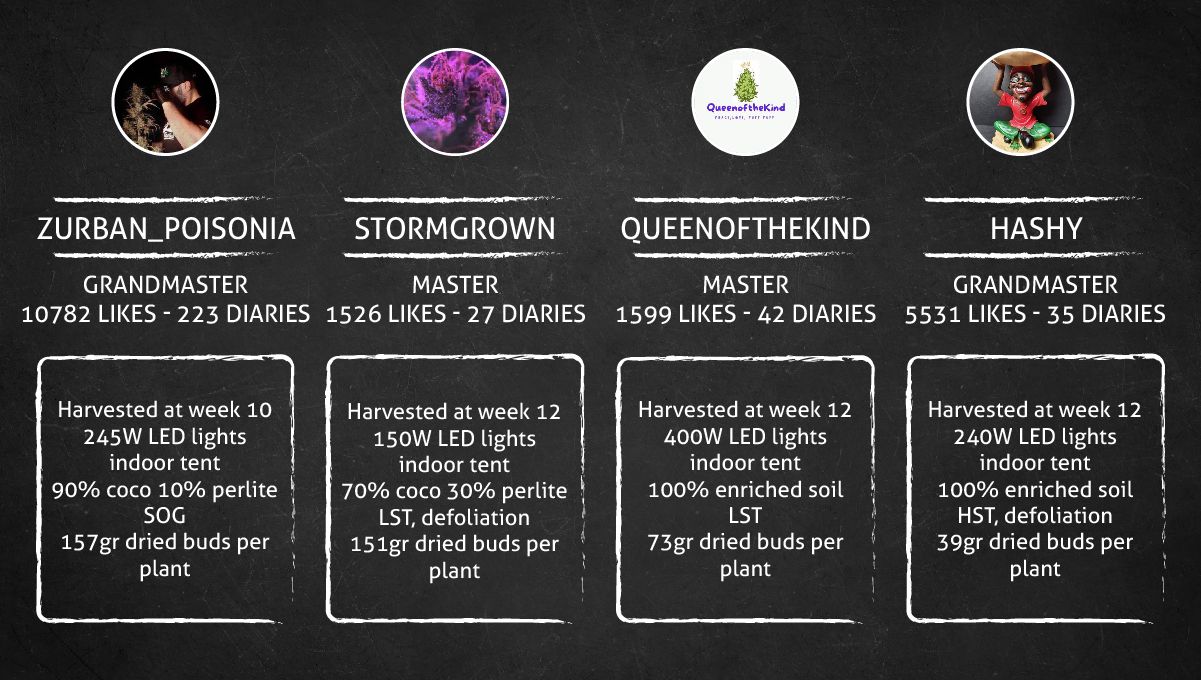
Our week-by-week guide for Cherry Cola Auto features four indoor grows by gardeners of varying experience levels, highlighting simple methods and best practices. These grows resulted in impressive harvests ranging from 1.38 ounces (39 grams) to 5.54 ounces (157 grams) per plant and took an average of 11 weeks from seed.
1. Grow Specifications
Cherry Cola Auto is a top-of-the-line hybrid that boasts a perfect balance of Sativa and Indica genes, with a composition of 45% Sativa and 55% Indica. With her XXL size, she can grow up to 90-150 cm in height, and its flowering period takes between 9-10 weeks. Her impressive yields make this autoflower a fantastic option for indoor growers, with an expected harvest of 500-600 grams per square meter. Outdoors, the strain can produce between 50-250 grams per plant, depending on growing conditions.
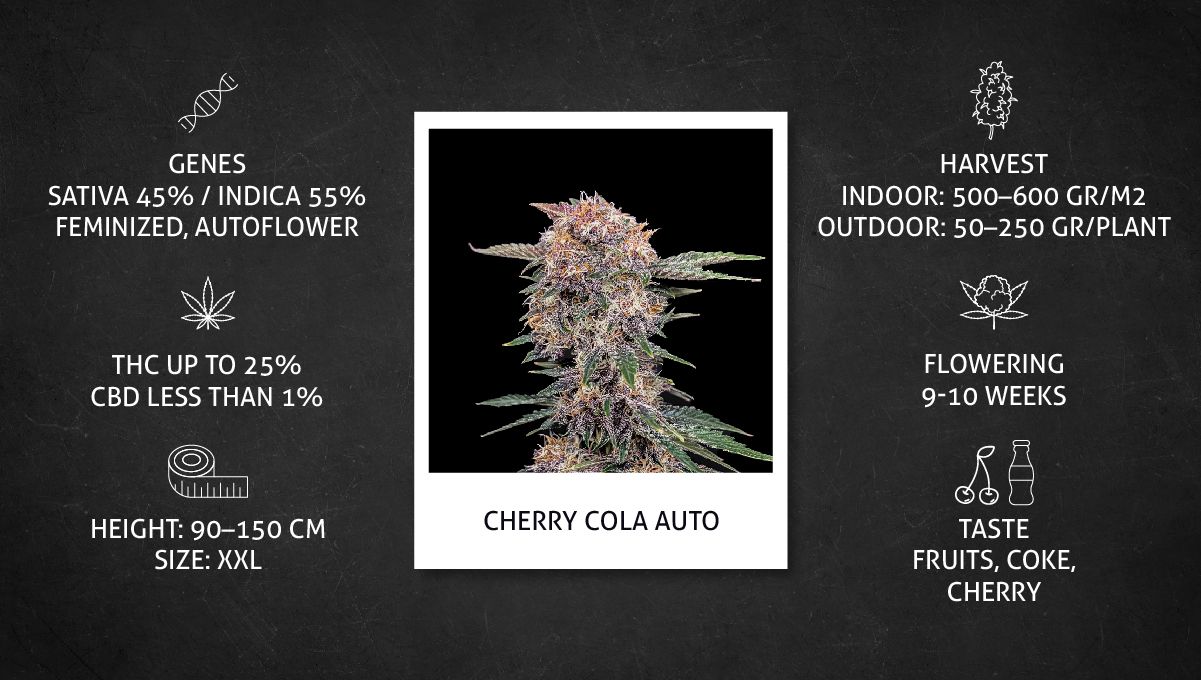
Cherry Cola Auto has a high THC content of up to 25%, while its CBD content is below 1%, and the aroma and flavor profile are truly unique, featuring a delightful blend of fruity and cola-like flavors with a distinct cherry undertone.
2. Grow Set Up
To create this Cherry Cola Auto week-by-week guide, we have chosen a set of grow diaries, and four of them will be closely monitored, while we may use pictures from other grows as well. The featured growers opted for a simple approach, using LED lights and small grow tents for their plant cultivation. Their growing techniques were not complicated, which is advantageous for you, as it means you do not require any prior experience to follow their footsteps and grow some stunning plants on your own!
| Grow Space | Light | Medium | |
|---|---|---|---|
| A | 0.6 m2 | 245W LED | Coco/Perlite |
| B | 0.6 m2 | 150W LED | Coco/Perlite |
| C | 1.49 m2 | 400W LED | Enriched Soil |
| D | 0.42 m2 | 240W LED | Enriched Soil |
While all these plants were grown using simple and straightforward techniques, it is important to note that Cherry Cola Auto can be successfully cultivated using various other methods, both indoors and outdoors. This plant is known for its versatility.
3. Germination And Seedling Stage | Week 1
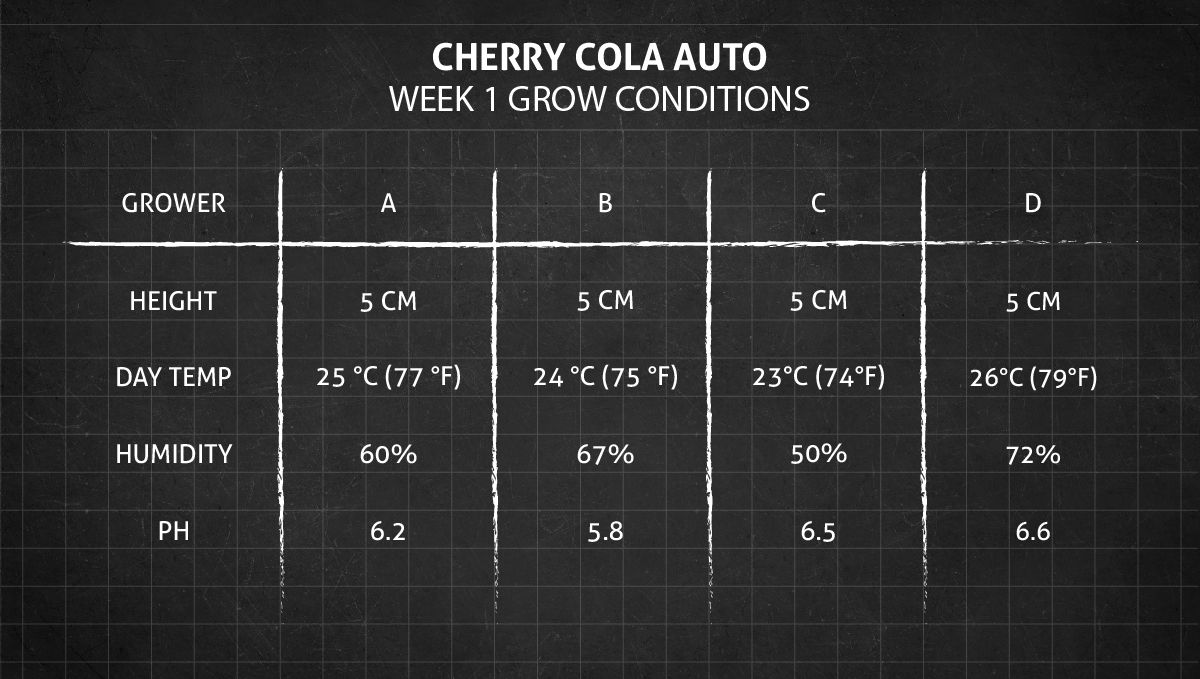
Cannabis seed germination requires specific conditions in order for the seeds to sprout successfully. The ideal temperature range for germination is between 70 and 85 degrees Fahrenheit (21-29°C), with a humidity level of around 70 percent.
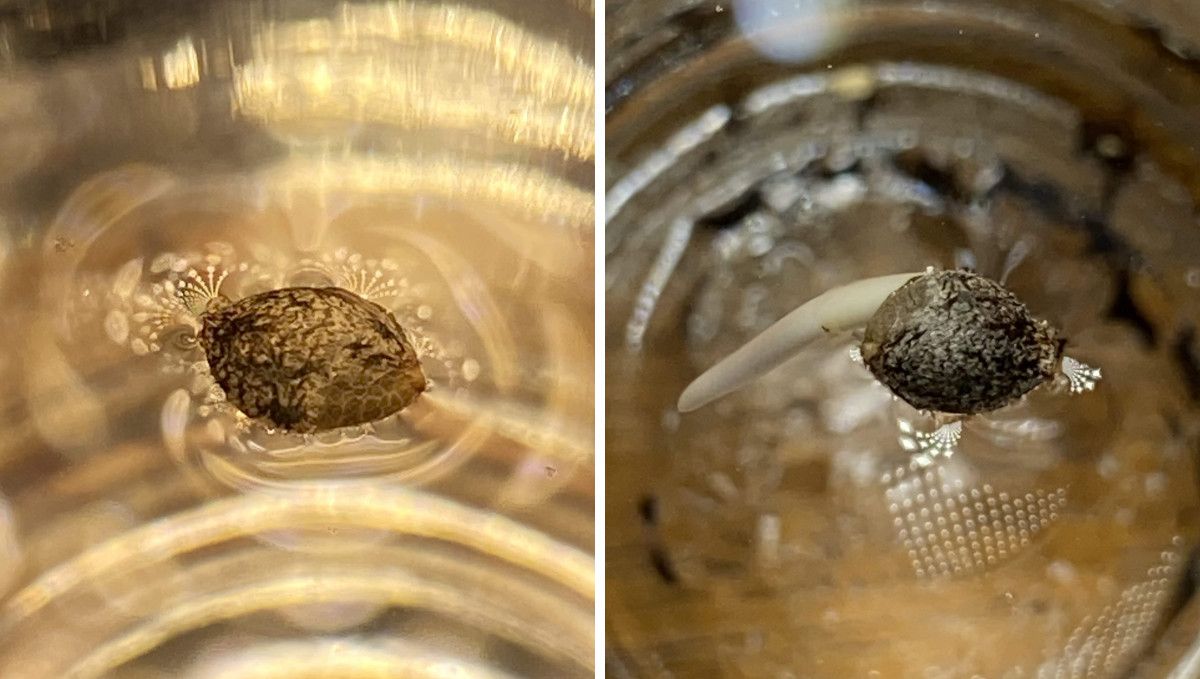
Cannabis seeds can be germinated using the surface-of-water method. This involves soaking the seeds in a container of water for up to 24 hours until they begin to sprout. It's important to use drinking-quality water to prevent any potential contamination. Remember to keep the container in a warm, dark place.
The paper-towel method is another popular way to germinate cannabis seeds. To start, dampen a paper towel and fold it over the seed, then place it in a sealed plastic bag or container. Keep the bag or container in a warm, dark place and check it regularly to make sure the towel remains moist. After a few days, you should see a small taproot emerging from the seed. Once it reaches about 1/4-1/2 inch (0.7-1.5 cm) in length, carefully transfer the seeds to soil or another growing medium to continue their growth.
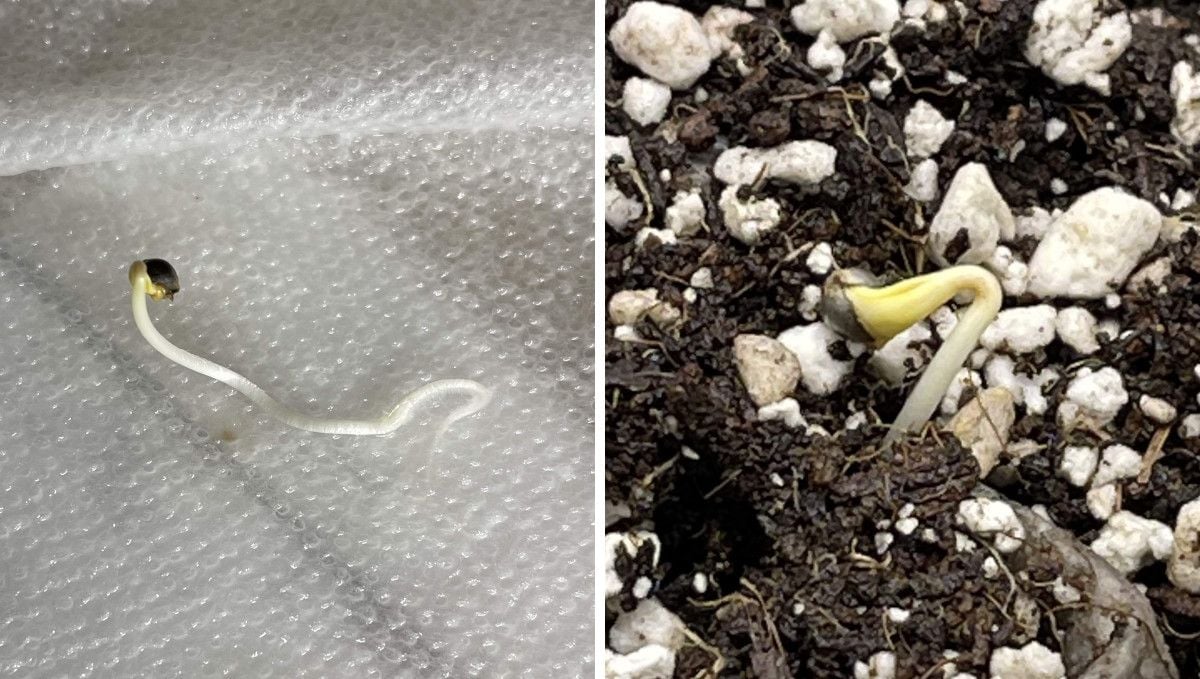
During the germination process, cannabis seeds will often shed their shells on their own as they begin to sprout. This natural process is known as "cracking" and can occur as the seedling opens its cotyledons.
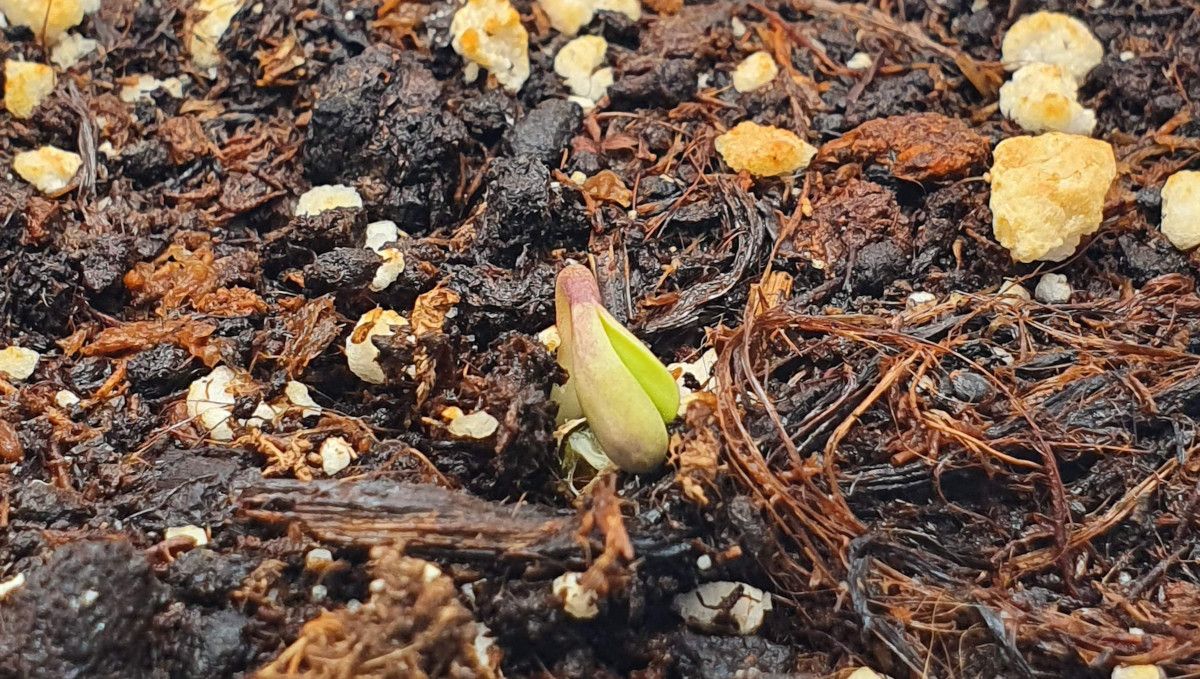
However, in some cases, the shell may remain intact, and gentle assistance may be required to remove it without damaging the emerging sprout. It is important to handle the delicate sprouts with care to avoid causing any harm to the young seedlings.
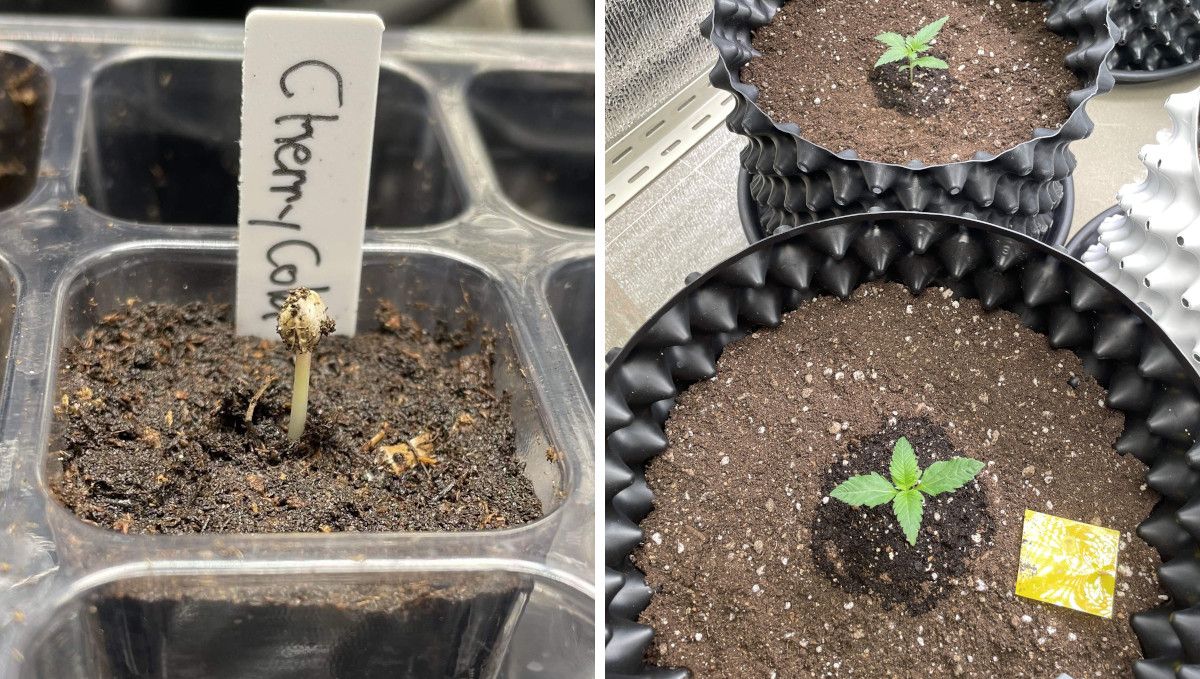
Cannabis seedlings require appropriate levels of light for optimal growth. The ideal light level for a seedling is around 2500 to 3000 lux. If the light level is too low, the seedling will stretch and become weak, while too much light can cause light stress and damage the plant. It's essential to provide the right balance of light for healthy growth and development.
As you have seen in the photos above, some growers first plant their seeds in smaller containers and then repot them. Others prefer to put them straight into the final containers. The later method helps you avoid the shock or transplanting, but on the other hand, watering becomes more difficult. As you can see in one photo, you should water your small plant around the base only.
4. Early Veg | Week 2
In the second week of growth, the young cannabis plant will start to develop its first true leaves. At this stage, it's important to maintain a temperature of around 70-80°F (21-27°C) during the day and 10°F (6°C) cooler at night, with a relative humidity of 70%. The light cycle should remain at 18 hours or more of light and 6 hours or less of darkness.
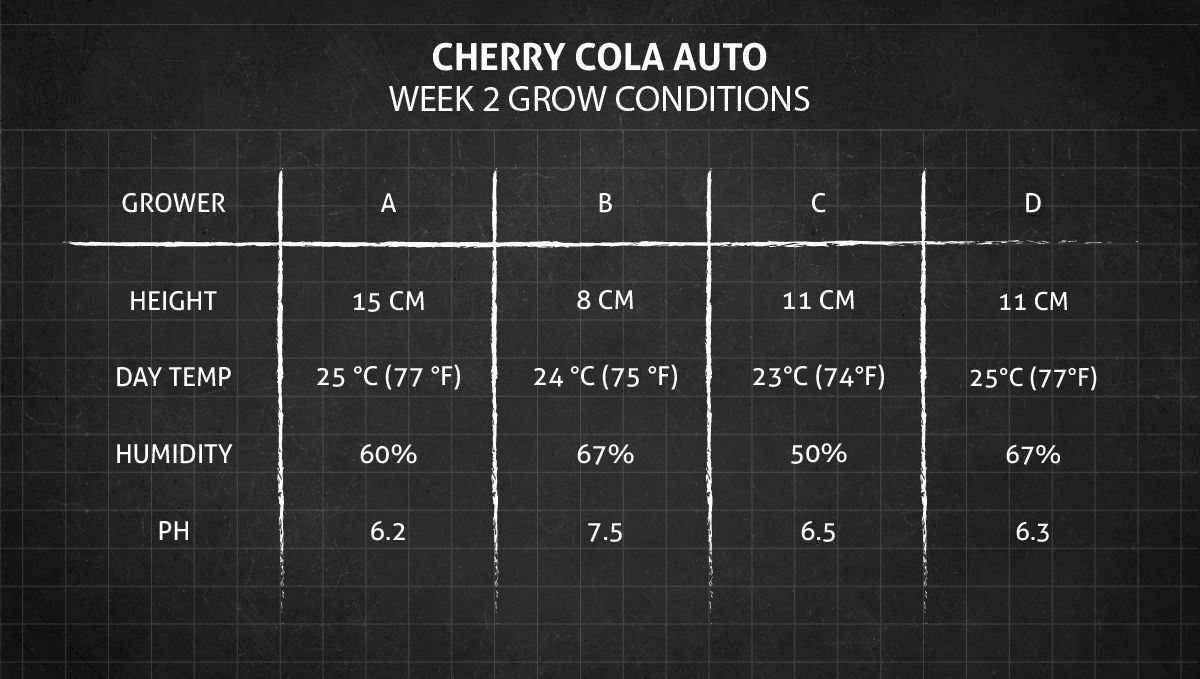
At this stage, it's important to avoid overwatering the plant and to allow the top inch of the soil to dry out between watering. Additionally, some growers may choose to start adding a small amount of nutrients to the water to support the plant's growth. However, in larger volumes of soil it isn't necessary yet.
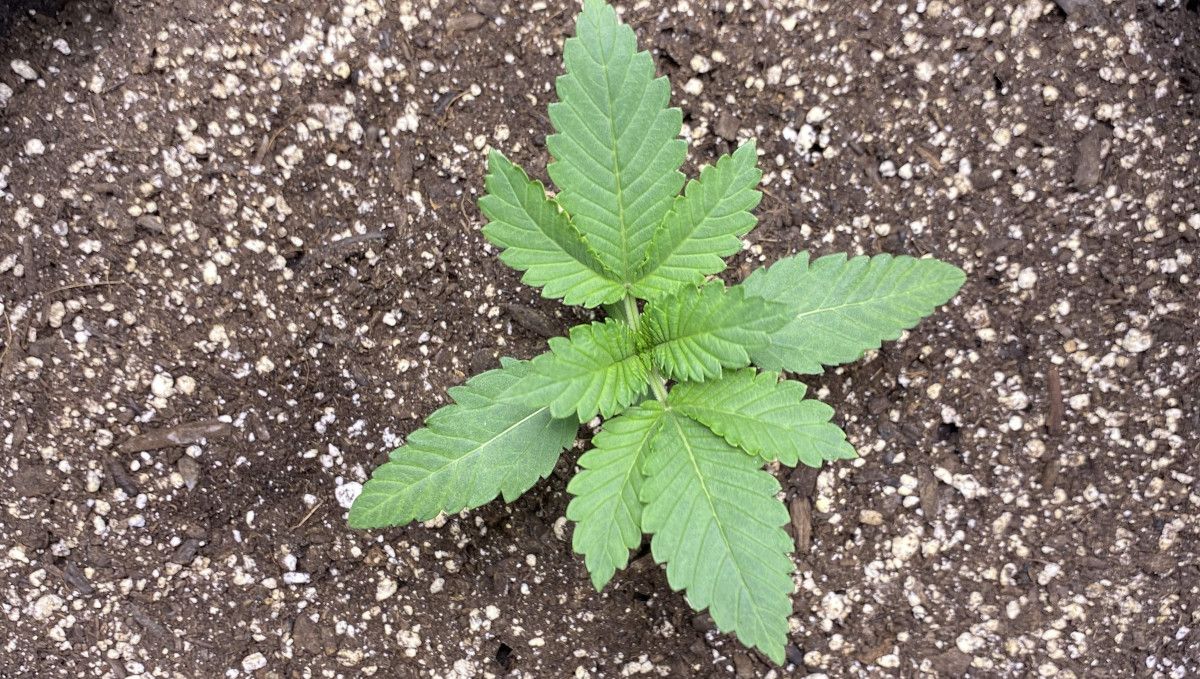
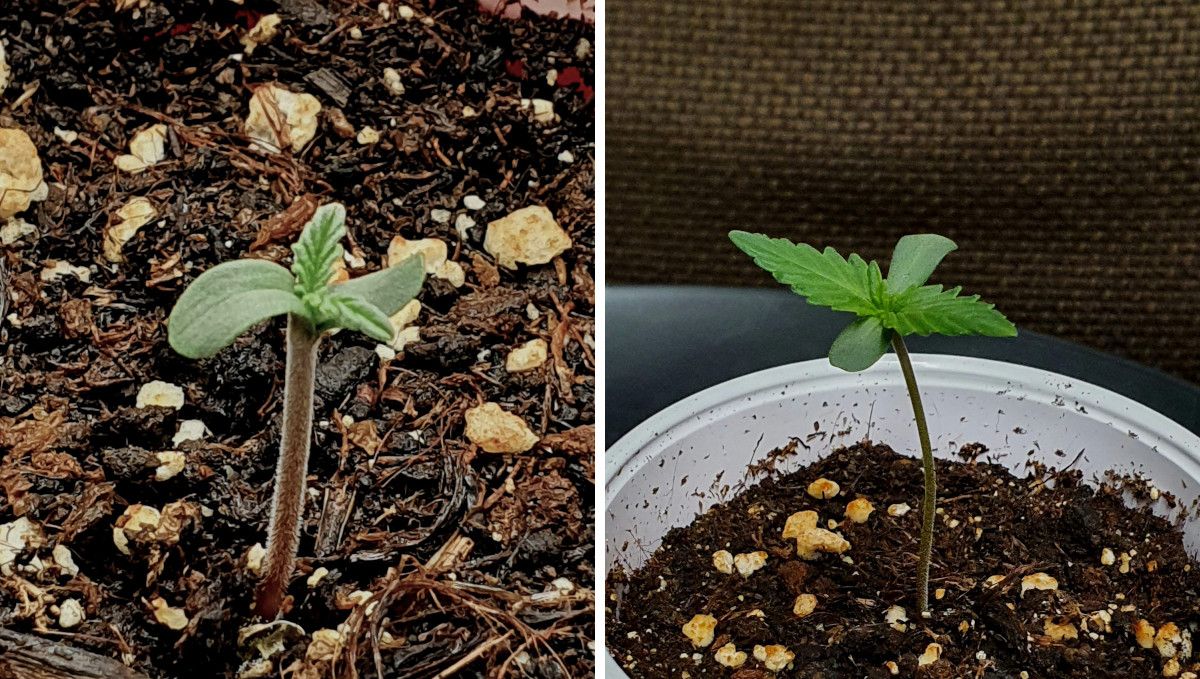
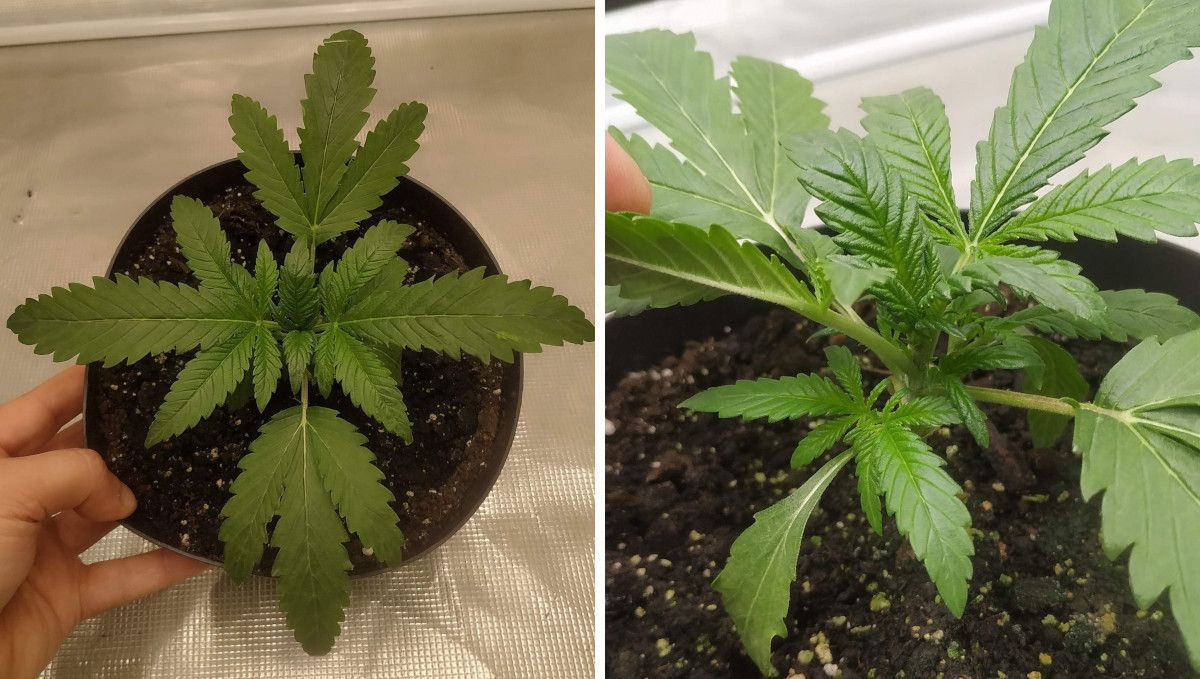
As shown in the picture below, Cherry Cola Auto displays a unique leaf shape for an autoflowering plant, more reminiscent of a photoperiod variety. The leaves are large and wide, and the plant's structure is distinctive in its compactness and early development of side branches.
At this stage, most gardeners will want to give their plants additional nutrients as the ones that have been present in the medium all along have probably been spent by this time. You don't need to make your feeding schedule overly complicated because cannabis plants can survive and even flourish on a very simple diet. The only thing that you really need to give them are macronutrients, such as nitrogen, phosphorus, and potassium (N-P-K), and a couple of dozens of micronutrients.
Basically, what you need are two bottles of nutrients: one for the vegetative phase and one for the flowering stage. Many companies that cater to the cannabis market make excellent products that are simple to use and ensure bountiful harvest. Find below just one sample nutrient regimen that you can safely follow.
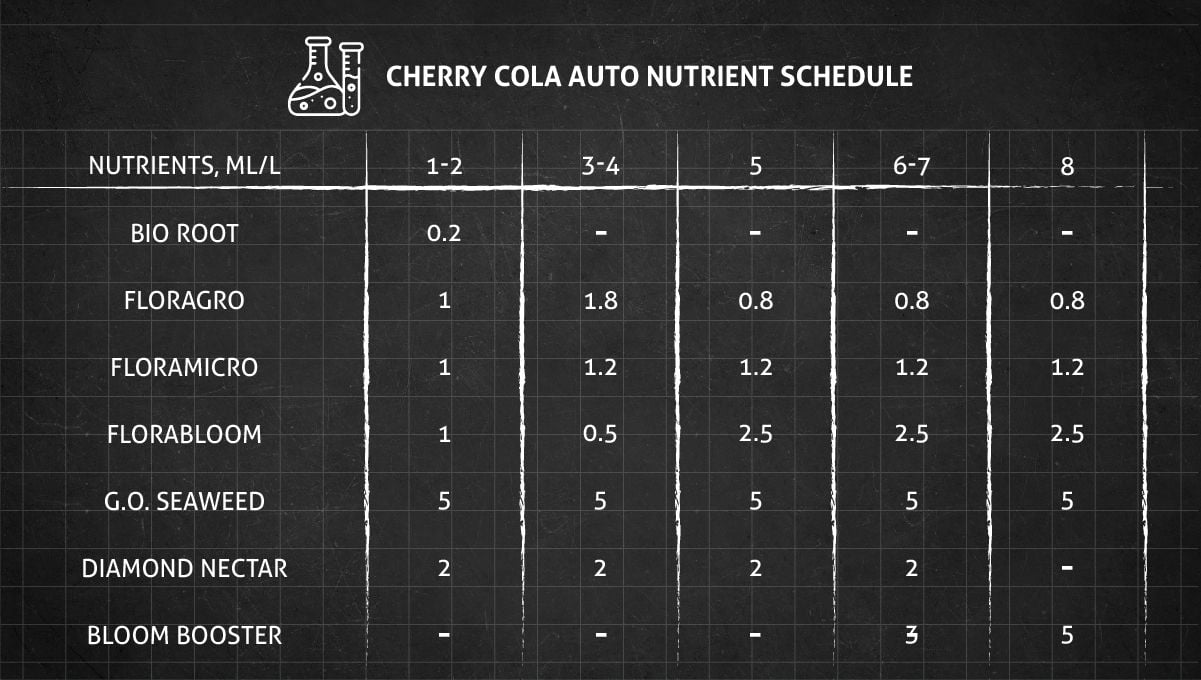
The most important nutrient for the vegetative phase is nitrogen (N). Make sure the diet you've chosen contains enough of it -- in this case, the leaves of your weed will have a saturated smooth green color. If you neglect to give your plants enough N, the foliage may appear less green and even a bit yellow, and the growth may slow down.
5. Mid Veg | Weeks 3-4
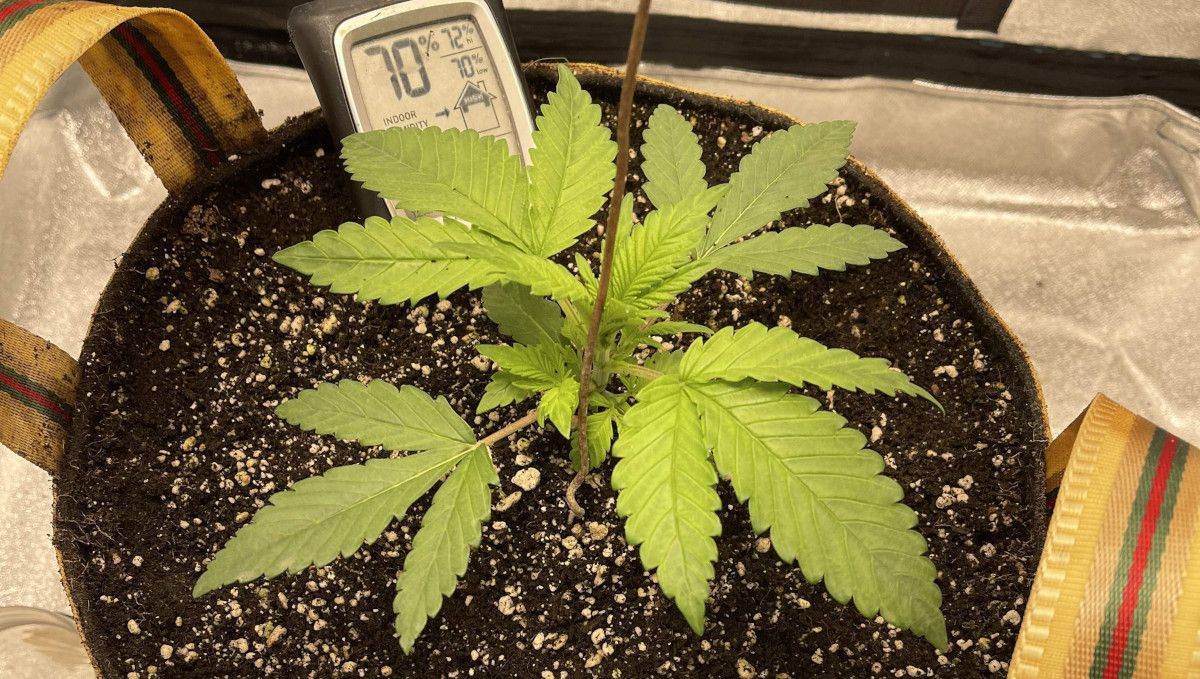
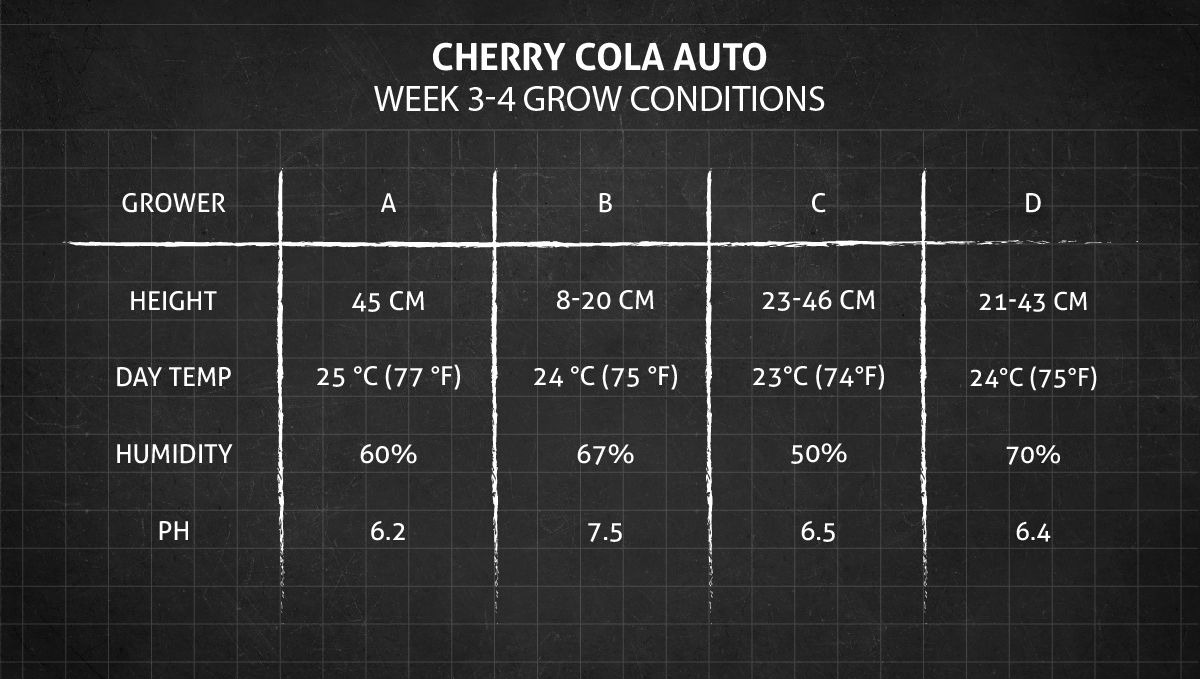
During weeks 3-4, cannabis plants experience rapid growth and undergo significant changes. The roots are now well-established and the plant will continue to produce more leaves and grow taller. Optimal conditions for this stage include maintaining a temperature range of 20-25°C and a humidity level of 50-70%.
The plant's stem will become sturdier, allowing it to support the growing weight of the leaves and branches. At this stage, the plant will also begin to develop more branches and nodes, which are the points where the leaves and branches emerge.
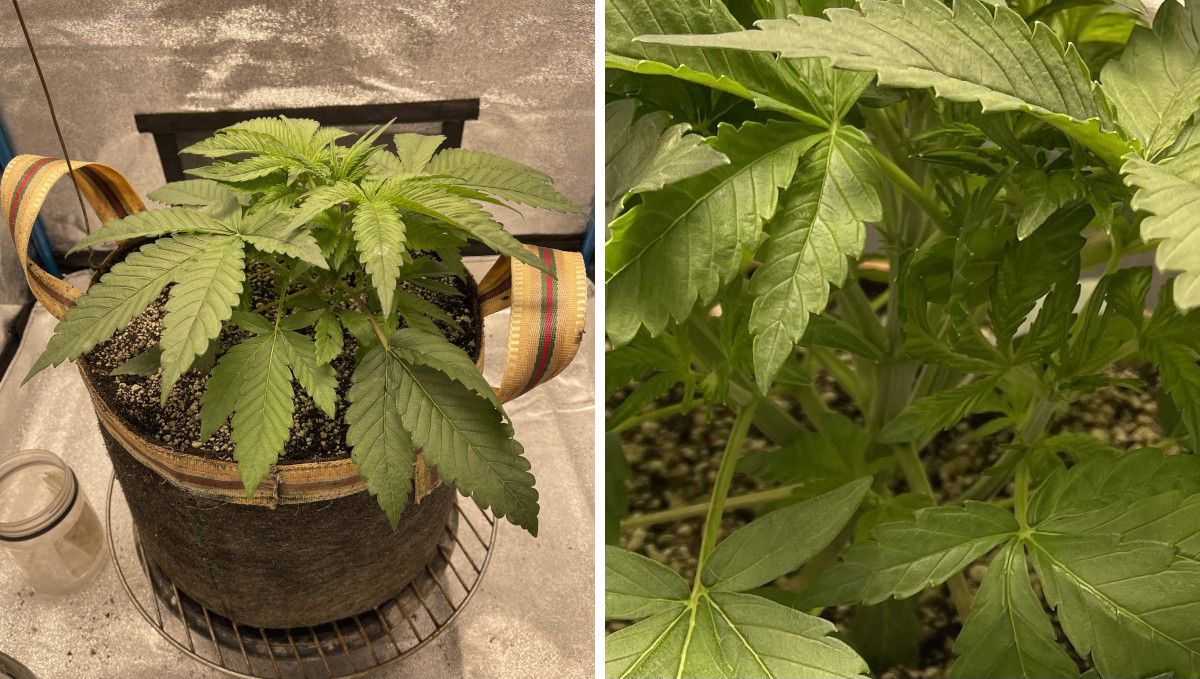
Look at Cherry Cola Auto in the photograph below. You can easily see that this plant is the shortest and the sturdiest. And it isn't for the lack of vigor as she's also very lush and has huge leaves that promise great size and abundant yields at harvest.
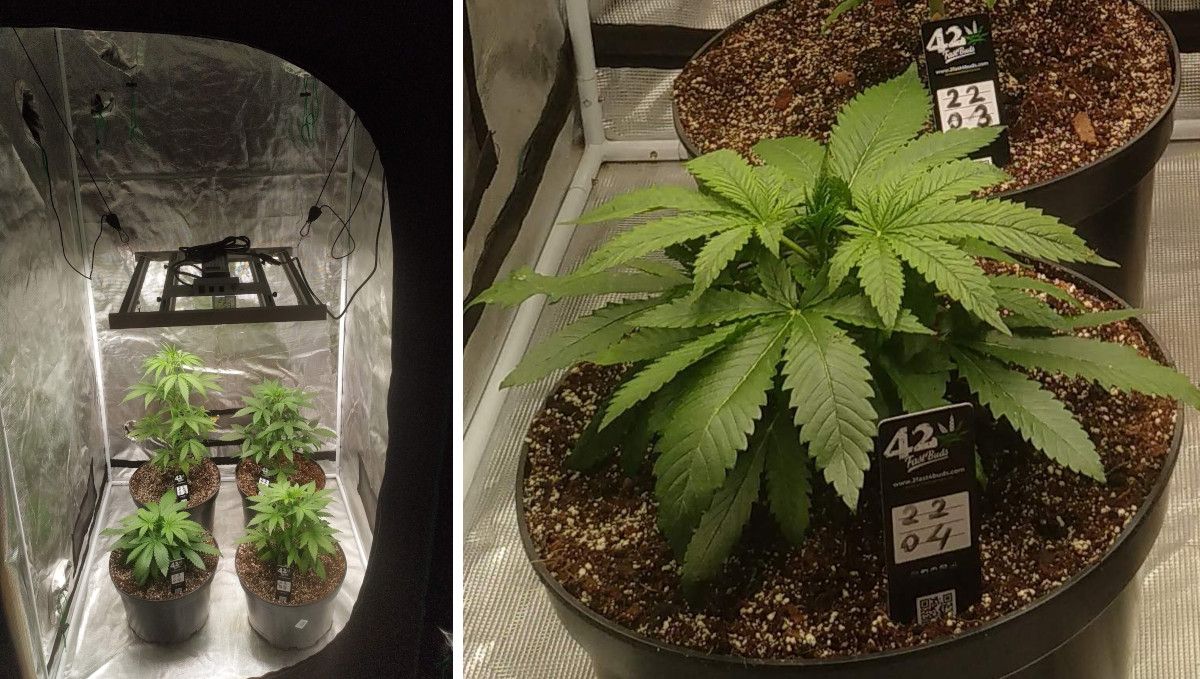
While indoor setups -- with their limited vertical space -- often call for training, it's best to let autoflowers grow naturally without subjecting them to either low- or high-stress training. This will ensure the most rapid growth and minimal stress.
6. Transition (Pre-Flower) | Week 5
Autoflowering cannabis plants are distinct from photoperiod plants in that they don't need a specific light schedule to trigger flowering. They are genetically engineered to automatically commence flowering after a certain period, regardless of the amount of light they receive. As a result, they begin to flower indoors under any light schedule, which usually happens around week five.
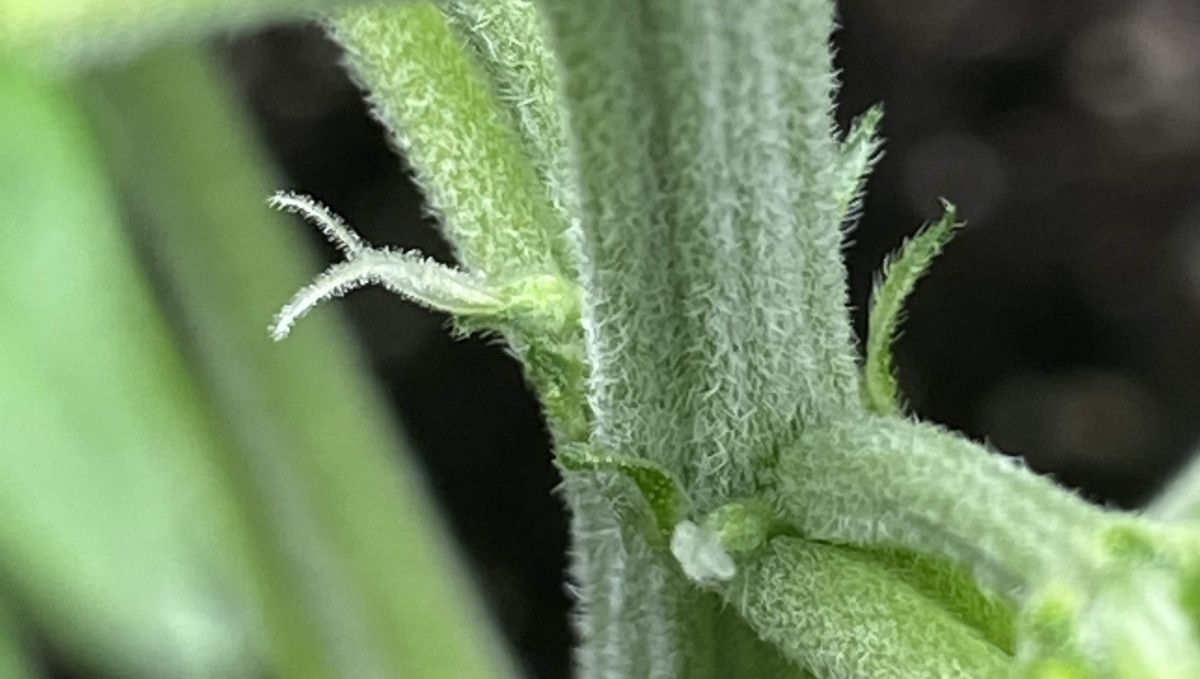
The first sign of maturity that you will notice at this point in the timeline is the emergence of tiny white hairs visible at the nodes somewhere inside the canopy. These tiny white hairs, also called pistils, show that the plant is female.
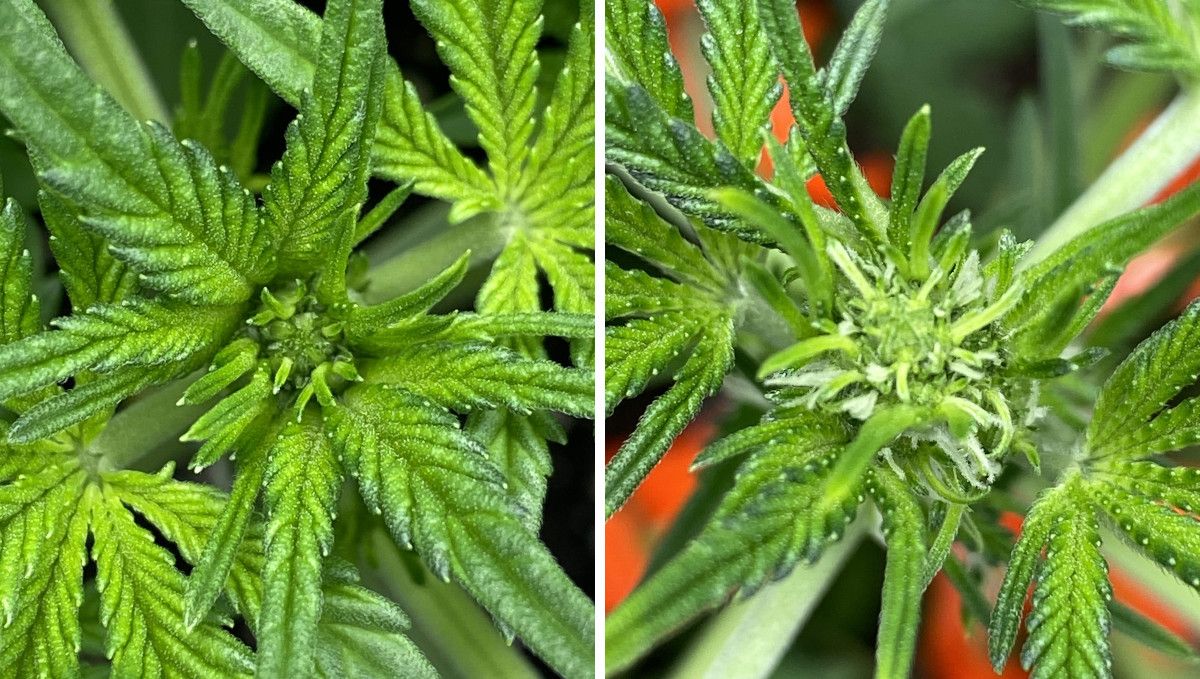
The second thing that happens when the plant transitions to flowering is the change on the tops as the new leaves here begin to grow very thin and almost threadlike, and the next thing that happens is the emergence of more white hairs next to those narrow tiny leaves. Another thing that is very noticeable is that the tops change their color from deep green to light green and almost yellowish.
Remember how we said that it's best to leave your autoflowers grow naturally? Most growers ignore this advice because they don't have enough vertical space in their home gardens, so they start to train their autoflowers early and do not stop this even when the plants begin to bud.
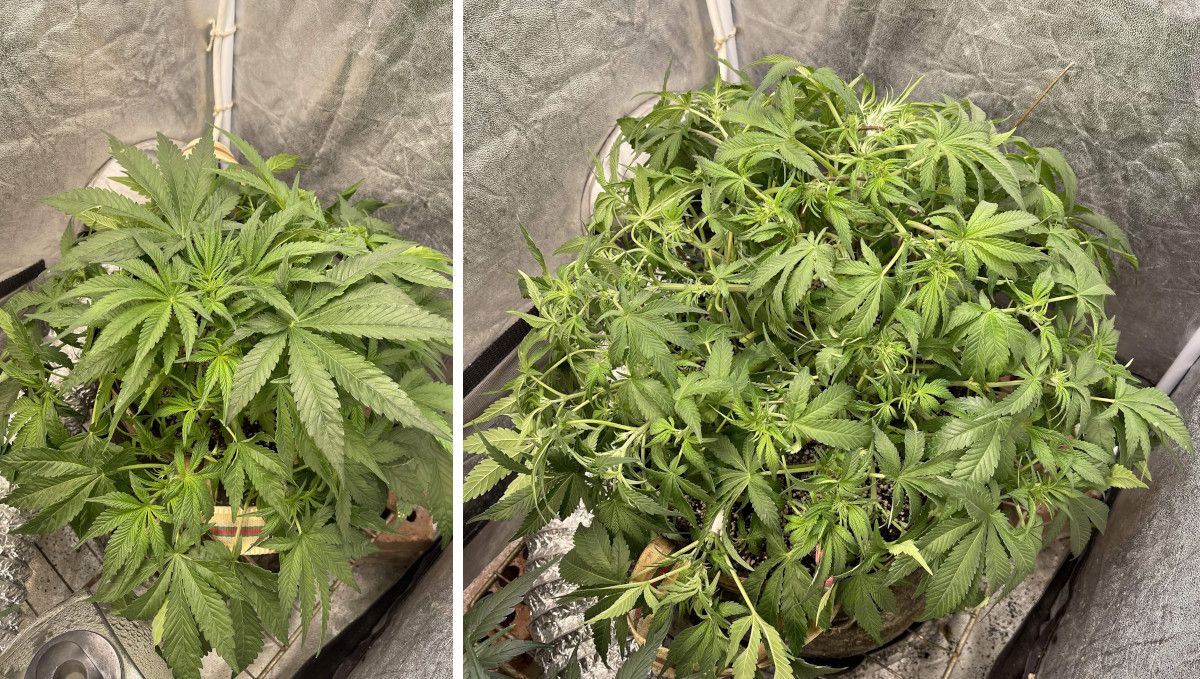
However, it's important to stress one more time that autoflowers are best cultivated in the most straightforward manner, and the SOG method is probably the most efficient. SOG, or Sea of Green, simply means that you place many weed plants in small pots next to each other. Cannabis grown this way has a very recognizable shape -- where the central cola is towering above the rest. Together with her neighbors, the plants in the garden form a more or less even and flat canopy, and provided that you have powerful enough lights, this method is one of the most productive.
However, don't forget that with weaker lights, the lower bud sides won't receive enough light, so you will have buds of good quality only on top, but the rest of the plant will produce flowers of subpar size and texture.
7. Early Flower | Weeks 6-7
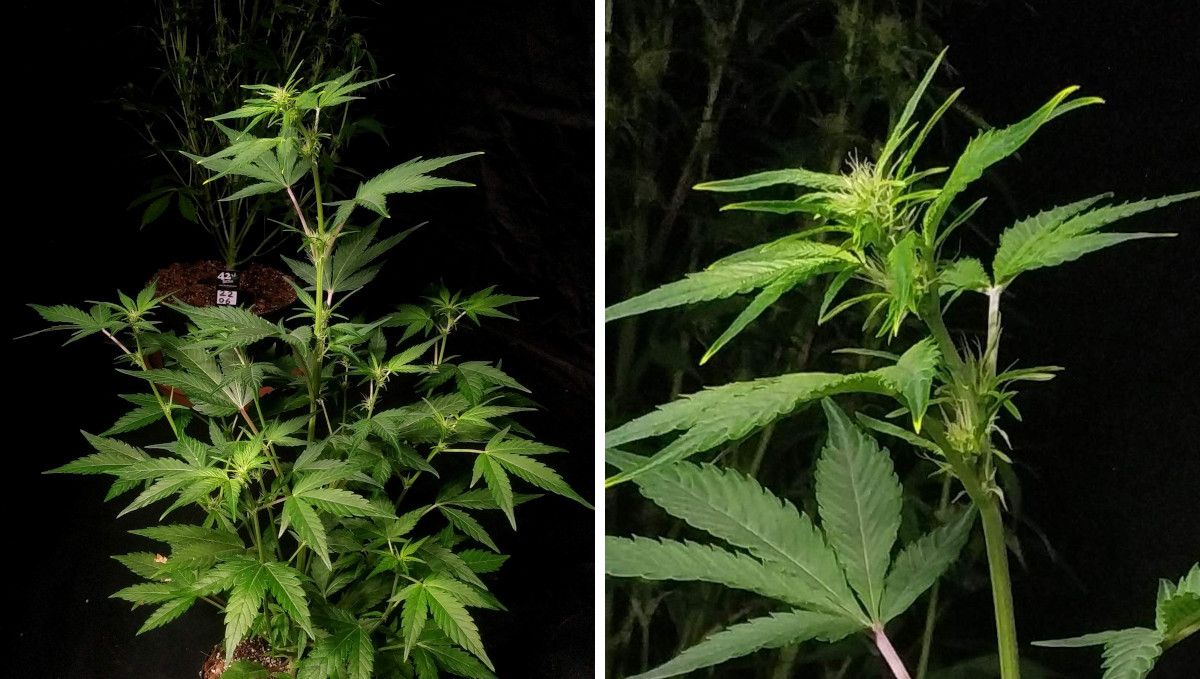
The stretch is a common occurrence in cannabis plants at the start of the flowering phase. It refers to the significant growth spurt that occurs in the plant as it transitions from the vegetative phase to the flowering phase. During this period, the plant can stretch rapidly, sometimes doubling or tripling in size, especially in Sativa-dominant strains.
While stretching may come as a surprise to some growers, they'll gladly embrace another thing that will happen around the same time -- the emergence of trichomes. Trichomes are tiny, hair-like structures that develop on the surface of cannabis plants during the flowering stage. These structures are where the plant's cannabinoids and terpenes are produced, which are responsible for the plant's unique aroma, flavor, and effects.
If you have invested your time and effort into training your plants, at this stage, you will be rewarded with a minimal stretch and a flat canopy. Compact and low profile weed plants are very convenient in indoor setups and under weaker grow lights.
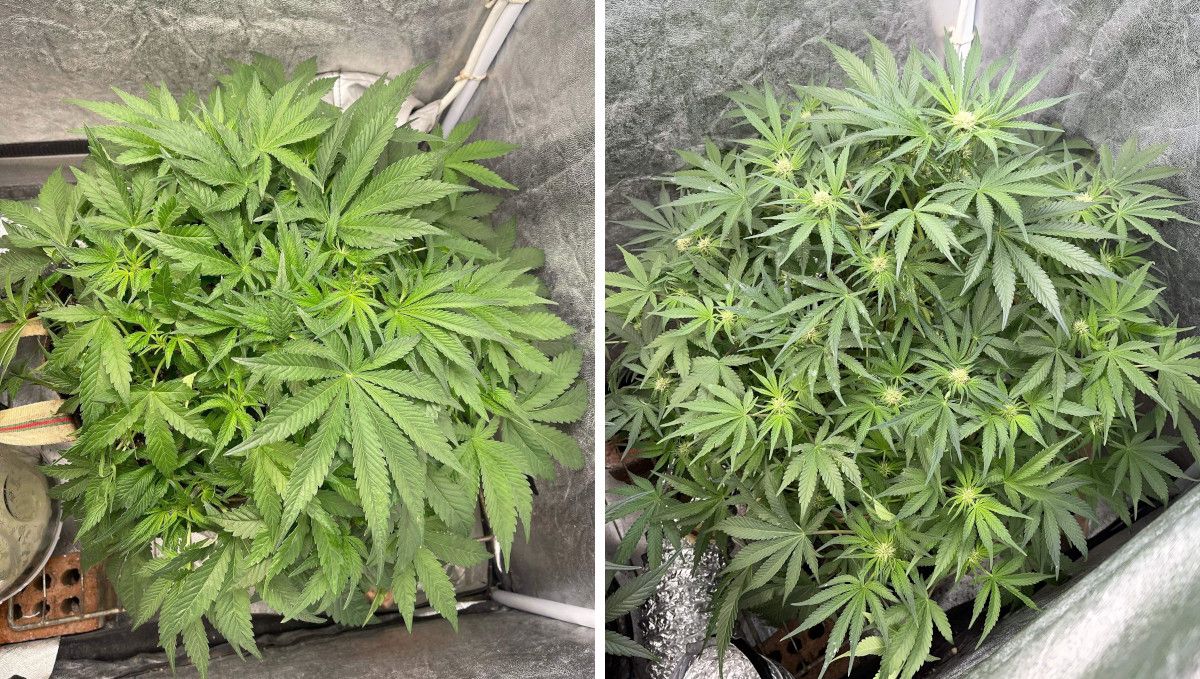
Sometimes, when you have failed to train your cannabis in time, it's possible to remedy the situation. There are some methods to curb the vertical growth of your plants. One of them is to supercrop the tallest branch. This method involves crushing the stem, then bending it, and securing it in a horizontal position.
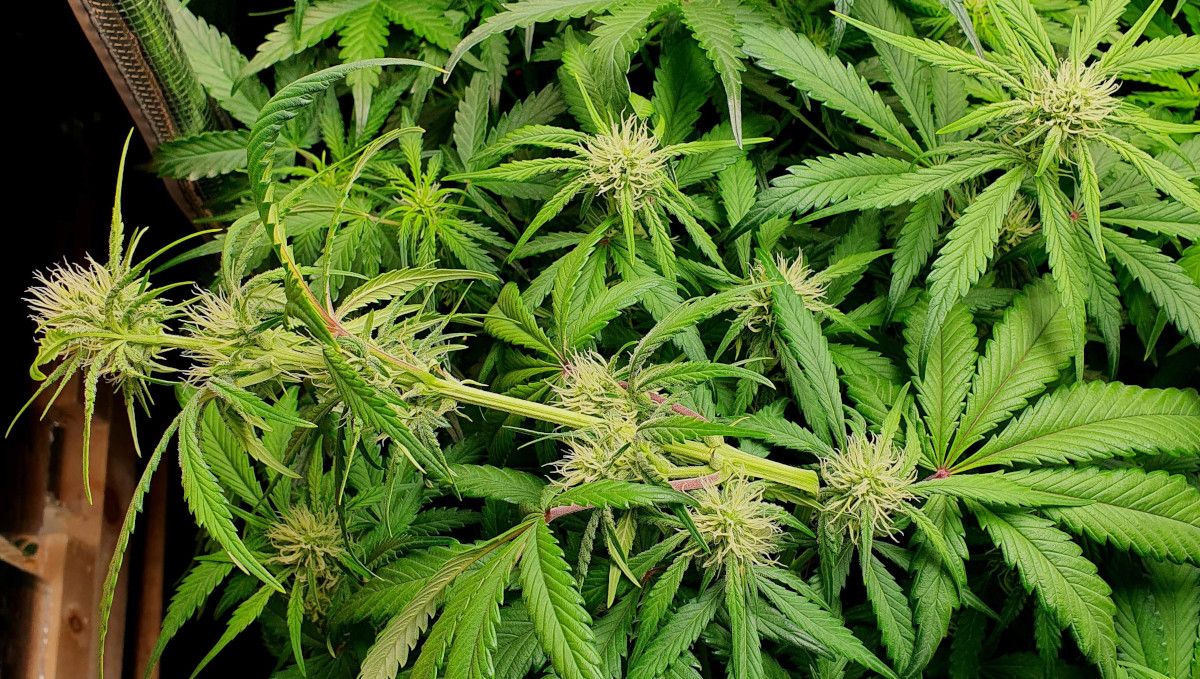
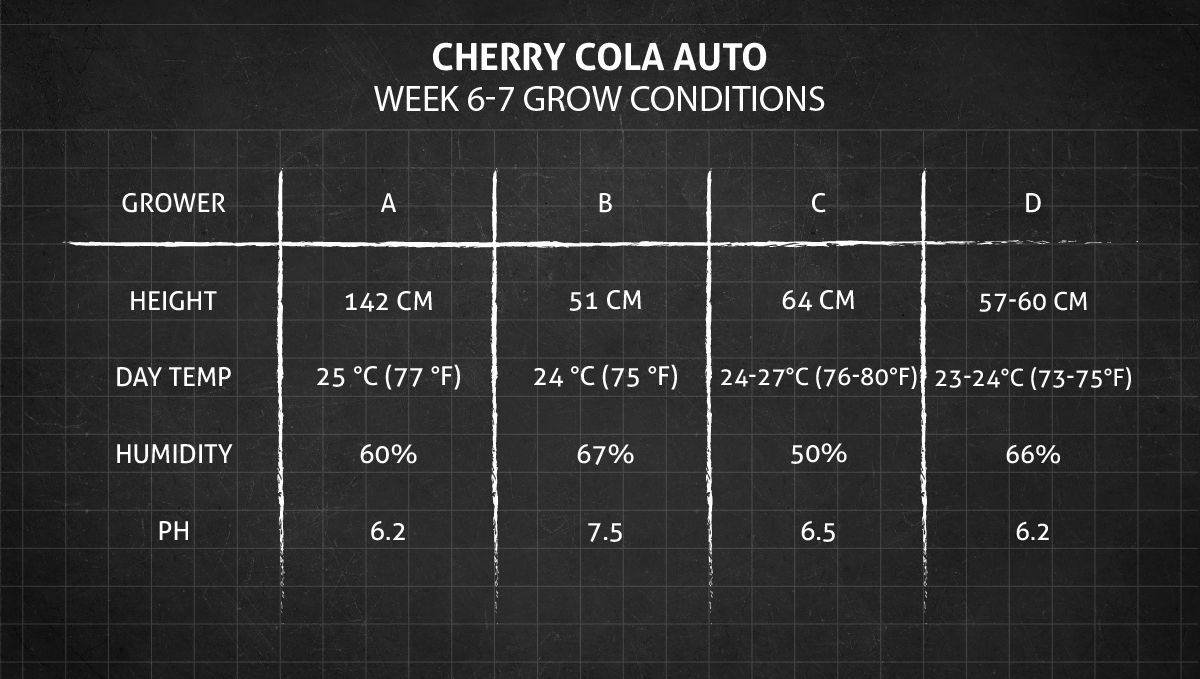
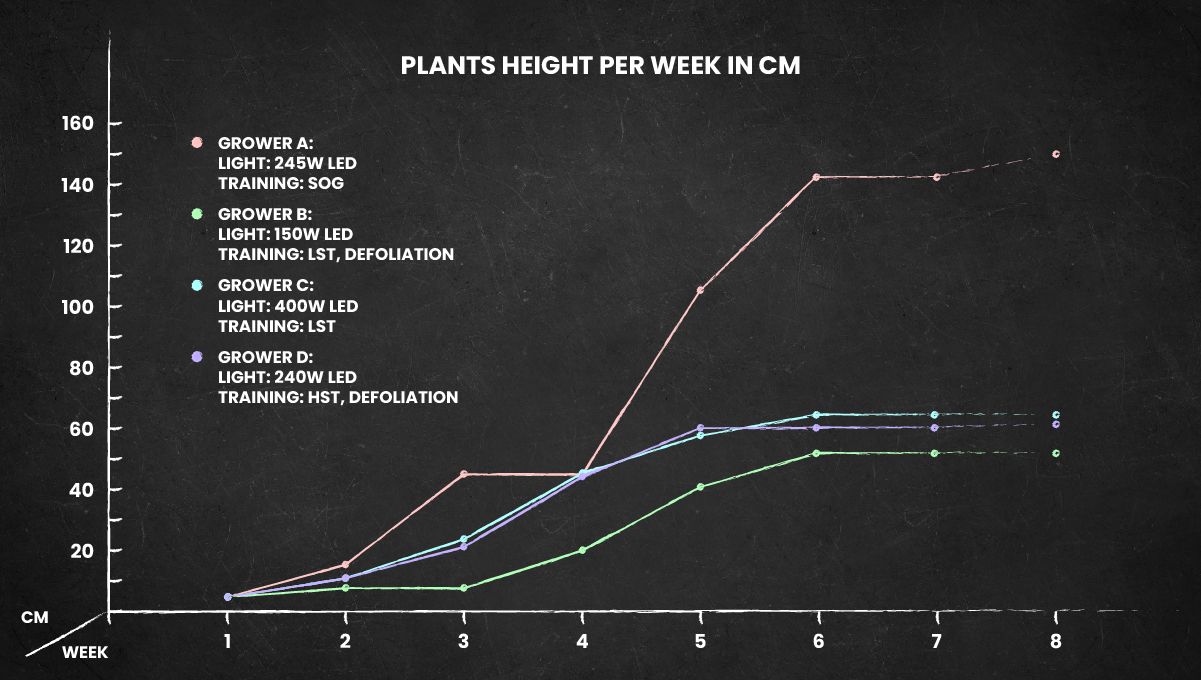
Luckily, the stretching won't last forever. At around 8th week from seeds, your autoflowers will stop gaining in height, and Cherry Cola Auto is no exception. In the graphic below, you can see the complete growth chart of this autoflower:
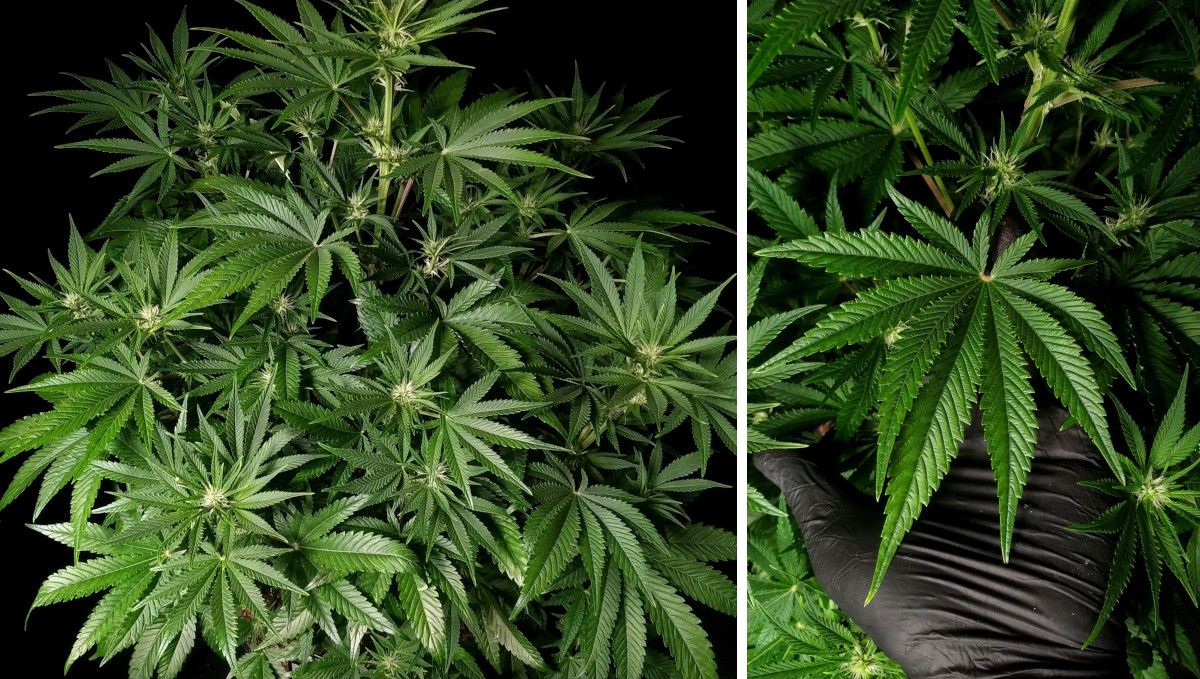
One other issue that indoor growers face all the time is the light penetration, meaning the ability of light to reach those bud sites that are deep inside the canopy and way down the stem and branches. To ensure this, you obviously need powerful lights, but another thing that helps is defoliation, meaning the removal of those leaves that shade lower bud sites. Please only use this technique if it's really necessary, especially on autoflowers, since it's easy to shock them with stress.
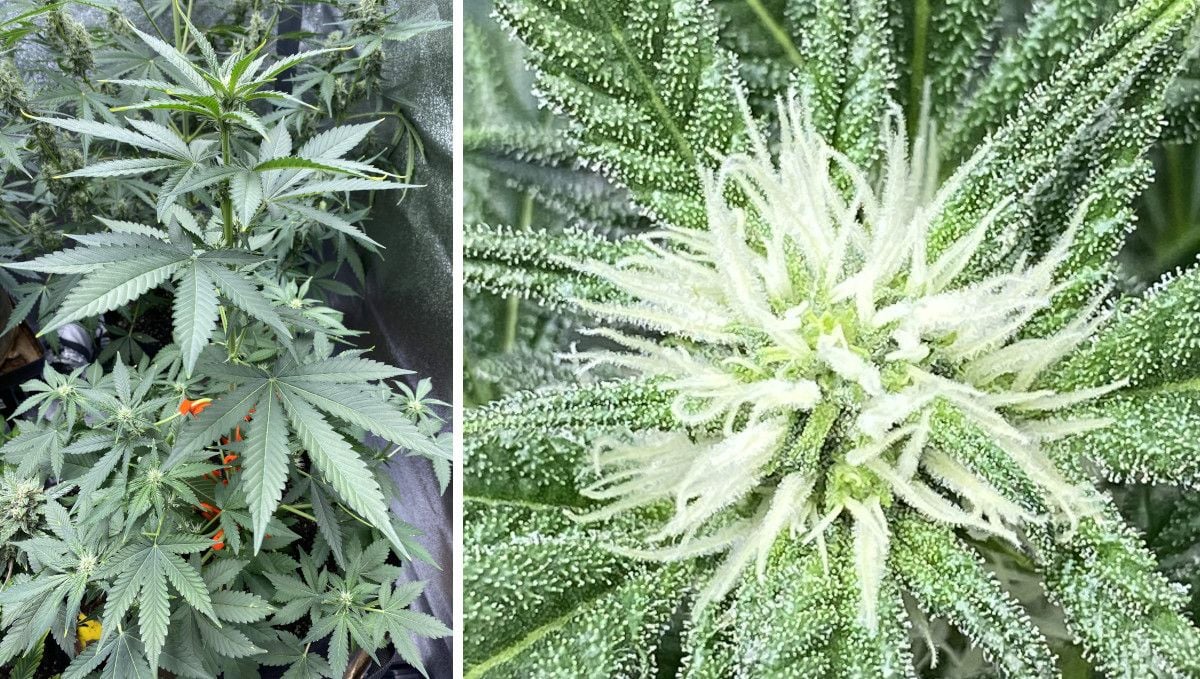
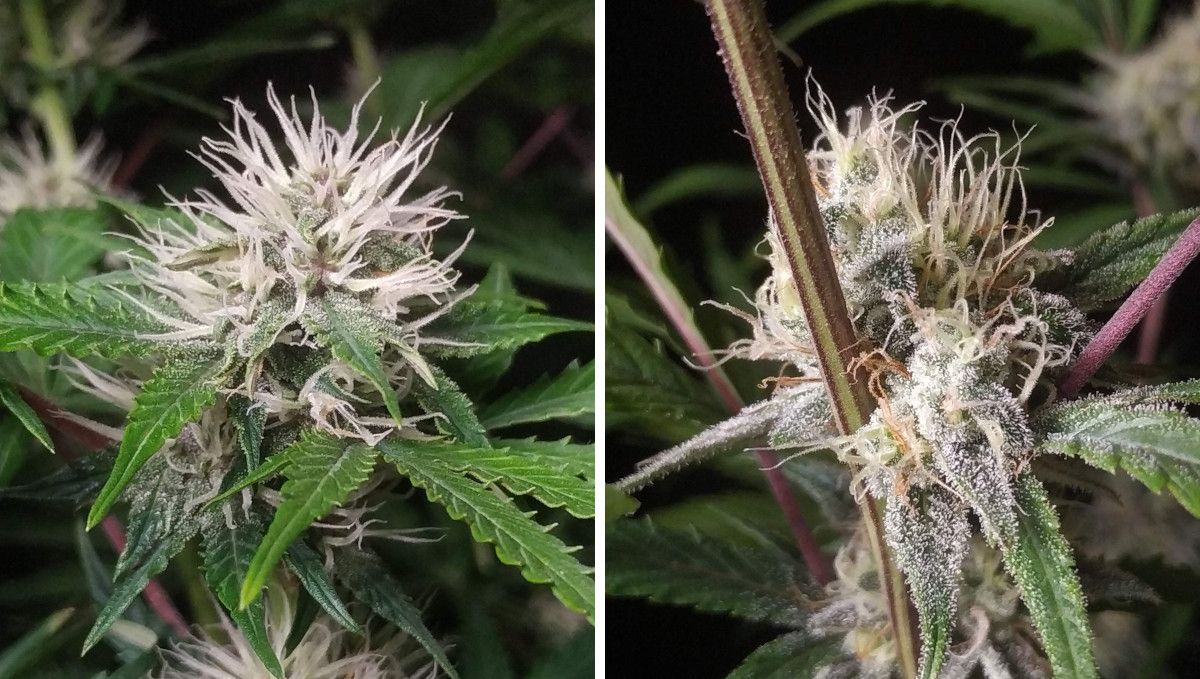
The size of buds in early flower isn't impressive yet, but good genetics mean that you will see a lot of crystals that are beautiful to look at and smell wonderful.
Of course, the smell of cannabis isn't only the source of joy for the gardener, but can also be a nuisance for neighbors. So don't forget about odor control. Luckily, there are a lot of ways to control the smell in indoor gardens, and the most efficient of them is the use of carbon filters.
8. Mid Flower (Bulk Phase) | Weeks 8-9
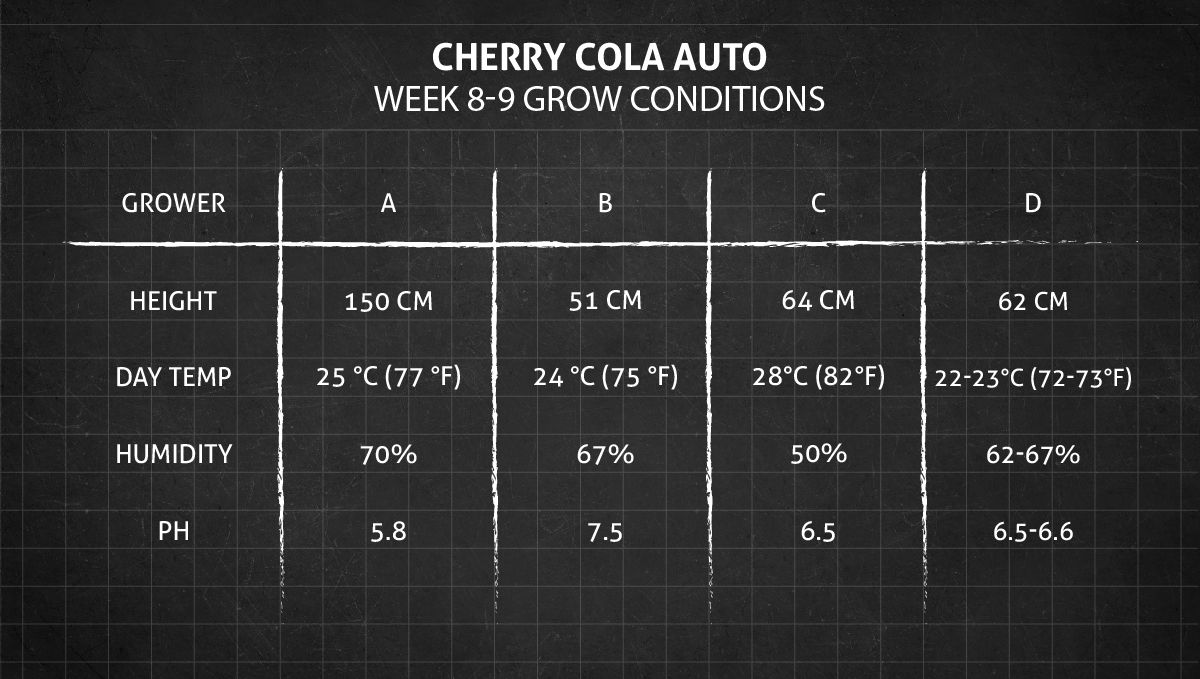
During the bulk-up phase, it is important to maintain an ideal temperature to preserve their terpene profile and prevent THC degradation in your cannabis buds. One effective strategy to achieve this is by lowering the temperature in the grow room. Additionally, it is crucial to reduce the relative humidity to prevent the growth of mold and bud rot, which can be detrimental to large, dense buds that struggle with moisture evaporation.
Don't forget that cannabis plants will not only require more water and plant food now, but their diet should be completely overhauled during the flowering stage. While they still require nitrogen, phosphorus, and potassium, they need different ratios of these macronutrients to support flower development. Specifically, cannabis plants need more phosphorus and potassium and less nitrogen during this stage. Additionally, they may benefit from micronutrients such as calcium, magnesium, and sulfur to support healthy bud growth.
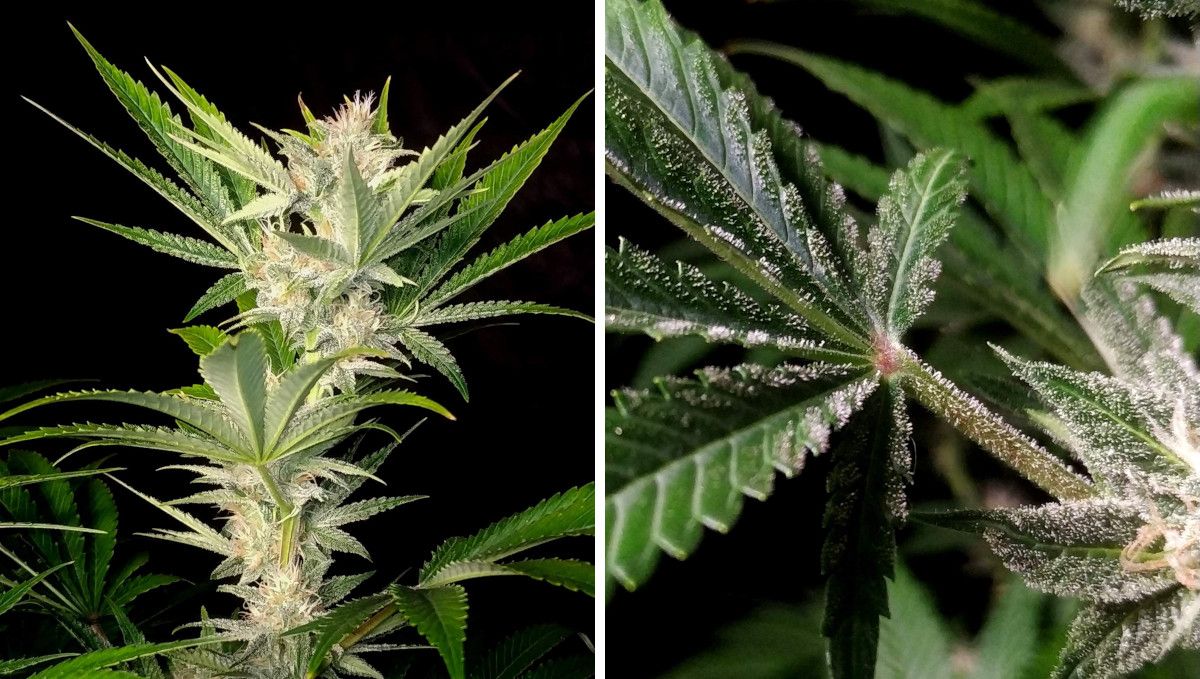
Even if your plants receive every nutrient they need, the color of the leaves and buds themselves might change now that they are nearing maturity. Don't treat it as a sign of a nutrient deficiency. Most probably, it's just a sign of an approaching harvest.
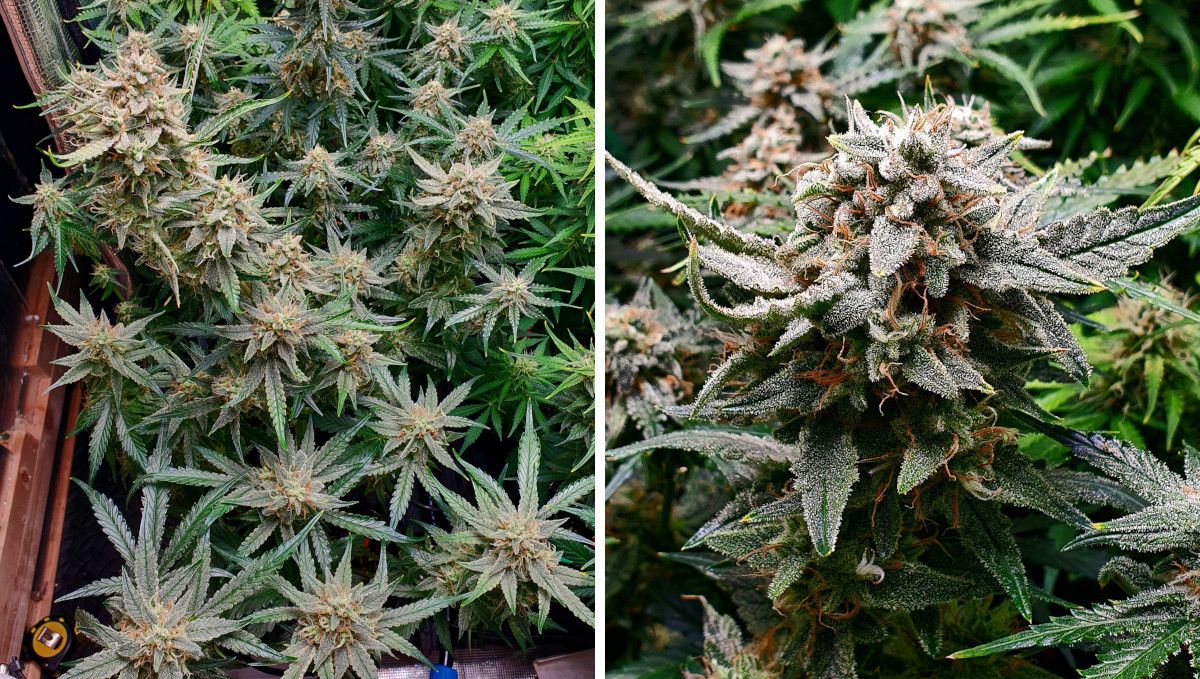
Many indoor growers prefer to give their autoflowers a major boost in phosphorus and potassium to facilitate bud formation. If you also plan to use a PK-booster, do it now. There are dozens products for that available on the market.
9. Ripening And Harvest | Week 10 (And Beyond)
Determining the right time to harvest your cannabis buds is crucial to achieving the desired potency, flavor, and aroma. There are several indicators that can help you determine whether your buds are ready to be harvested, and this is your main job in the last few weeks of your autoflower life cycle.
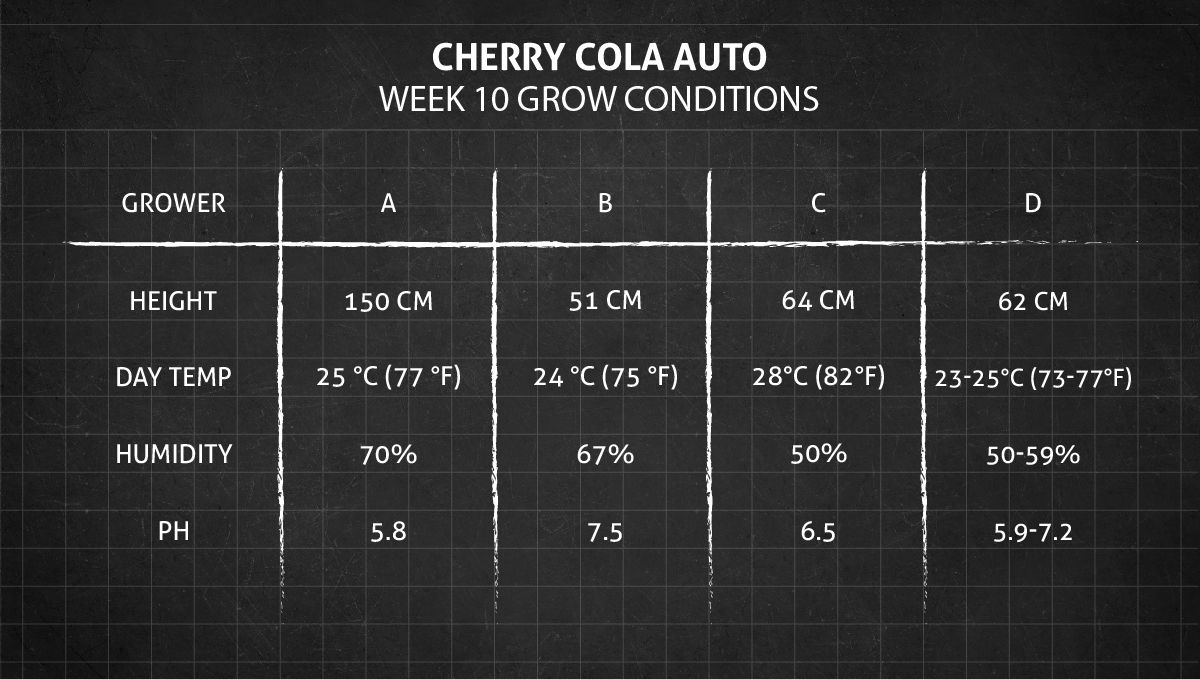
When your buds look fantastic and appetizing, display beautiful autumn colors, and appear sugared all over, how to tell whether to harvest them right now or wait another week?
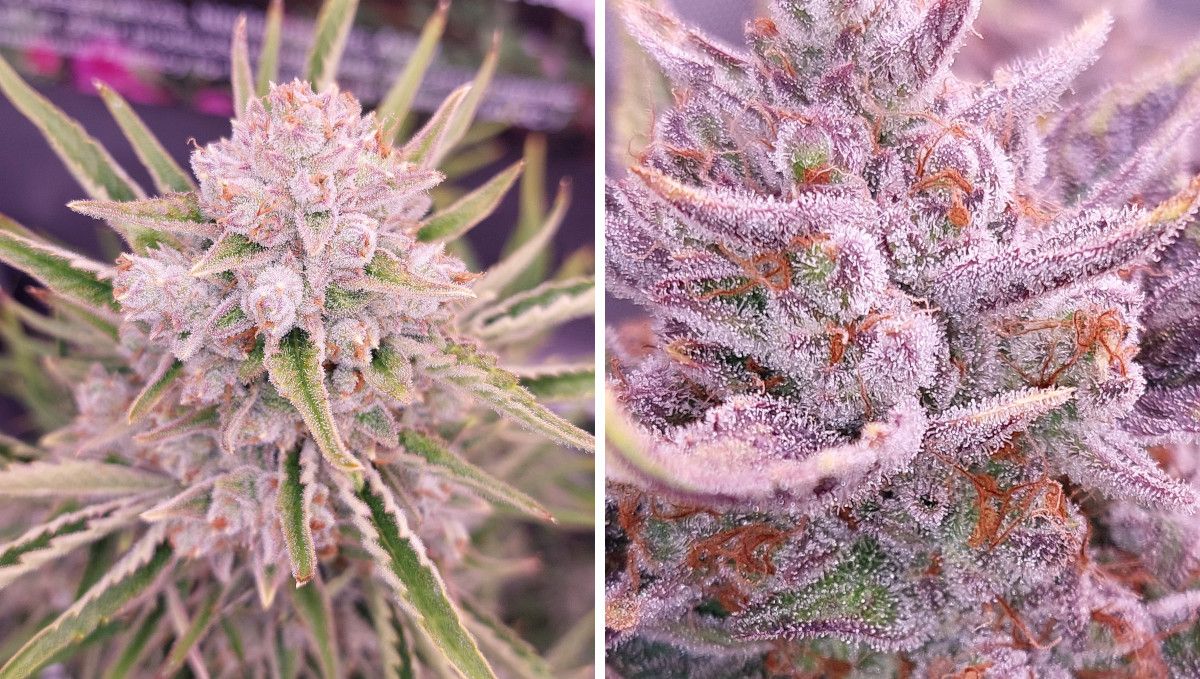
Start by paying close attention to the trichomes, which are the small, crystal-like structures that cover the buds. When the trichomes turn from clear to cloudy or milky, it is a good sign that the buds are ready to be harvested. Additionally, the pistils or hairs on the buds will turn from white to dark orange or brown.
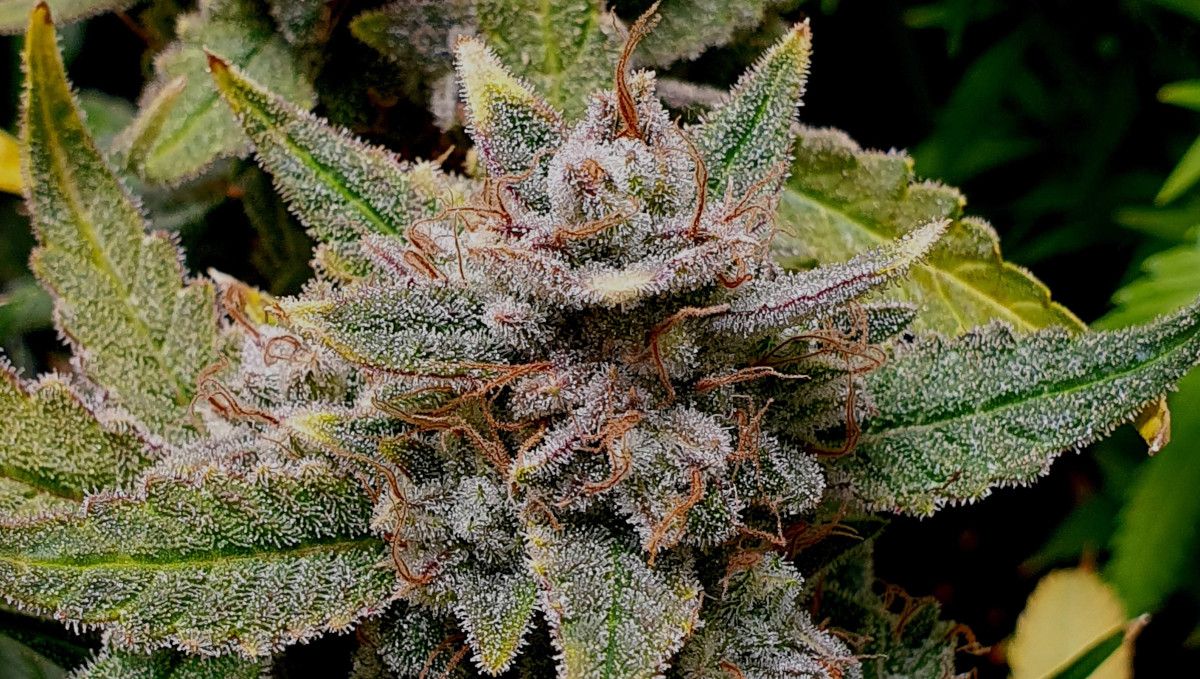
Finally, you can test the buds by giving them a gentle squeeze to feel their density. If they are firm and springy, it is a sign that they are ready to be harvested. By monitoring these indicators, you can ensure that you harvest your cannabis buds at the optimal time for the best results.
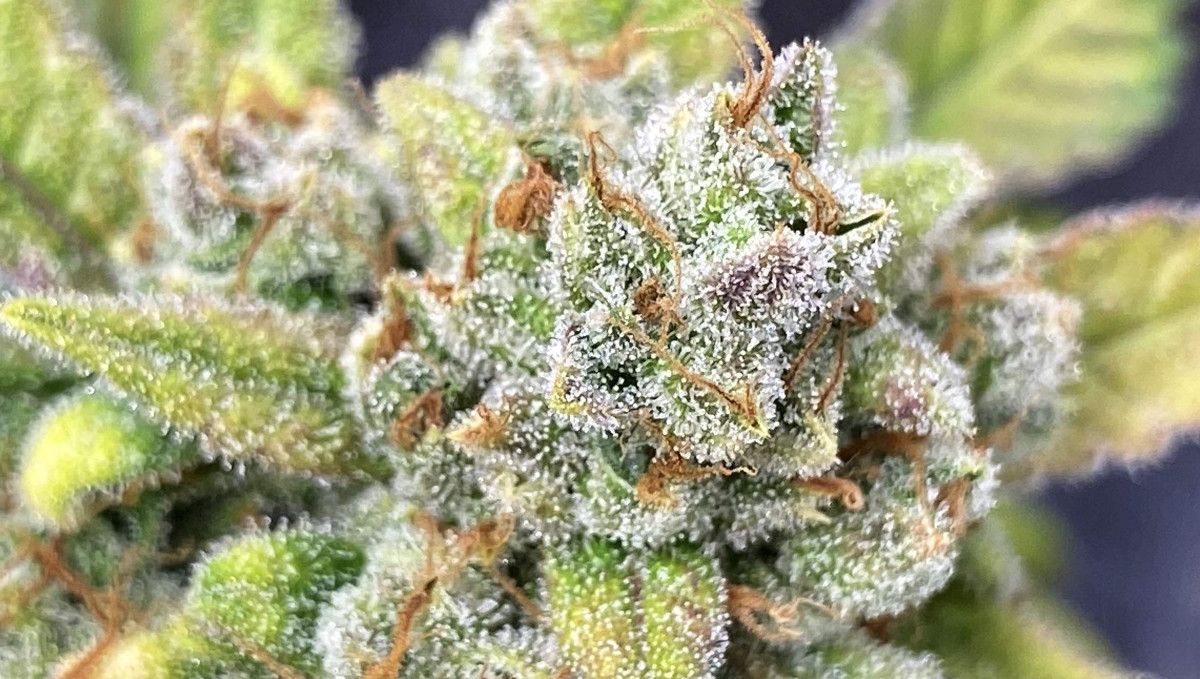
Also, as the cannabis plant approaches harvest time, the leaves will start to fade and turn yellow. This is a natural process that indicates that the plant is beginning to cannibalize its own nutrients as it focuses its energy on producing denser and denser flower mass. The yellowing of leaves is most noticeable in the larger, fan leaves and will gradually move up the plant towards the top.
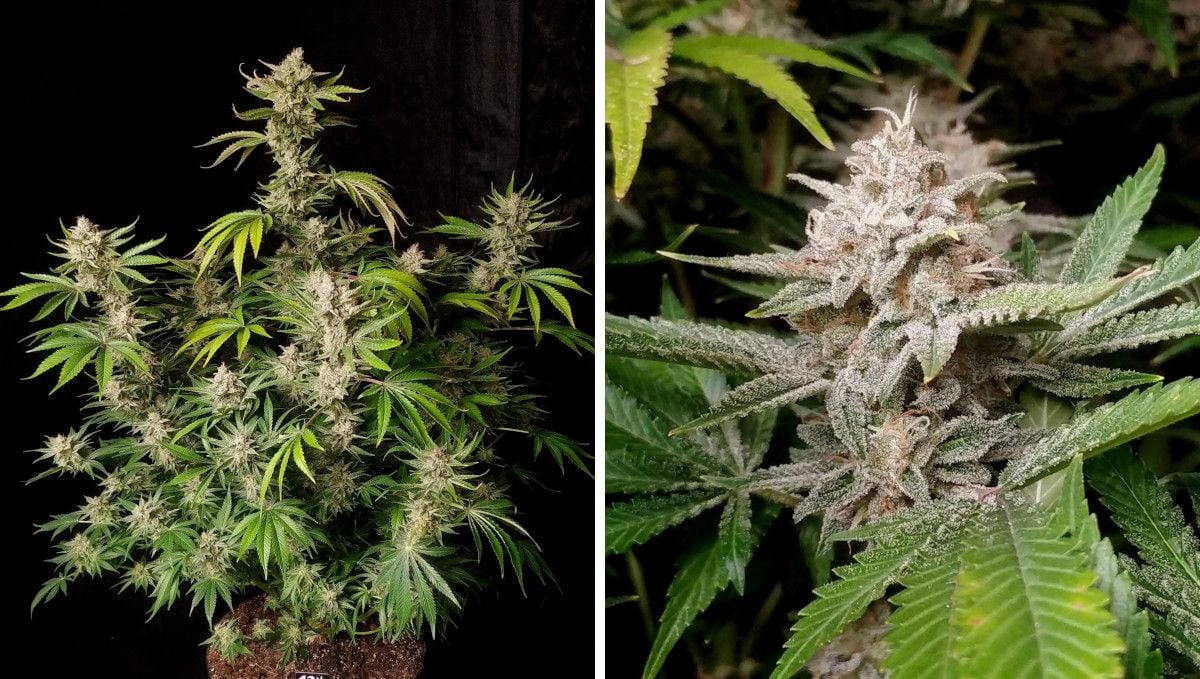
As the leaves fade more and more, the chlorophyll inside them degrades, and it's a good thing because it means that you will have less hay smell in your smoke. To facilitate the fade, don't forget to flush your autoflowers. It means that you need to use fresh water for at least one or two weeks before cutting your weed plants. The purpose of flush is to remove build-up salts from the soil and to make the plants use up the rest of the nutrients that it has stored inside its tissues.
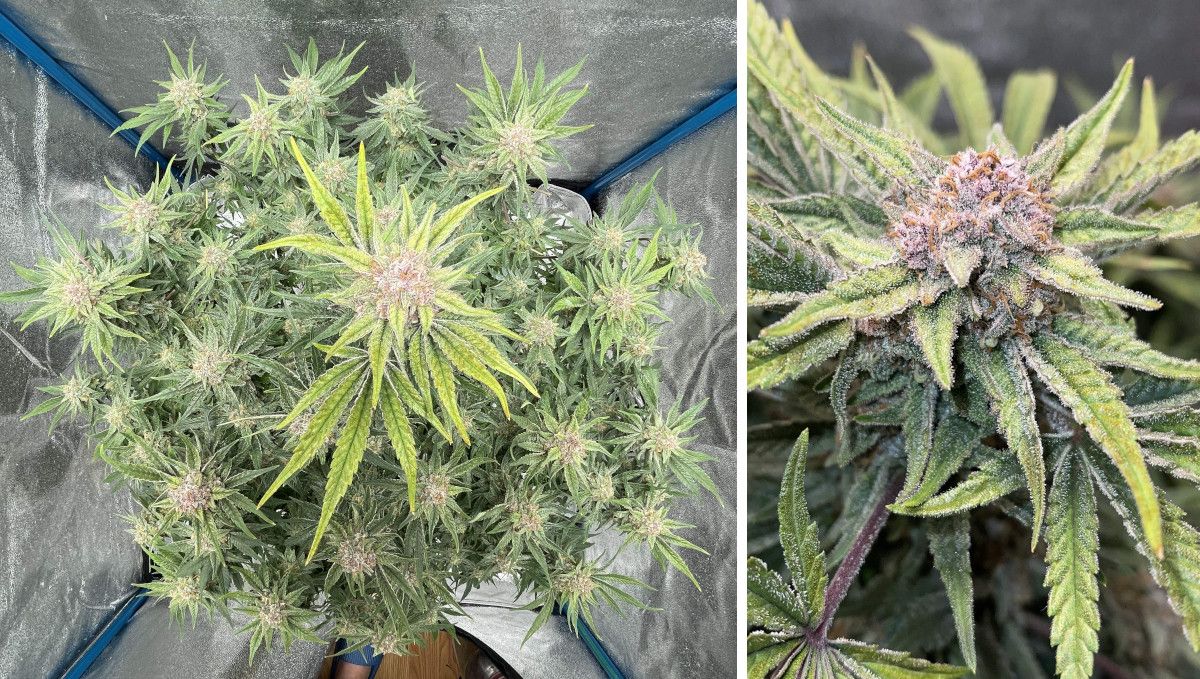
After you have done a thorough flush and the trichomes are all cloudy with a small number of amber ones, cut your plant and hang it to dry.
10. The Outcome
In all the grows that we have reviewed, the yields of Cherry Cola Auto where very good and in some cases extraordinary. As you have seen for yourselves, you don't need to be a very experienced gardener, employ complex techniques, or use expensive nutrients to achieve such spectacular results.
Cherry Cola Auto Yield
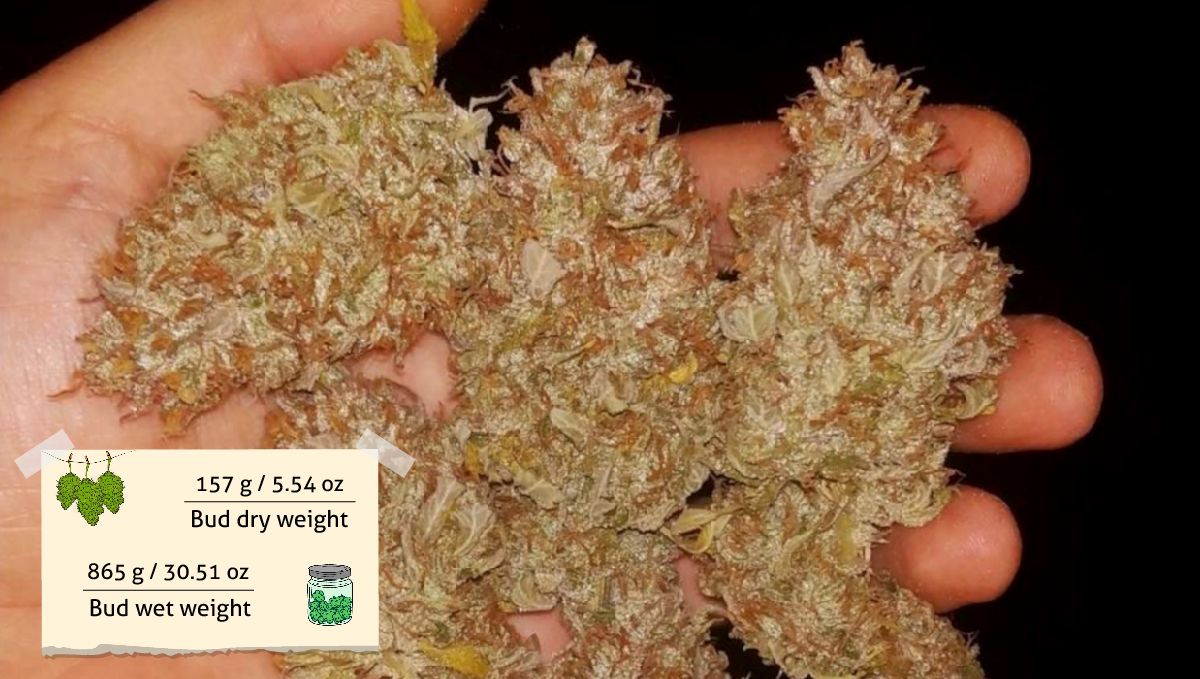
The yield of the first Cherry Cola in our review was the most amazing -- 5.54 oz (157 g) of dried and cured buds.
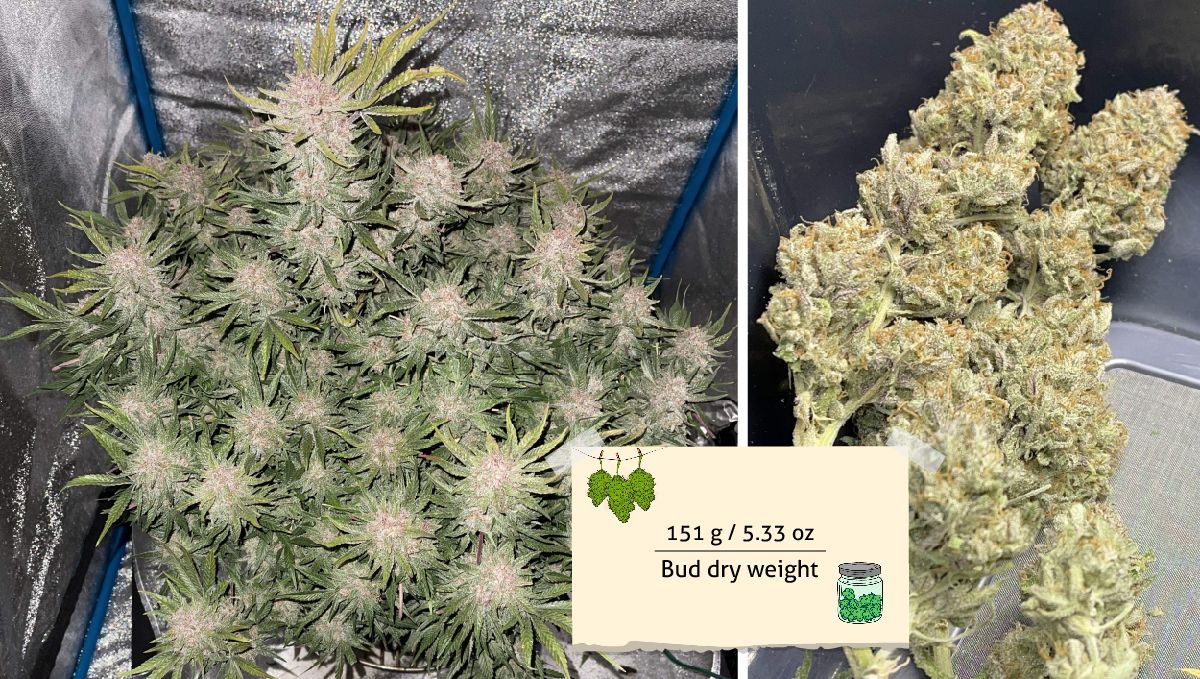
The yield of the second Cherry Cola Auto was equally spectacular at 5.33 oz (151 g). We can safely say that this outstanding result was due to the clever training done by the grower.
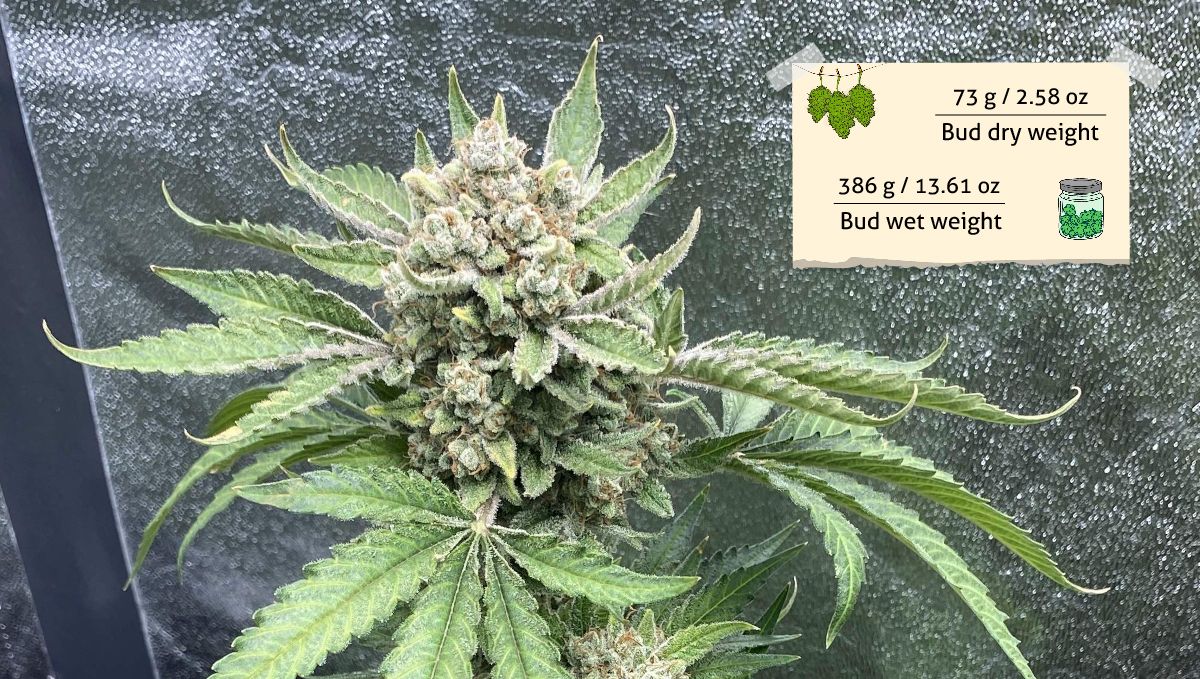
The third plant was much smaller than the other two -- mostly because it was cultivated SOG style in a tight grow space -- but it still brought 2.58 oz (73 g), and the buds were the highest quality.
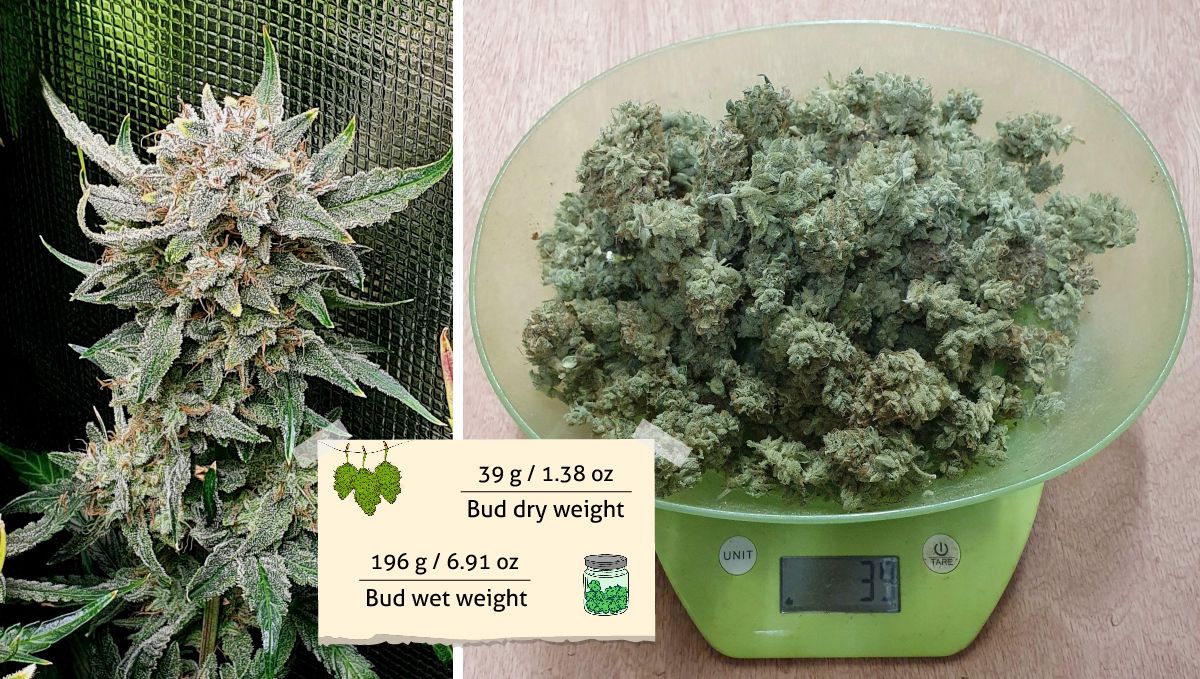
Finally, the smallest Cherry Cola in our review -- the one that grew in the most crowded conditions and had to be supercropped -- didn't disappoint either as the grower harvested 1.38 oz (39 g) from this one plant, and there were several others in his small grow tent.
Cherry Cola Auto Smoke Report
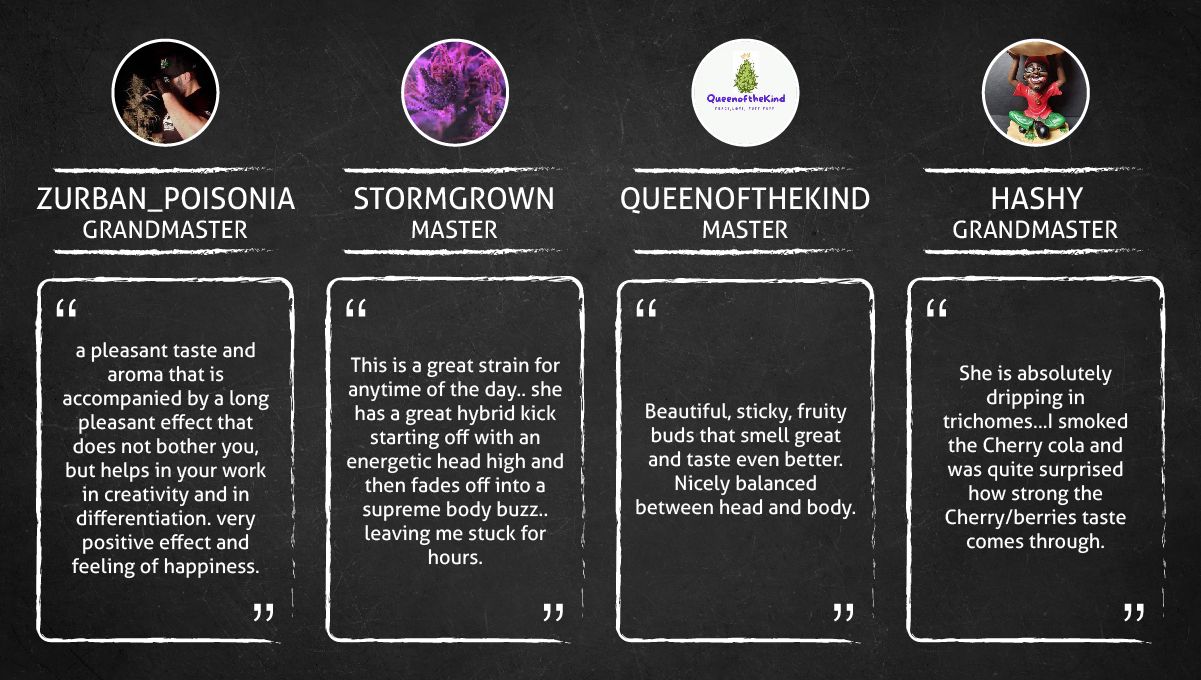
All reviewers noted Cherry Cola Auto's pleasant taste and aroma, with fruity and cherry notes that come through strongly. They described the effects as a well-balanced hybrid kick that starts with an energetic head high and then settles into a body buzz, leaving the user feeling happy and creative. They also praised Cherry Cola's high trichome content and stickiness resulting in a potent smoking experience. As the effects can last for hours, it's a perfect smoke for use at any time of day.
Also, smokers who have much experience smoking super potent strains, can count on Cherry Cola Auto buds being exceptionally strong. Even lab tests attest to that:

10. In Conclusion
Drawing conclusions from the 4 grow diaries that we have closely followed for the purpose of compiling this growing guide, we must say that Cherry Cola Auto is indeed an XXL-sized autoflower. The one grower that chose not to train her at all, got a five-foot tall cherry tree, which in his case worked great as the outcome was correspondingly generous. The rest of the gardeners in our review could not afford such tall autoflowers and employed clever canopy management so that their Cherry Colas could realize their full potential in smaller setups and/or under weaker lights.
We suggest that you keep this in mind. Only if you have enough vertical space in your grow room and your light is powerful enough to ensure big and dense buds along the whole length of the branches, can you let your Cherry Cola Auto grow as a tall stretchy plant. Otherwise, you may find out too late that the central cola is towering too much above the rest and needs some radical training, such as supercropping, which would probably result in reduced yields (as it did in grower D's case).
However, if you manage to train your autoflower into a wide bush with a flat top and multiple branches, the outcome will be spectacular. We should also probably mention that the outcome depends on your medium as well. Hydroponic setups and coco -- as hydro's simplified version -- all offer greater growth rates than soil grows. You can compare the results achieved by the four gardeners reviewed in our guide to draw this conclusion: the coco coir growers (A and B) got much bigger yields than those who chose soil (C and D).
In all other respects, Cherry Cola Auto is an easy-to-grow, vigorous cultivar that can give even newbie growers a huge amount of best-quality buds. Happy growing!



Comments