Skywalker OG Auto Cannabis Strain Week-by-Week Guide

- 1. Grow specifications
- 2. Grow set up
- 3. Germination and seedling stage | week 1
- 4. Early veg | week 2
- 5. Mid veg | weeks 3-4
- 6. Transition (pre-flower) | week 5
- 7. Early flower | weeks 6-7
- 8. Mid flower (bulk phase) | weeks 8-9
- 9. Ripening and harvest | week 10 (and beyond)
- 10. Yield and smoke report
- 11. In conclusion
Skywalker OG Auto is an extraordinary autoflowering strain that brings a twist to the classic Skywalker OG – the autoflowering format which allows for a hassle-free cultivation process. In just 10-11 weeks from seed, you'll get a potent product that offers a perfect balance of mental clarity and full-body relaxation. With its killer US genetics wrapped in a beginner-friendly package, Skywalker OG Auto is a cosmic adventure you won't want to miss.
Below, you’ll find a week-by-week cultivation guide that’ll give you an idea of what to expect from Skywalker OG Auto during its life cycle, what the perfect conditions are, as well as get insights into the strain’s timeline and progress from seed to harvest.
1. Grow Specifications
You’re about to discover the fantastic Skywalker OG Auto, a blend of 25% Sativa and 75% Indica genetics in an autoflowering format. With a swift 70-days harvest from seed, it's a delight for growers. Indoors, it thrives at a compact height of 80-90cm, yielding up to 450-500g/m². Outdoors, it stretches up to 90-120cm, rewarding you with a bountiful harvest of up to 650g/m².

The aroma of tropical fruits, citrus, and diesel accompanies a taste that's sweet, earthy, and piney. Its tranquilizing and mind-expanding effects create a truly enchanting experience, and up to 23% THC will leave you in awe. Embrace the force of Skywalker OG Auto and embark on a journey like no other.
2. Grow Set Up
For this Skywalker OG Auto guide, we've chosen a grow journal in which the gardener risked it and trained his plant rather heavily. As you will see, that didn't prevent him for reaping outstanding rewards, which means you can count on a generous harvest too, especially if you play it safe. There was nothing special about the grower's setup, and you may find out that it's close to what you have in your own home garden. See the details in the table below.
| Grow Space: | 1.5 m2 (16.15 ft2) | Pot Size: | 11 l (2.91 gal) |
|---|---|---|---|
| Seed to Harvest: | 11 weeks | Medium: | 75/25 coco/perlite |
| Flowering: | 7 weeks | Nutrients: | Synthetic/Organic |
| Light Cycle: | 20/4 | pH Levels: | 6.2 |
| Light Type: | LED | Day Temperature: | 28°C (82°F) |
| Watts Used: | 300 | Humidity: | 40-60% |
Of course, you may rest assured that this genetics is compatible with any indoor or outdoor setup or growing conditions. So, it's less about your particular environment and more about your acumen and skills as a weed grower. We only hope that the tips and tricks we'll share in this grow guide will help you be at your best game.
3. Germination And Seedling Stage | Week 1
When cultivating cannabis plants indoors, it is essential to create optimal conditions, especially during the germination of seeds and the early growth of the plant when it develops its first sets of true leaves. Ensure that the relative humidity is maintained at least 60% or higher. The daytime temperatures should be kept ideally between 25-28°C, while during the night, the temperature can decrease, but not by more than 5 to 10 degrees.
| Plant Height: | 2“ (5 cm) | Humidity: | 60% |
|---|---|---|---|
| Distance to Light: | 28“ (70 cm) | Water per Day: | 0.05 gal (0.2 l) |
| Day Temp: | 82°F (28°C) | pH: | 6.2 |
| Night Temp: | 72°F (22°C) | TDS: | 300 ppm |
There are several methods for cannabis seed germination. Probably the most straightforward approach is to place the seed directly into the growing medium. However, many gardeners prefer a slightly less "natural" but more reliable method of germinating seeds between wet paper towels.
In this case, the seed will typically sprout within 2 to 4 days if provided with warm temperatures, access to moisture, and darkness. Once the seed shows its taproot or, even better, reaches a length of about 1 cm, you can transfer the sprout into the growing medium.
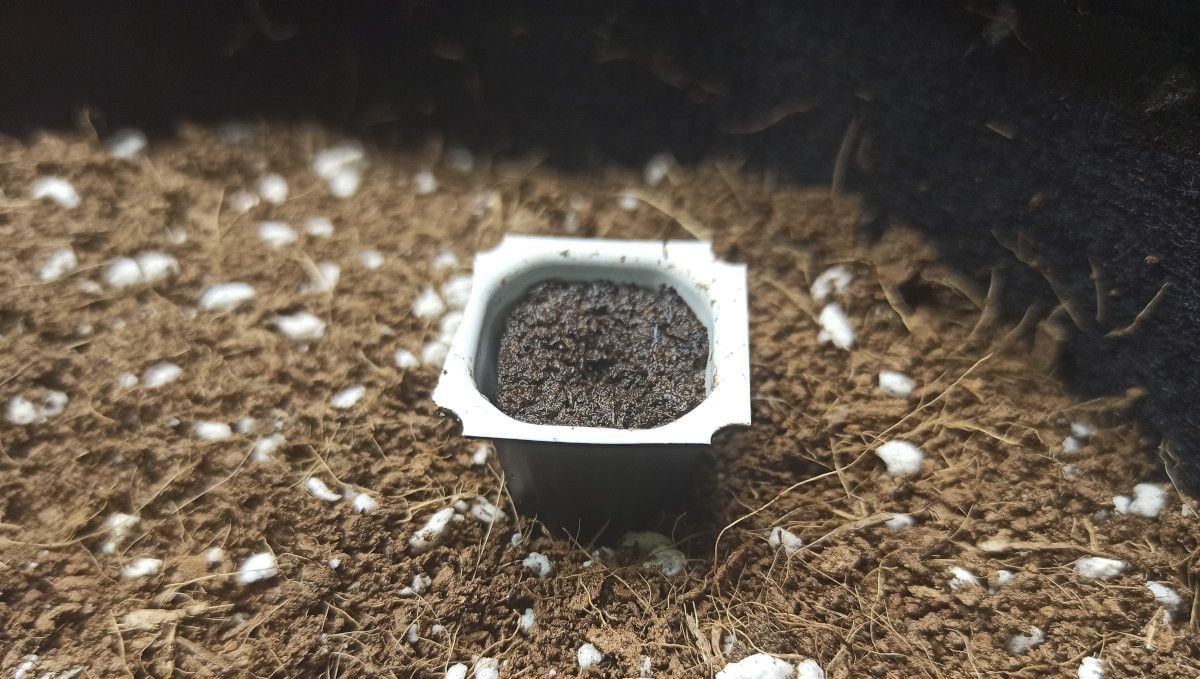
There are two approaches to planting your cannabis seeds. The first involves using a starter cup, such as a solo cup. The second method requires planting the seed directly into the final pot. Both methods have their pros and cons. The first one makes watering very easy during the first couple of weeks. The second method allows you to avoid transplant shock when later moving the seed into the final container. Choose the method that best suits your experience, dexterity, and personal gardening style.
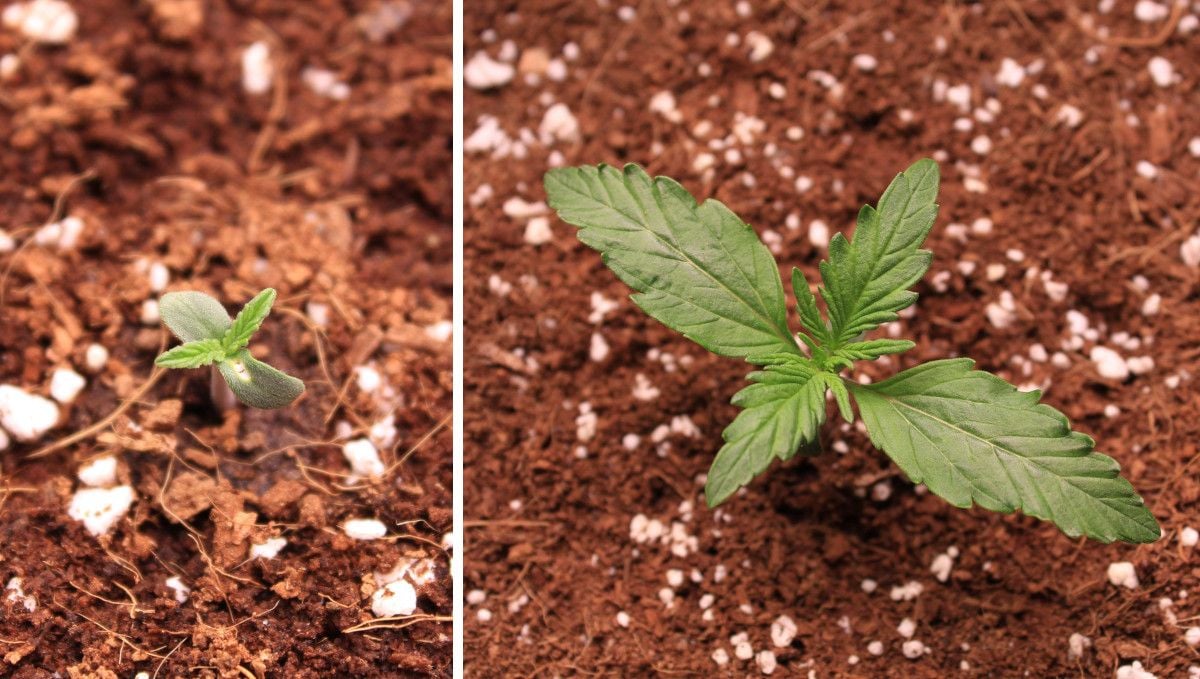
While the sprout hasn't emerged from the ground yet, you can keep it in darkness. However, once the seedling emerges, you should definitely turn on your grow light. Just make sure that the light is not placed too close to the young seedling to avoid stunting its growth, but also not too far away, as that may cause the seedling to stretch. Finding the right distance for the grow light is crucial for the healthy development of the cannabis plant.
4. Early Veg | Week 2
In week two from seed, things may still appear a little slow to you because most of the changes are happening unseen underground. The above-ground part of the plant doesn't grow too fast during this stage. At times, it may seem painfully slow. However, rest assured that if you do everything right, your precious weed seedling is fine and will seriously pick up the pace in the second half of the month. For now, just maintain the same mild conditions as in the previous week.
| Plant Height: | 5“ (13 cm) | Humidity: | 60% |
|---|---|---|---|
| Distance to Light: | 28“ (70 cm) | Water per Day: | 0.05 gal (0.2 l) |
| Day Temp: | 82°F (28°C) | pH: | 6.2 |
| Night Temp: | 72°F (22°C) | TDS: | 300 ppm |
Your main concerns right now are to keep the optimal distance between the plant and the light and to water it just the right amount and as often as the plant prefers. The watering frequency largely depends on the medium you use. The airier the medium, the less water it can retain, and the more frequent watering it requires. However, most of the time, you won't have to water your young plant more than once every few days. Unless, of course, it sits in a small solo cup – in this case, you'll probably have to water it every day.
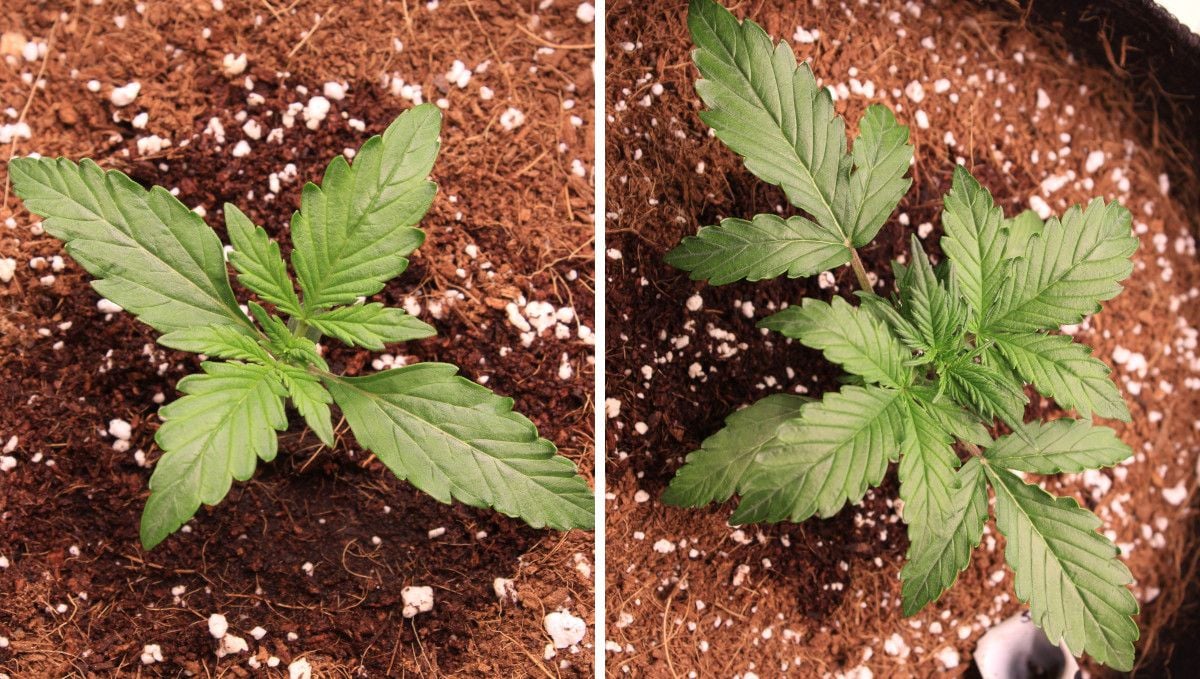
In the grow that we are following, the gardener chose coco coir – one of the most widely used mediums for cannabis cultivation. When amended with perlite, coco coir provides excellent water retention and root aeration simultaneously.
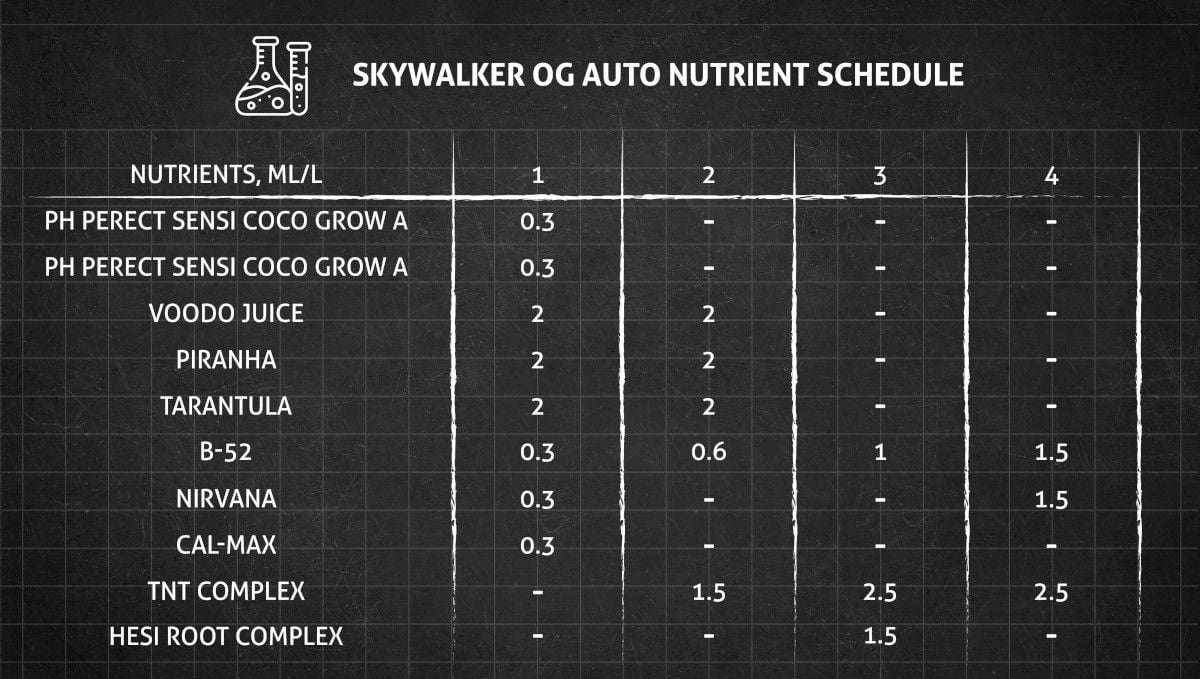
Of course, when using coco, you'll have to provide nutrients to your seedlings almost from day one. Please find below a sample feeding schedule from this grow. Actually, it needn't be so complicated. The first two staple nutrients in the table would be enough plus, of course, a Cal-Mag supplement, as calcium and magnesium are extremely important in coco grows.
If you provide your cannabis plant with just the right amount of light, water, and nutrients, it should thrive. The roots will gradually fill the entire volume of the medium, while the above-ground part of the plant will prepare for the upcoming vegetative growth explosion.
5. Mid Veg | Weeks 3-4
In weeks three and four, your cannabis plant will start growing towards the lights, effectively reducing the distance between the plant and the light source, and it's okay because the plant can handle higher light intensity now. The conditions that you kept very mild before can now be in a wider range because the plant is strong enough to tolerate a variety of environments. You may lower the temperature slightly and also decrease the relative humidity compared to the previous period.
| Plant Height: | 7-14“ (19-36 cm) | Humidity: | 60% |
|---|---|---|---|
| Distance to Light: | 20-28“ (50-70 cm) | Water per Day: | 0.21 gal (0.8 l) |
| Day Temp: | 82°F (28°C) | pH: | 6.2 |
| Night Temp: | 72°F (22°C) | TDS: | 300 ppm |
The growth of new leaves and side branches during this period can be intimidating, and owners of smaller indoor setups may begin to feel nervous. Some of them, unsure if they have enough available headspace to accommodate their growing autoflower, start to train it. Training not only helps manage the height but also creates a flat canopy, ensuring every flowering top is at the same distance from the light, receives the same amount of energy, and consequently becomes a similar size to the rest.
Over the decades, cannabis cultivators have developed a number of training techniques, some being low-stress and others high-stress. With autoflowers, we suggest sticking to low-stress training techniques as they are safer and reduce the risk of shocking the plant. However, experienced gardeners aren't afraid to top or FIM their autoflowers. If you know what you're doing, you may get away without stressing your plant.
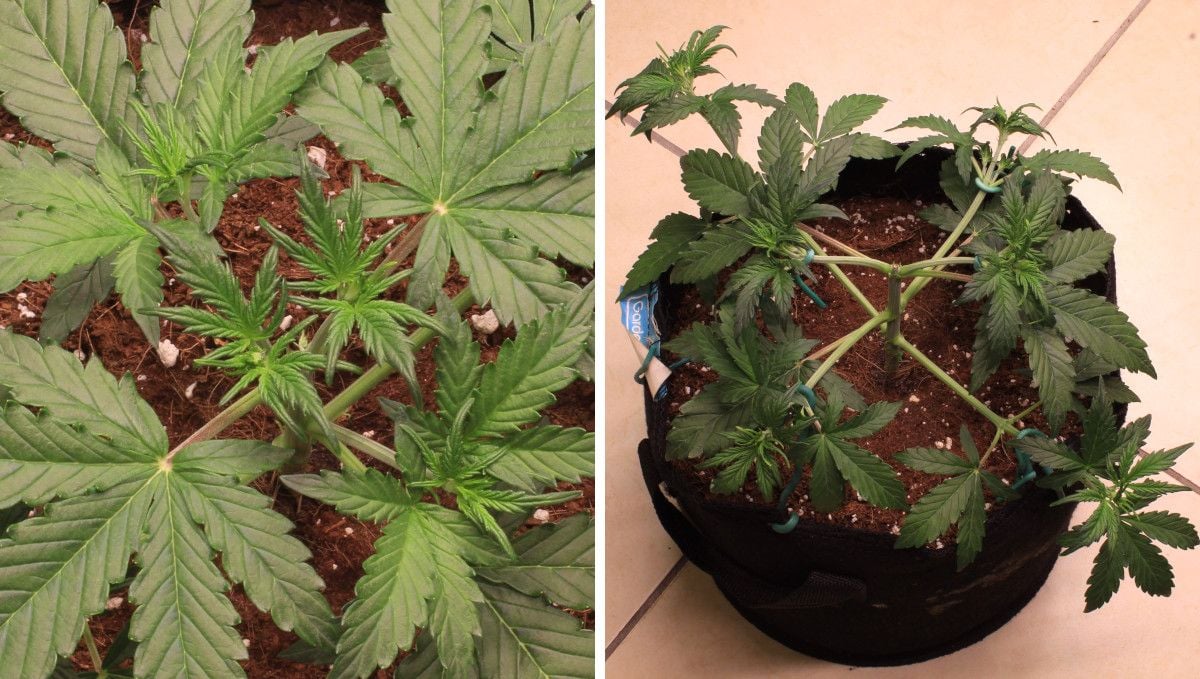
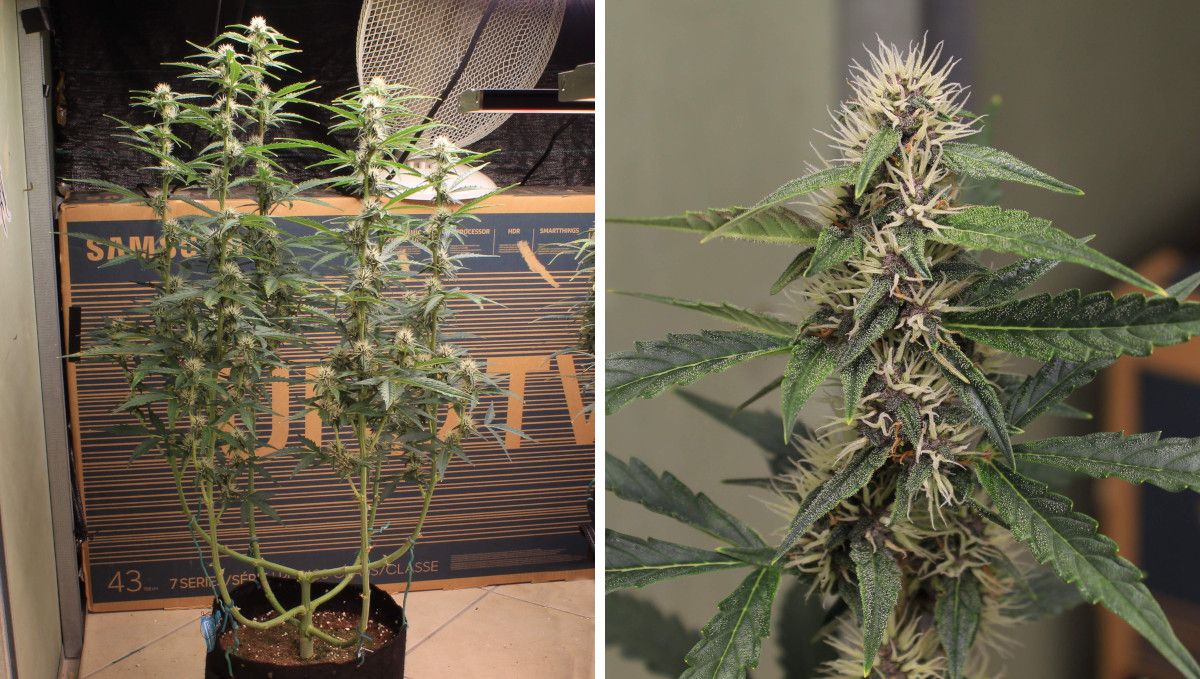
As shown in the photo above, this grower topped the main stalk of their plant to promote branching. It is doubtful that this decision led to an increase in the final yield, but the plant handled the procedure well and continued developing.
Many gardeners, especially inexperienced ones, prefer to simply bend down the branches of their autoflowers and secure them using various methods. In the photo below, you can observe how it's done with the ScrOG (Screen of Green) technique.
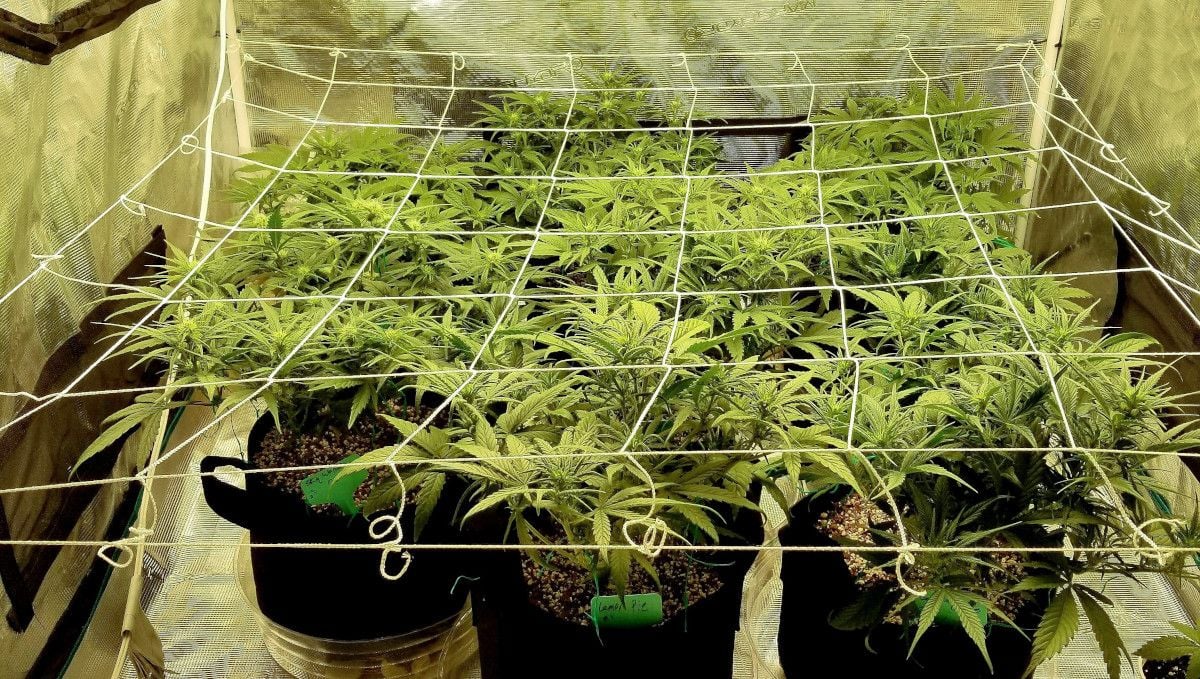
While managing the canopy, don't forget about the other needs of your plants. This is the most crucial part of the vegetative phase – when the plants develop all the branches they will use during flowering. It means that you need to make every day count and provide your plant with enough food, light, and water.
6. Transition (Pre-Flower) | Week 5
In week five from seed, not much changes in terms of the environment. However, you can consider lowering the temperature by a degree or two now that the plant is about to start flowering. Additionally, you can decrease the humidity because during the flowering stage, it doesn't need to be as high as during the seedling and vegetative phases. You don't have to adjust the light schedule either. Most autoflowers will start budding under any photoperiod, including 20/4 and 24/0.
| Plant Height: | 22“ (56 cm) | Humidity: | 50% |
|---|---|---|---|
| Distance to Light: | 16“ (40 cm) | Water per Day: | 0.26 gal (1 l) |
| Day Temp: | 82°F (28°C) | pH: | 6.2 |
| Night Temp: | 72°F (22°C) | TDS: | 1100 ppm |
The evidence that flowering has started is unmistakable. First, you will see pistils – tiny white hairs – at the middle nodes of the plant. Then, pistils will begin forming at the tops as well. At the same time, the little leaves at the tops continue to grow, but now they are very thin, almost threadlike. When the tops become fluffy with all those hairs and narrow leaves, it's a clear sign that flowering has begun.
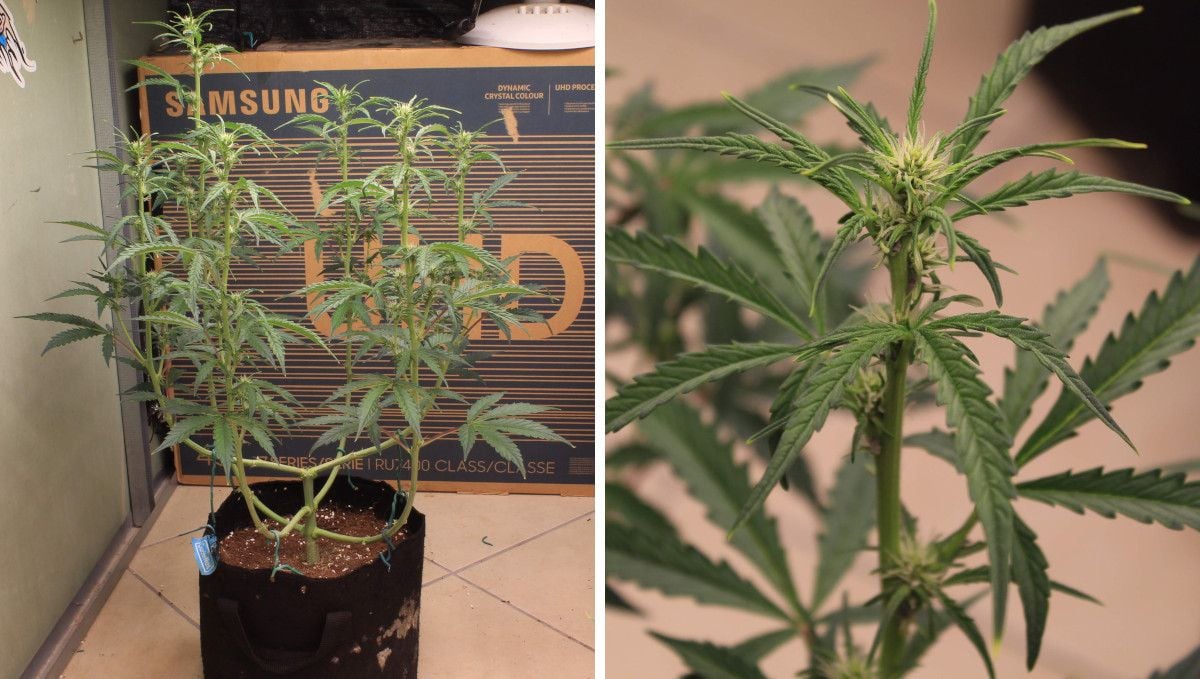
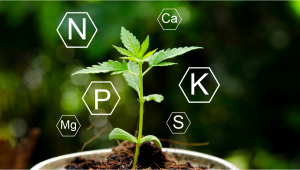
During the flowering stage, the plant's nutrient requirements change. Now, the plant needs less nitrogen (N) and more phosphorus and potassium (P and K). Although the flowers are still tiny and the plant continues to grow (stretch), it's safe to change the feeding regimen now.
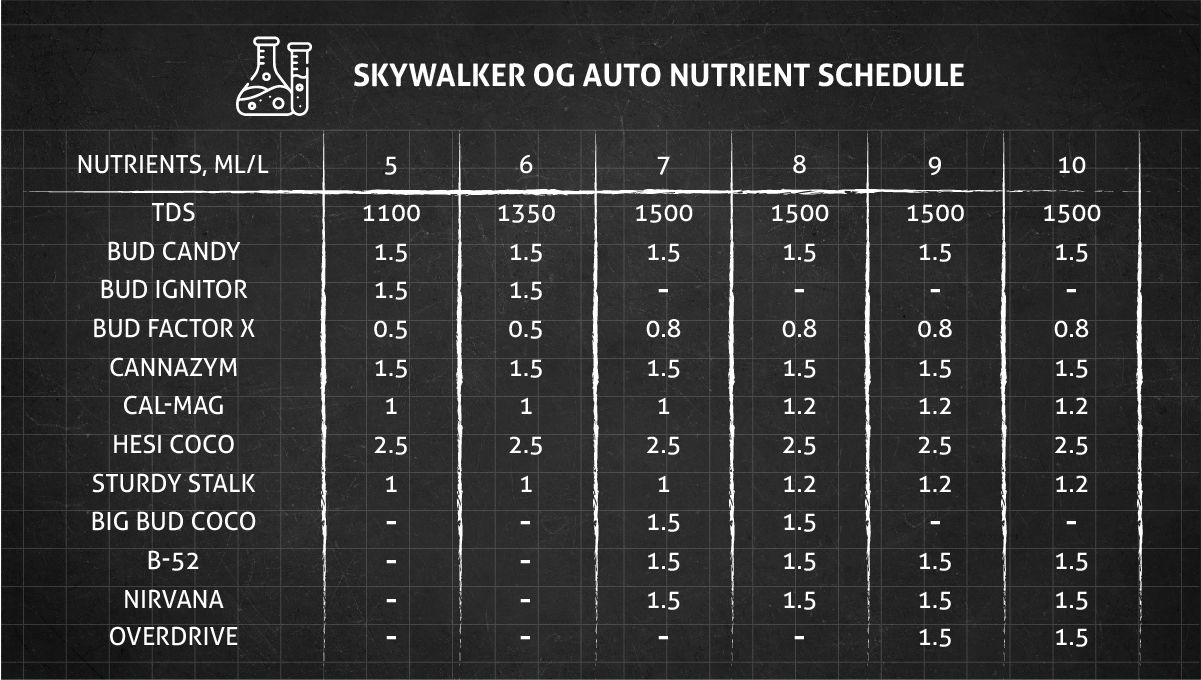
Below is another feeding schedule, this time for the flowering stage. Again, it is very sophisticated (as the gardener using it was experienced). In most cases, you can make do with just a couple of nutrients, provided that they have enough P and K, some N, and of course a healthy dose of Cal-Mag, as calcium and magnesium are needed in large quantities in coco grows.
If you looked attentively at the photo of the plant above, you must have noticed that the flowers aren't the only new thing about it. The plant has also stretched quite a bit compared to the previous period. This is called a flowering stretch, and it often catches a novice grower by surprise. Please remember that in the initial weeks of flowering, your plant can stretch by 50% or more.
7. Early Flower | Weeks 6-7
During weeks six and seven, the main development with your plants will be the stretching. The plant tops will get closer and closer to the light, but eventually, the stretch will stop, and the plant will direct all its energy towards producing bigger and fatter flowers. During this time, it will be a good idea to start gradually reducing the humidity, as well as both day and night temperatures.
| Plant Height: | 35-38“ (89-97 cm) | Humidity: | 50% |
|---|---|---|---|
| Distance to Light: | 12-16“ (30-40 cm) | Water per Day: | 0.42 gal (1.6 l) |
| Day Temp: | 82°F (28°C) | pH: | 6.2 |
| Night Temp: | 72°F (22°C) | TDS: | 1500 ppm |
A good autoflower will develop nice-sized buds even before the stretching is over. You will notice more and more white hairs forming on the tops, and the buds will start to stack up, forming long continuous colas that we all find so attractive. It's also around this time that your autoflower will begin to emit a strong aroma.
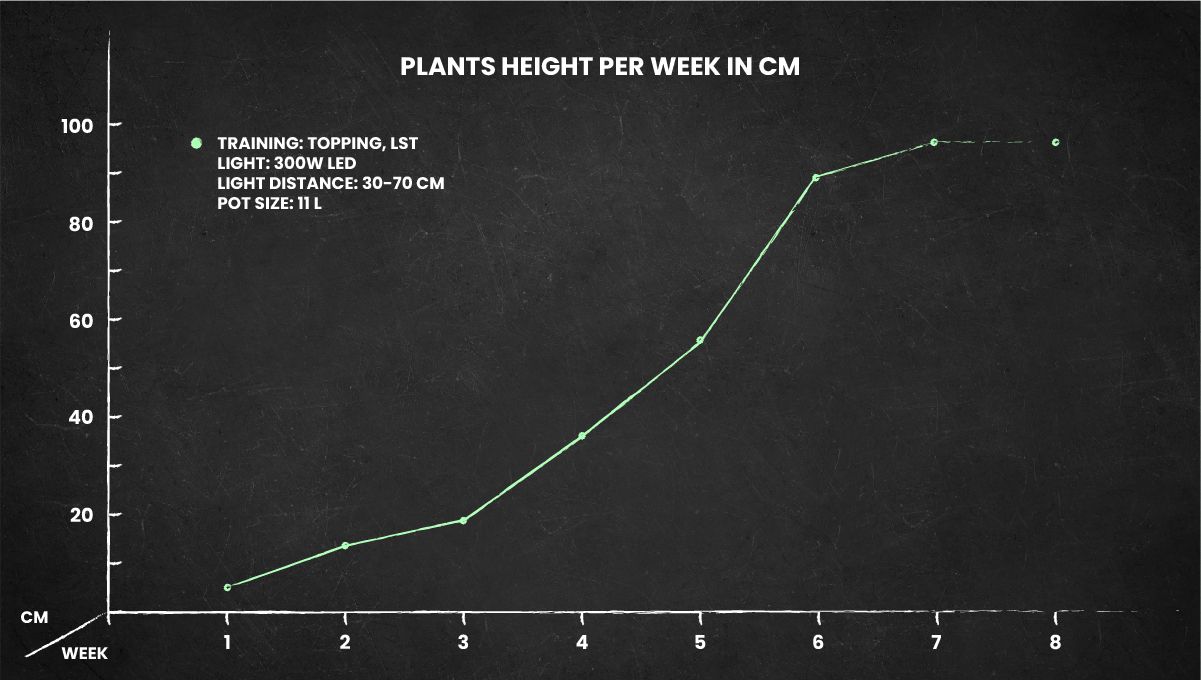
If you were feeling close to panic before, watching your plants get dangerously close to the light, you can relax now because sometime around the beginning of week eight, most autoflowers will stop all vertical growth. In the graphic below, you can see how the size of Skywalker OG Auto changed over the course of the entire grow.
8. Mid Flower (Bulk Phase) | Weeks 8-9
Weeks eight and nine from seed require certain not-so-subtle changes in the environment. Lowering the temperatures can benefit your plants as it helps conserve THC and terpenes (which don't evaporate too quickly when it's cooler). Additionally, you should definitely lower the relative humidity to around 40%, as excessively humid conditions can contribute to the emergence of mold and bud rot.
| Plant Height: | 38“ (97 cm) | Humidity: | 50% |
|---|---|---|---|
| Distance to Light: | 12“ (30 cm) | Water per Day: | 0.42 gal (1.6 l) |
| Day Temp: | 82°F (28°C) | pH: | 6.2 |
| Night Temp: | 72°F (22°C) | TDS: | 1500 ppm |
At this point in the timeline, your Skywalker OG Auto will start to look the most beautiful because the branches will stop stretching, and the plant will direct most of its energy to the fattening up of the buds. You might even wonder if it's time to 'chop' because the buds are so resinous and seemingly ready for harvest. However, hold your horses – the pistils are still white at this time, indicating that the maturation of the buds is still ongoing.
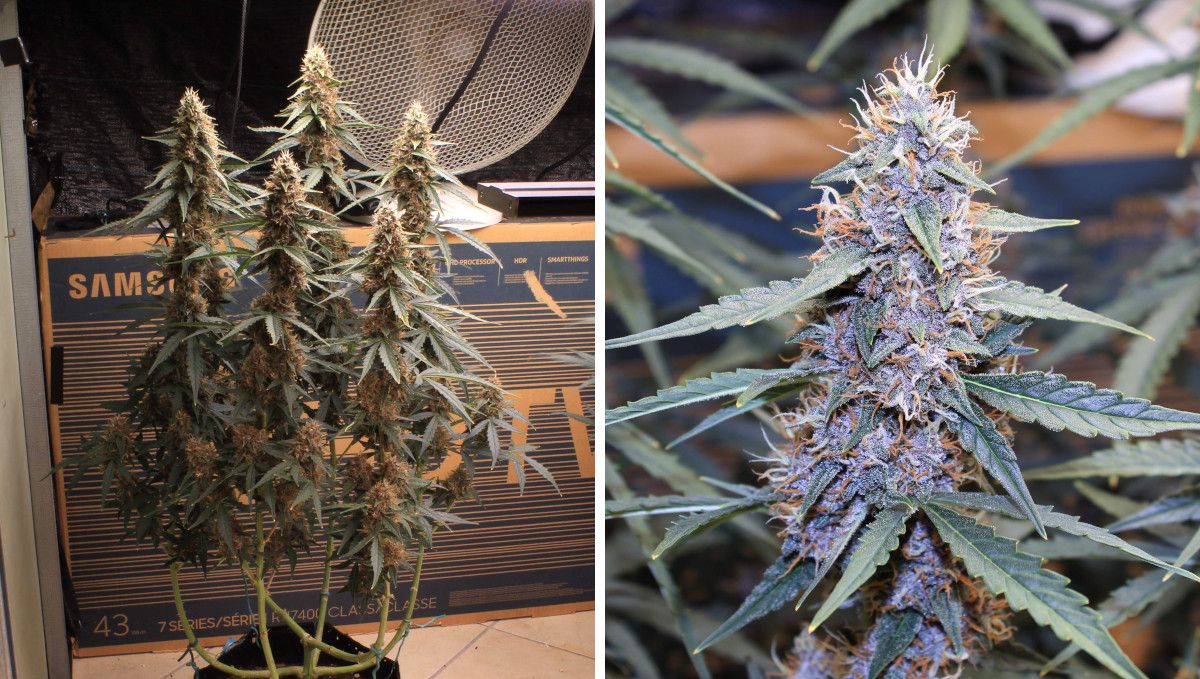
Keep in mind that with all that THC-filled resin, your plants will start to emit a really strong aroma. Even one medium-sized autoflower can produce a powerful smell that can permeate the whole place. For larger gardens with several plants, the scent can become unbearable. In this case, your only option is to install a carbon filter to effectively neutralize and remove the odor.
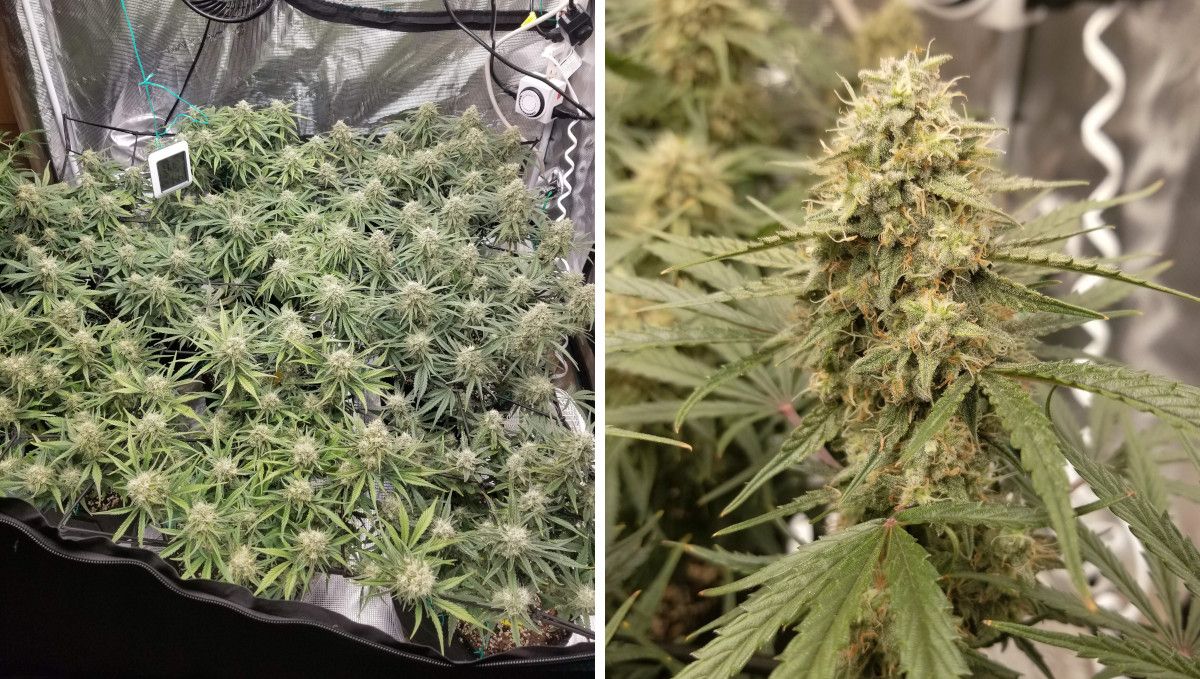
These two weeks are crucial for increasing the size and density of the buds. That's why your priority should be feeding your plants high amounts of nutrients, especially those rich in phosphorus and potassium. But as always, don't get carried away – always look for signs of overfeeding because that can do more harm than good.
9. Ripening And Harvest | Week 10 (And Beyond)
In the last week (or weeks) leading up to harvest, make sure that the relative humidity is 40% or lower to decrease the risk of fungal infections. You may also lower the night temperatures as cooler nights can lead to the emergence of beautiful purple colors in susceptible strains.
| Plant Height: | 38“ (97 cm) | Humidity: | 40% |
|---|---|---|---|
| Distance to Light: | 12“ (30 cm) | Water per Day: | 0.42 gal (1.6 l) |
| Day Temp: | 82°F (28°C) | pH: | 6.2 |
| Night Temp: | 72°F (22°C) | TDS: | 150 ppm |
As the buds mature, the white hairs covering them will gradually turn brown or orange and wither. This should be your first indicator that the harvest is fast approaching. However, this is not the most reliable sign. Any grower worth their salt has a 60x microscope at hand. Use it for trichome inspection. Trichomes are resin glands that cover calyces and little leaves growing next to them, often referred to as trim or sugar leaves.
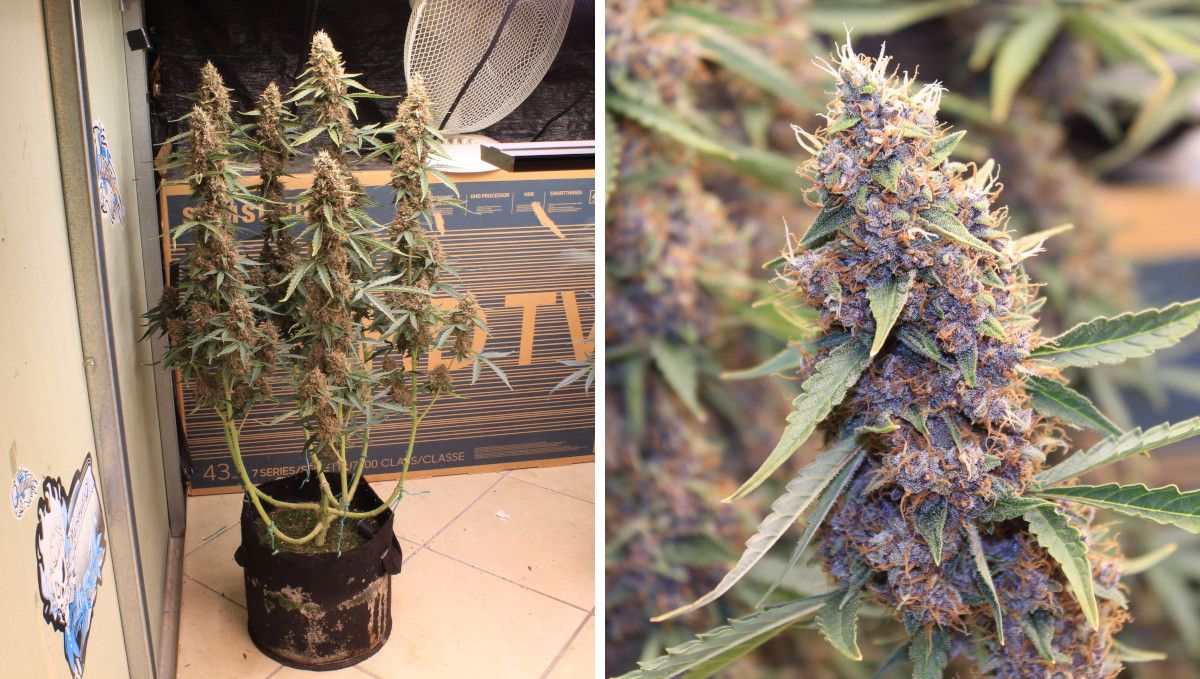
If you use a microscope powerful enough, you will see that the trichomes that used to be transparent before are now starting to turn opaque. This change indicates that they are filling up with THC and other cannabinoids. After a while, when they all look cloudy, and you may also notice some amber trichomes among them, it's the best time to cut down your plant because the THC levels are at their peak.

The challenge here is not just to wait for the peak moment but to predict it a week or two in advance, as that's when you should start flushing. By flushing, we mean giving the plant no more nutrients but only pure water. This process serves to clean the medium and the plant itself of any built-up salts, ensuring that your smoke is clean and has a powerful, natural smell.

Flushing, which takes about two weeks in soil and one week in hydroponics, will also get rid of most of the chlorophyll, making your plant appear yellow and faded towards the end. The process of getting rid of chlorophyll (with its unpleasant hay smell) will continue during the drying and curing periods. Don't neglect those steps – proper drying and curing can make a significant difference in how your smoke smells and even how potent it is.
10. Yield and Smoke Report
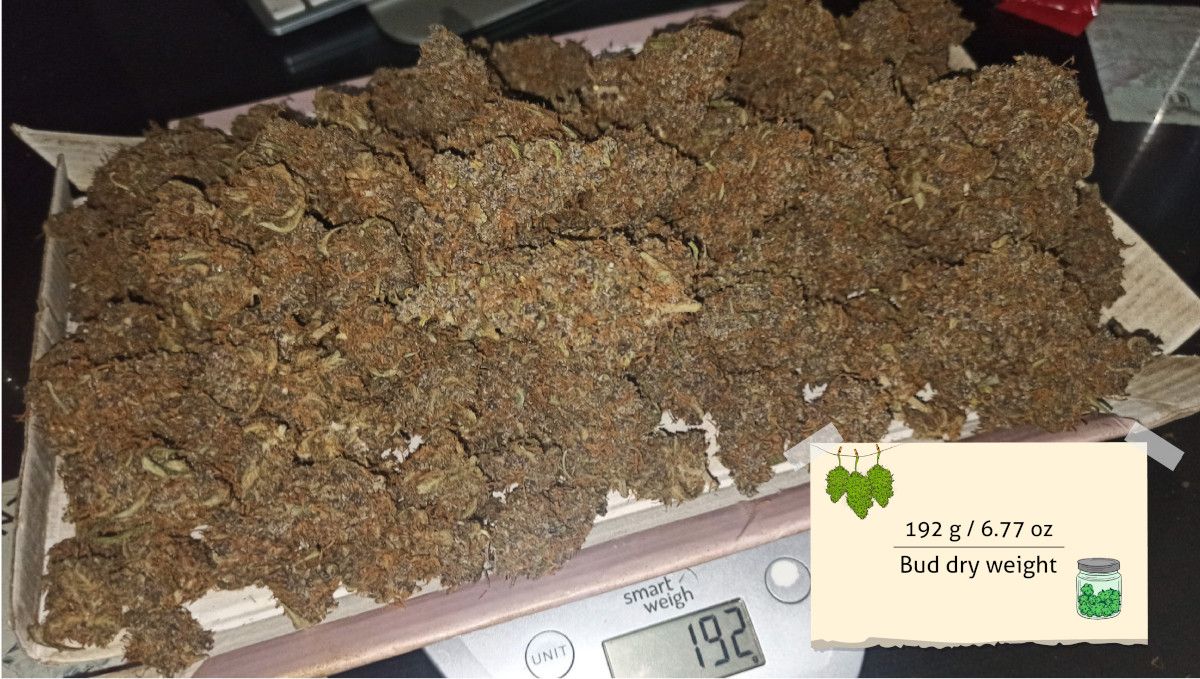
Like many cutting-edge autoflowering hybrids, Skywalker OG Auto has a great yield potential, and this gardener managed to harvest an outstanding 192g (6.77 oz) fro his one plant.
Based on the smoke reviews we've seen online, Skywalker OG Auto is a powerful and relaxing strain that can make you feel euphoric, creative, couch-locked, or sleepy. It is ideal for evening or night time use, as it can help with pain, stress, anxiety, and insomnia. It has a strong and earthy smell with hints of diesel, pine, and citrus, and a sweet and spicy taste with notes of lemon, fuel, and skunk. Beware of dry mouth, dry eyes, paranoia, or munchies as possible side effects of consuming it.
Very nice citrus taste, chill and relaxed indica high. not very strong high, but very pleasant :)
Mojo_Risin
11. In Conclusion
As we have seen in the Skywalker OG Auto grow diaries we could find, this strain is easy to cultivate, tends to grow large, and becomes bushy even without much intervention. It also tolerates high-stress training procedures but will probably be better off without them. The buds that the plant eventually produces are long, fat, and very dense, resulting in a generous harvest.
In short, Skywalker OG Auto is something you should definitely try, and we hope our week-by-week guide will help you be at your best and achieve the most spectacular results. Happy growing!






Comments