Vanilla Kush Cannabis Strain Week-by-Week Guide
- 1. Grow specifications
- 2. Grow set up
- 3. Germination and seedling stage | week 1
- 4. Early veg | week 2
- 5. Mid veg | weeks 3-4
- 6. Transition (pre-flower) | weeks 5-7
- 7. Early flower | weeks 8-10
- 8. Mid flower (bulk phase) | weeks 11-14
- 9. Ripening and harvest | weeks 15-16
- 10. Yield and smoke report
- 11. In conclusion
Vanilla Kush by Barney's Farm is a cannabis strain that is famous for its unique sweet scent of vanilla. In all other respects, it's one of the best indoor Indicas cannabis seeds - medium-sized, branchy, and high-yielding, with a strong relaxing high that is perfect for recreational smokers and medical patients alike.
In our week-by-week grow report, we'll show how Vanilla Kush can be grown in a basic and rather small indoor setup and try to glean some tips that will hopefully help you cultivate this strain the way it deserves. Our guide is based on a real-world grow that yielded 50 grams under a 100-watt light in 16 weeks.
1. Grow Specifications
Marrying native genetics of Hindukush and Kashmir, Vanilla Kush is an 80% Indica and so grows into a compact plant with multiple branches with a central cola that's not towering above the rest. Expect a height of 90-100 cm (3'-3'4") indoors and hardly more outdoors. While the outdoor yields will be proportional to this plant's modest size, indoors, you can count on bountiful harvests – up to 600 gr/m² (2 oz/ft²). And you won't have to wait long to reap these outsized rewards – Vanilla Kush usually takes about 55-60 days of 12/12 to fully mature. In the Mediterranean type of gardens, the harvest time comes sometime in the second half of September.
Like all connoisseur-quality strains, Vanilla Kush needs a proper cure of at least 3 weeks to bring out its one-of-a-kind smell and taste of sweet molasses, lavender, and vanilla. The same long cure will benefit the effects too as they'll get mellow but strong, with a happy, euphoric vibe and a lot of blissful sleepiness.
2. Grow Set Up
As an example, we have chosen a rather small amateur grow that'll hopefully serve as a source of inspiration for beginners. A grower with the nickname Faradumnezeu uses a 2'x2' (60x60 cm) grow tent which produces just enough bud for a casual smoker. Grow spaces of such small size also present some challenges with temperature and humidity control, especially in summer, and don't allow installing powerful lights (only a 100W LED in his case). Hence, the quality of buds, such as their size and density, won't be very high. Another limitation is vertical space which doesn't allow growing tall Sativas and dictates that you shouldn't veg even Indica plants for too long. Of course, these limitations don't apply if you choose autoflowers instead of photoperiod strains.
| Grow Space: | 0.34 m2 (3.66 ft2) | Pot Size: | 12 L (3.17 gal) |
|---|---|---|---|
| Seed to Harvest: | 16 weeks | Medium: | Coco |
| Flowering: | 12 weeks | Nutrients: | Advanced Nutrients, GHE |
| Light Cycle: | 18/6 → 12/12 → 11/13 | pH Levels: | 5.8-6.0 |
| Light Type: | LED | Day Temperature: | 23-26 °C |
| Watts Used: | 100W | Humidity: | 70% ↘ 50% |
3. Germination And Seedling Stage | Week 1
The grower didn't describe the way he germinated his seed but that shouldn't worry us because there are dozens of different or slightly different methods of germination and all are working. Probably the most efficient is the paper towel method where you place the seed between wet paper towels and keep them in a warm dark place until the taproot shows and get about 1 cm (a half inch) long. Then you can plant it in the medium about 1 cm deep and wait for it to break ground.
| Distance to Light: | 40 cm | Water per Day: | 1 L |
|---|---|---|---|
| Day Temp: | 26 °C | pH: | 5.8 |
| Night Temp: | 20 °C | TDS: | 600 ppm |
| Humidity: | 70% | Smell: | None |
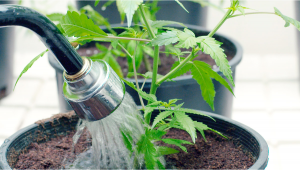
The medium in this grow was coco – not the easiest one to work with, but once you master it, it's very rewarding. You can hand water your plants in coco – the same as in soil – but you'll get even better results with frequent fertigation with an automatic drip system. That's what our grower used, and it saves you a lot of trouble. Just make sure to keep the reservoir with the nutrient solution outside the tent so that it doesn't get overheated.
Also, when using coco, better amend it with perlite (the default ratio is 70/30) because in pure coco, roots tend to suffer from water saturation and a lack of oxygen. Perlite helps you with that by providing air pockets inside the medium so that the roots can breathe even when just watered. As you'll see in this week-by-week guide, Vanilla Kush showed signs of overwatering throughout most of the vegetative phase.
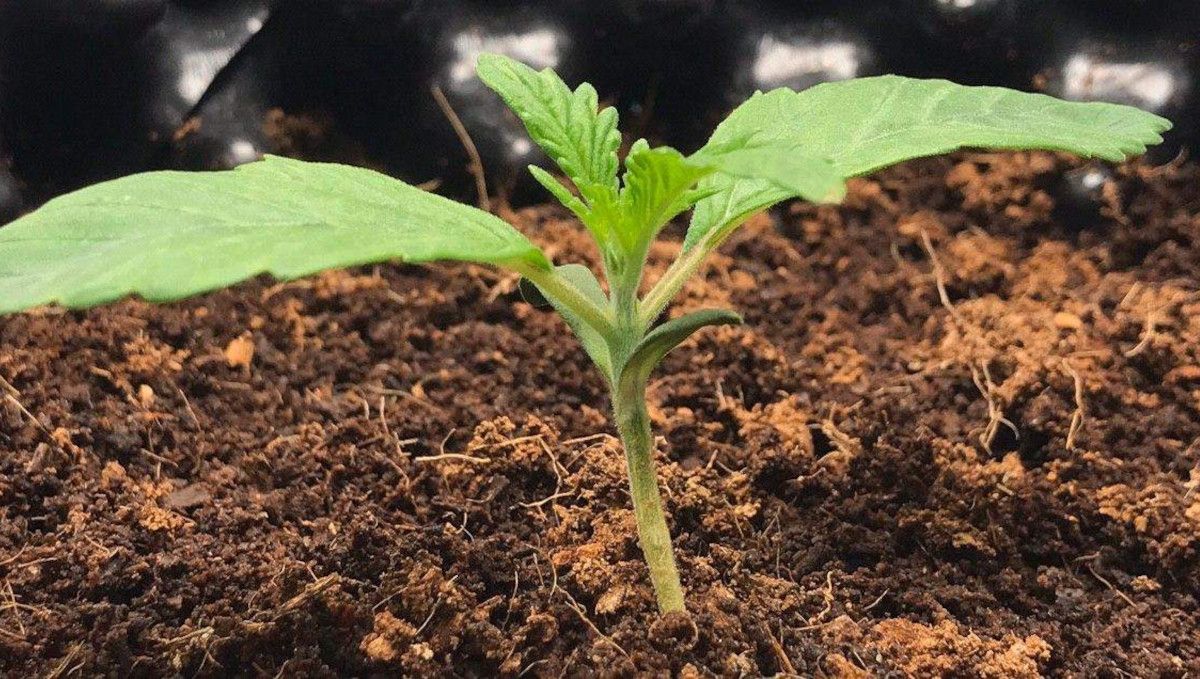
In contrast to soil, coco is a medium that has no nutrients the seedling could use. So, be sure to use them from day one. It's recommended that you pre-amend your coco with some Cal-Mag product otherwise you'll almost certainly run into deficiencies of these two nutrients. This grower didn't report doing that, but instead, he used a CalMag supplement from seed to harvest.
He was also adding two products that populate the root zone with beneficial microbes and mycorrhizae – Advanced Nutrients Tarantula and Voodoo Juice. They contribute to the growth of a healthy rootball. However, the main formula that would provide the young plant with necessary macro- and micro-nutrients was Advanced Nutrients pH Perfect Sensi Coco Grow A and B.
Advanced Nutrients is a rather pricey line, and of course, you can use many other products – those that are specifically formulated for cannabis and even those that are meant for other houseplants. Just don't forget to look at NPK figures and keep in mind that vegging plants need more nitrogen (N) while in flower you'll need another bottle where there's more phosphorus and potassium (P and K).
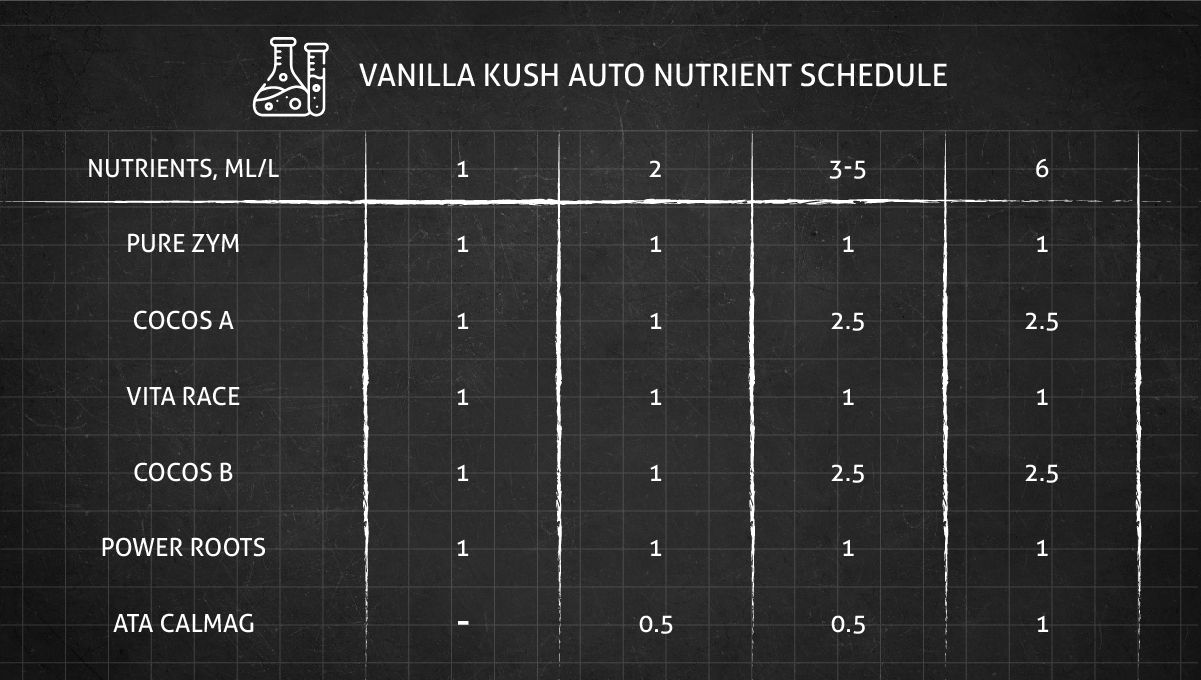
And whatever you choose, start low and slow – with something like 1/4 of the recommended dosage (as seen on the label) and see how it goes. Nursing underfed plants back to health is easy. Remedying a nute burn, deficiencies, and lockouts due to overdosing can be a nightmare. Below, you can see an even simpler feeding schedule than the one just described, but often simple solution give you the best results.
4. Early Veg | Week 2
While in week 1, you won't see much growth because the main changes are happening underground where the roots spread through the medium, in week 2, the young plant begins to develop noticeably. Your goal is to provide enough light but not too much of it so that your cannabis doesn't keep close to the ground but stretches a couple of inches. The day temperature should be mild at around 25-28 °C and the air should be relatively humid at 70% or more. The most widely used light schedule for veg is 18 hours of light and 6 hours of darkness (18/6), and be sure the night temps don't drop too much – a 5-10 degree drop is the most comfortable.
| Distance to Light: | 40 cm | Water per Day: | 1 L |
|---|---|---|---|
| Day Temp: | 26 °C | pH: | 5.8 |
| Night Temp: | 20 °C | TDS: | 700 ppm |
| Humidity: | 70% | Smell: | No smell |
If all goes well, plants develop new sets of true leaves where each new pair eventually gets bigger than the previous one. Besides, side branches begin to develop at the nodes – where a leaves' petiole attaches to the main stem. If you see side branches appear early and if they grow at a fast rate, you can be sure that your weed will be a branch one. Otherwise, you may be dealing with a single-cola pheno.
In the pic below, you can see that the fan leaves on Vanilla Kush don't look especially healthy. If not exactly 'clawing', they still show some signs of overwatering because the grower didn't bother to add perlite to coco. Also, notice that he was using the so-called airport that has 'studded' walls with holes in them. They are designed to let as much air as possible into the root zone. It would help the roots with breathing tremendously but later. For now, the leaves show that the roots are deprived of oxygen.
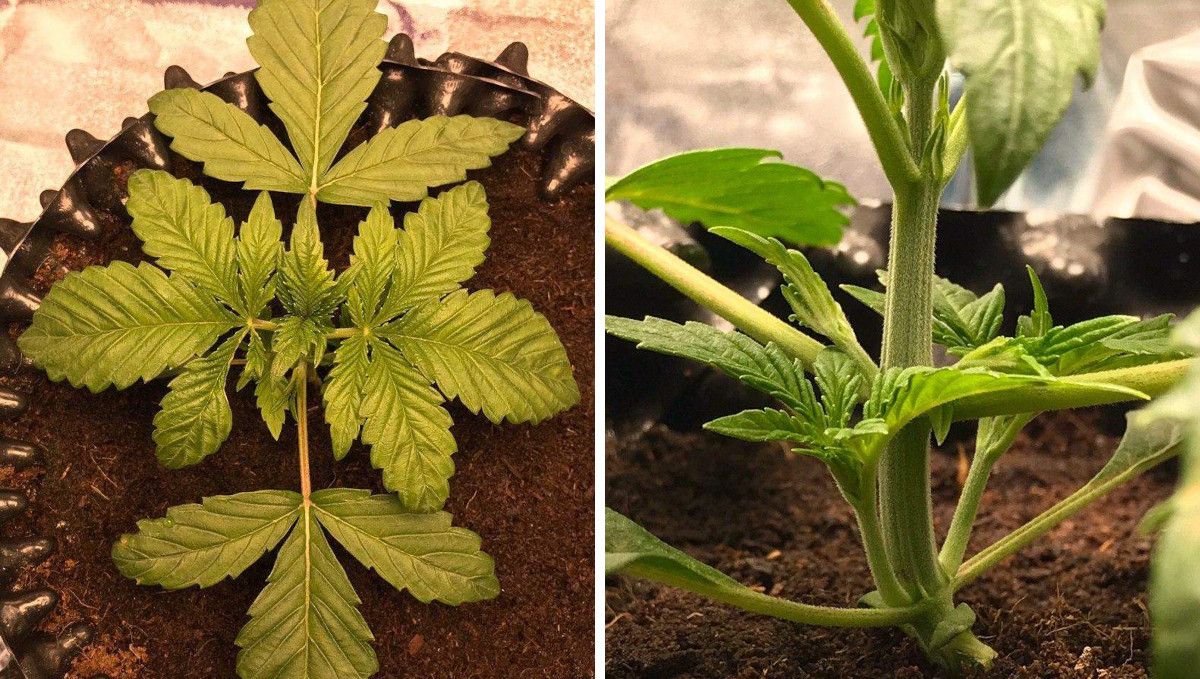
Apart from the overwatered texture of leaves, they had a healthy green color and no deficiency spots.
5. Mid Veg | Weeks 3-4
In the second half of the first month, the growth visibly ramps up so you can train your plants if you need to. The purpose of training indoors is to make sure that every future bud site is at more or less the same distance from the light and none is out of the effective range. If you let your plants stretch uncontrollably, the top buds will receive enough or too much light but the lowers won't get enough and will remain subpar in size and density.
| Distance to Light: | 40-45 cm | Water per Day: | 2-6 L |
|---|---|---|---|
| Day Temp: | 26 ↘ 23 °C | pH: | 5.8 |
| Night Temp: | 20 °C | TDS: | 760 650 ppm |
| Humidity: | 50% | Smell: | None → Normal |
There are two types of training – high-stress (HST) and low-stress (LST) – and photoperiod genetics, such as Vanilla Kush, are compatible with both. The thing is that even if they undergo high-stress procedures, get shocked, and stop growing, you can give them as much time to recover as they need. There's no rush.
So, in this grow, Vanilla Kush was topped, which is definitely HST but was strong enough to take it in stride. She just kept producing more and more branches and looked lush and healthy. The grower then proceeded with LST – tying down the branches with rubber bands – to keep the canopy as flat as possible.
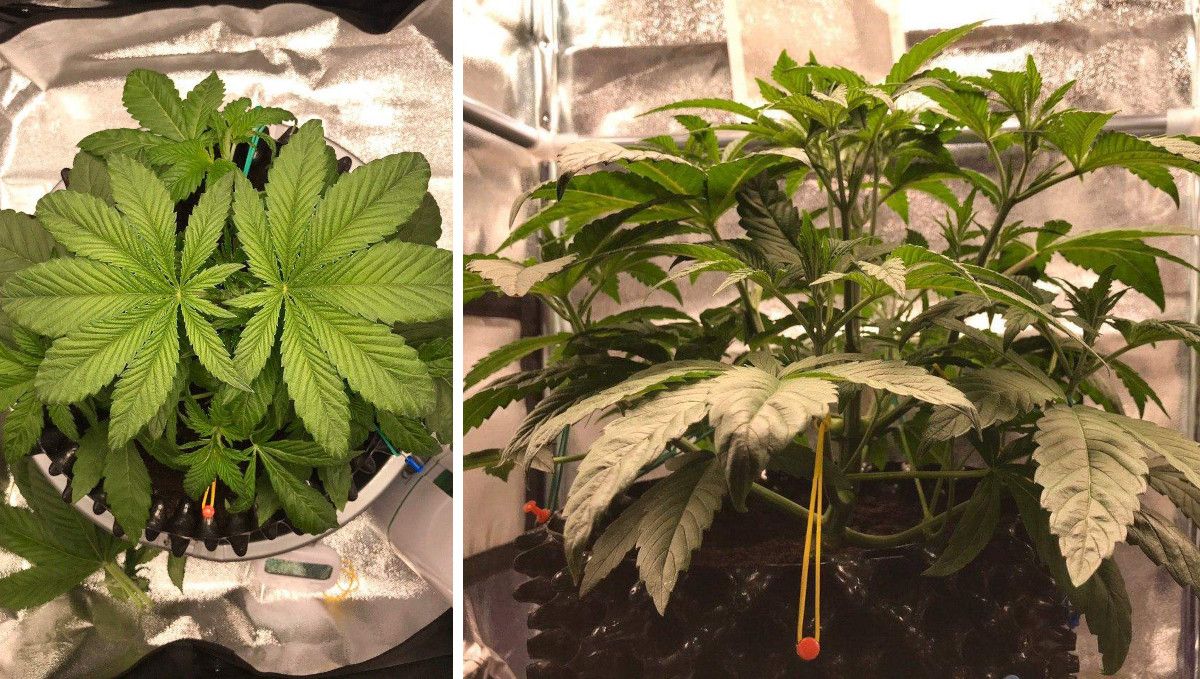
A mature vegging plant isn't so vulnerable anymore, so you can lower the relative humidity to something like 50% as this gardener did. The day temp also dropped (by 2 degrees), but we don't know whether it was intentional or not. Generally, it's recommended to lower the temps a little in mid- to late-flower.
6. Transition (Pre-Flower) | Weeks 5-7
Making a photoperiod plant flower is easy. You just change the light schedule from whatever it was (e.g. 18/6) to 12/12 and make sure that the 12 hours of darkness are uninterrupted. This means no surprise visits from you during the dark period (with turning on the lights or even a flashlight on your phone) and no light leaks through cracks and little holes from the outside.
| Distance to Light: | 45 ↘ 20 cm | Water per Day: | 6 ↘ 5 L |
|---|---|---|---|
| Day Temp: | 23 °C | pH: | 5.8-6 |
| Night Temp: | 20 °C | TDS: | 650-800 ppm |
| Humidity: | 50% | Smell: | Normal |
At the same time as he changed the light schedule, the grower did some radical training – he installed a ScrOG (screen-of-green) net and heavily defoliated his Vanilla Kush by removing almost all large fan leaves.
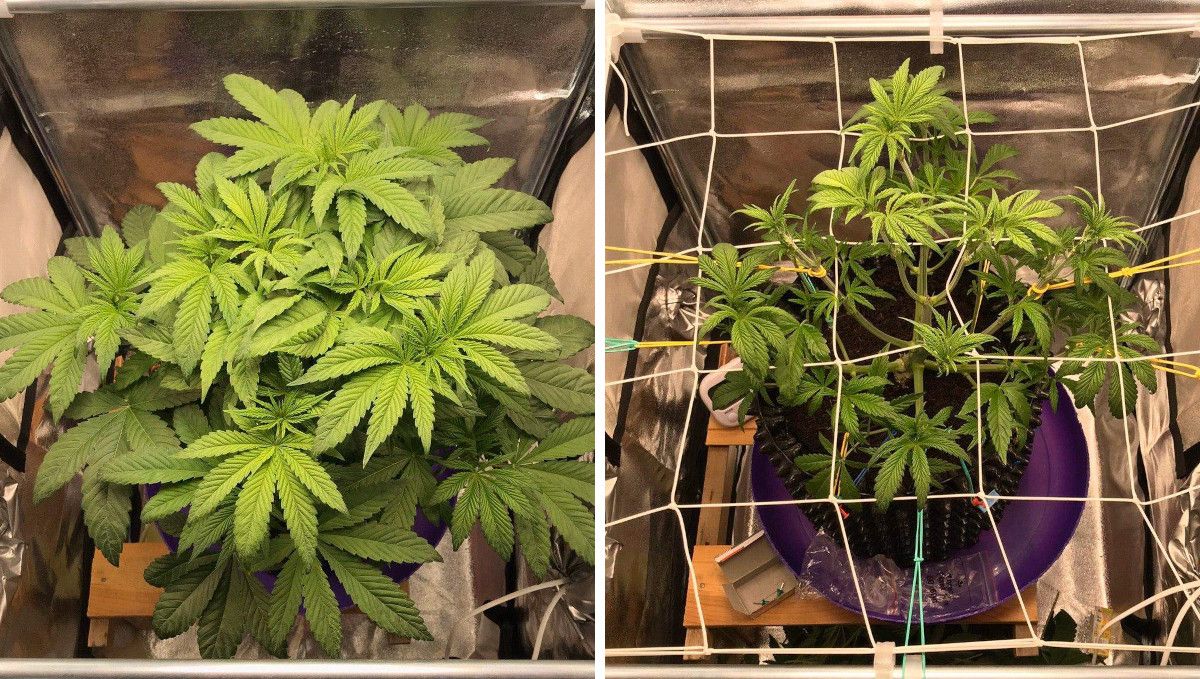
In case you're wondering, ScrOG serves two functions: 1) it lets you direct the growth of your cannabis sideways by tucking the faster-growing tops under the net, 2) it provides support for branches when they carry all those heavy buds in the last week of the flowering stage and tend to bend or even snap. As for heavy defoliation, the jury's still out on whether it's an effective method. Some growers swear that it automatically increases production. Others say you shouldn't remove leaves unless they create shade for future buds or prevent adequate air movement.
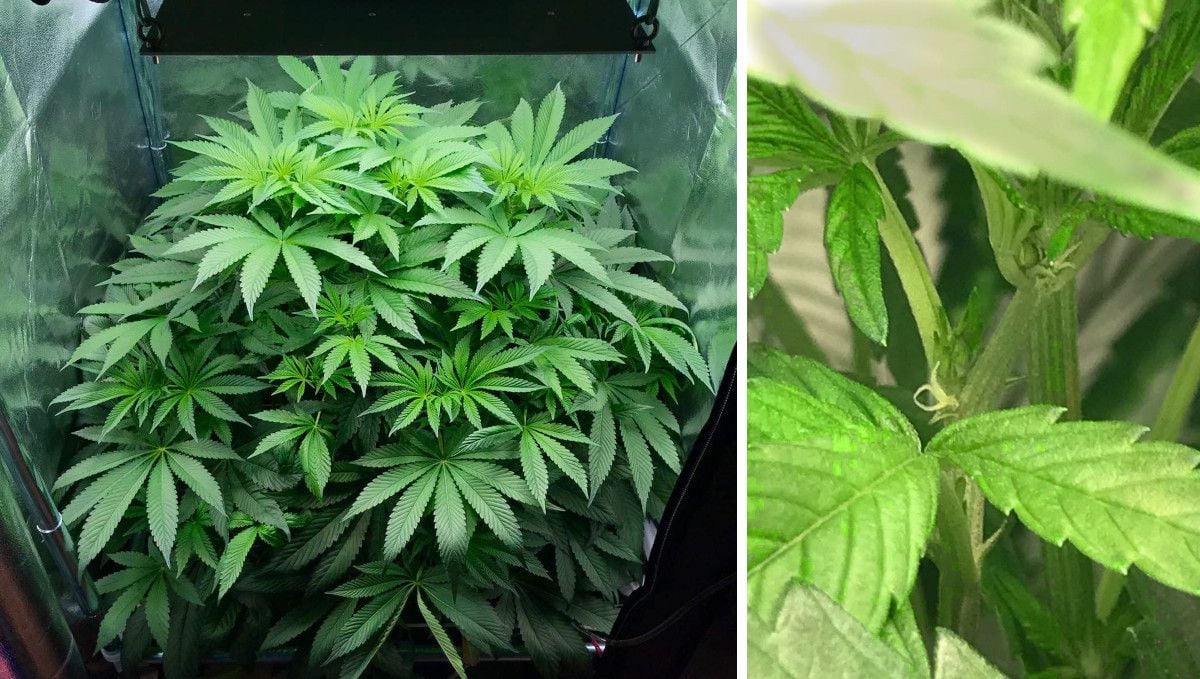
The transition to flowering usually happens within a week of 12/12, but for that, the weed plant needs to be mature. You can see that it is when you notice the first female pistils (pre-flowers) at some of the nodes. If the plant is still too young, switching to 12/12 won't jump-start the budding right away. In this grow, it took at least three weeks of 12/12 for the emergence of pre-flowers, not even proper buds. It's unusually long. Maybe the reason was light leaks or other disruptions to the light schedule.
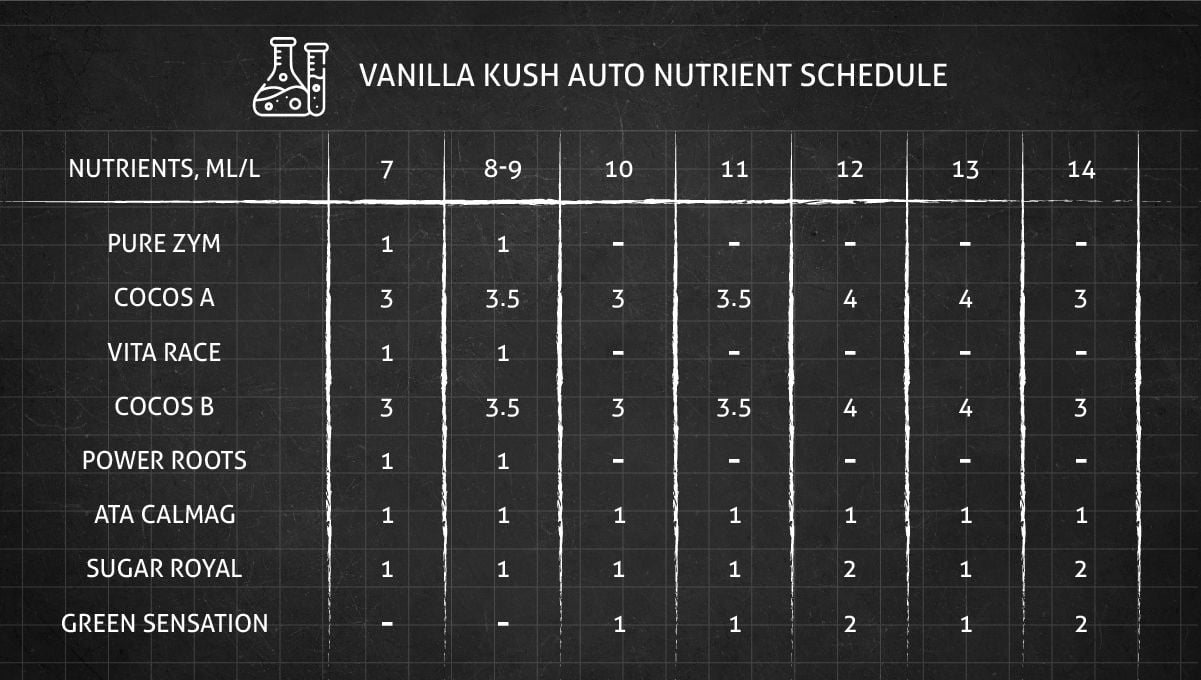
Of course, when the flowering kicks in, you'll need to change the feeding schedule by changing the ratio of nutrients from N to P and K because P and K are more important for the development of flowers and too much N is even detrimental. In this grow cycle, the gardener used the following products by Advanced Nutrients:
- pH Perfect Sensi Coco Bloom A and B
- B-52
- Big Bud Coco
- Bud Candy
While the first one in the list is the staple nutrient that provides cannabis with the essentials, the rest make sure developing buds get their subtler needs covered and grow big and rich in cannabinoids and terpenes alike. You can also look at the chart below - it uses different products but is also quite effective.
7. Early Flower | Weeks 8-10
At the beginning of the flowering stage, your goal as a grower is to control the rapid spurt in growth called the flowering stretch because this is the time when cannabis gets 1.5-3 times taller. Other than that, make sure every bud site gets enough light and isn't shaded by fan leaves, and if some buds are too far down, lag behind, and look underdeveloped, better remove them. This is called lollipopping and is a powerful tool to direct plant's resources to the top growth where they matter most.
| Distance to Light: | 20 cm | Water per Day: | 5 L |
|---|---|---|---|
| Day Temp: | 23 °C | pH: | 6.0 |
| Night Temp: | 20 °C | TDS: | 800 ppm |
| Humidity: | 50% | Smell: | Normal |
As soon as the grower noticed pre-flowers, he did a high-stress procedure known as 'schwazzing'. It's a radical removal of most of the foliage. You can see in the pic below what it means. If you ever decide to do the same, remember that every leaf is a source of energy and when you cut so many of them, provide alternative energy in the form of plant food. The author of the schwazzing technique suggests using black-strap molasses as a rich source of sugars.
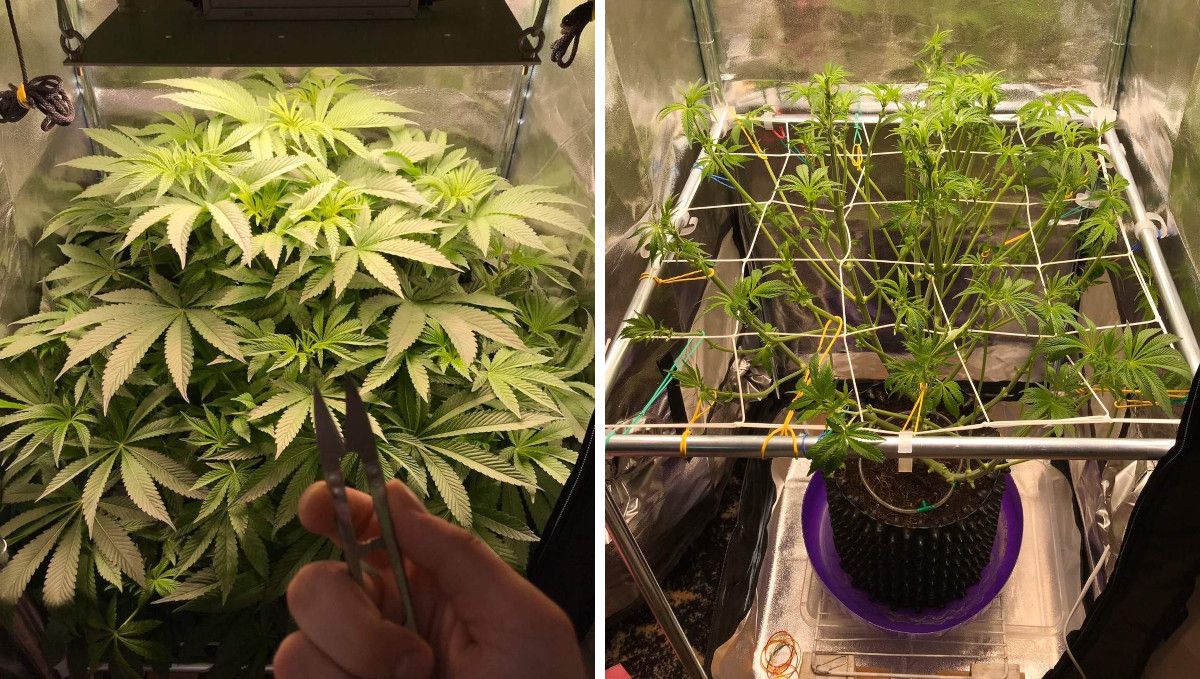
In the pic below, you can see the flowering stretch in action. It's generally not advisable to grow stretchy plants indoors because the lights are usually too weak to reach all the way down and you'll have to discard most of the lower growth. Besides, the plant spends too much energy on the transport of nutrients along drawn-out branches. All this affects your final yields. So, whenever possible, maintain compact plants through the timing of veg, training, and the placement of lights at a correct distance.
In weeks 4-6 since the start of 12/12, Vanilla Kush started to flower but very slowly, so the grower cut down the light schedule to 11/13. People seldom do this and usually only when there are issues with the normal flowering process. It's believed that 11/13 not only speeds up the budding but also leads to the expression of Sativa traits in your cannabis.
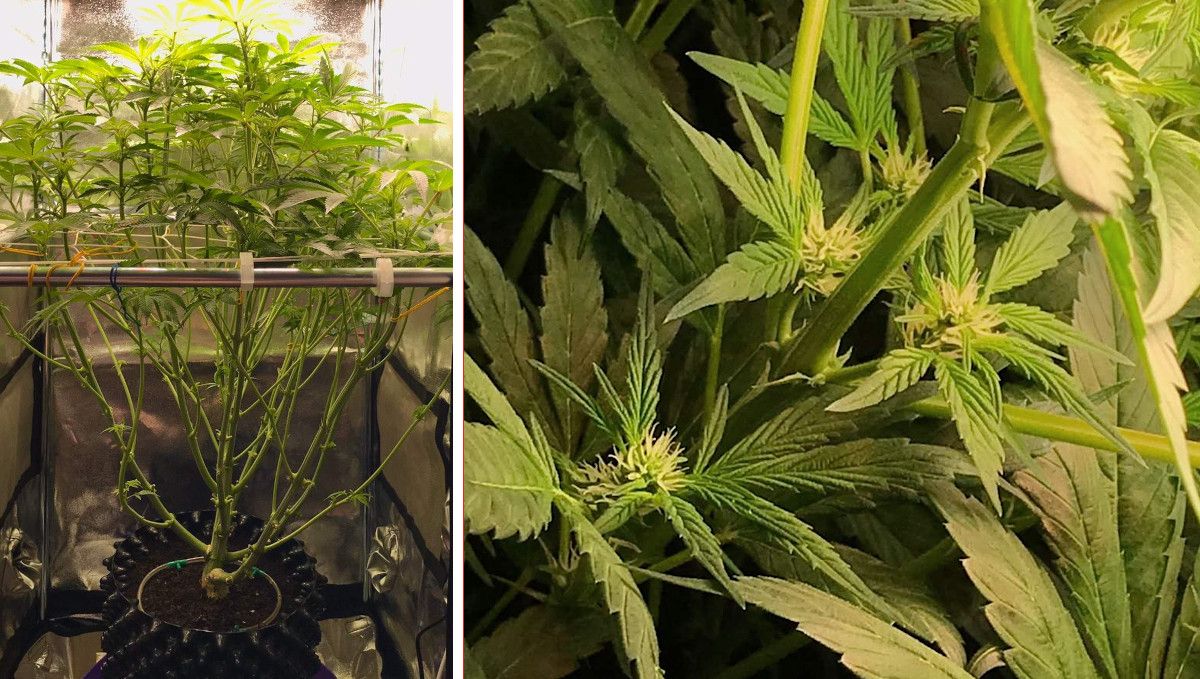
When looking at the photo above, please also note that in ScrOG, everything below the screen gets removed. If something doesn't make the canopy, it's useless to you. It only interferes with ventilation and invites mold.
8. Mid Flower (Bulk Phase) | Weeks 11-14
Two things happen in mid-flower: 1) buds start to stack up, filling the gaps between nodes, and 2) the trichomes begin to form on flower calyces and adjacent leaves. By this time, the plant has reached its final size and you've finished your daily struggle to keep the stretch under control. Now, the only thing left for you to do is keep fertigating your lady, watch for signs of deficiencies, and maybe remove a leaf or two that's shading the lower growth.
| Distance to Light: | 20 cm | Water per Day: | 5 L |
|---|---|---|---|
| Day Temp: | 23 °C | pH: | 6.0 |
| Night Temp: | 20 °C | TDS: | 800 |
| Humidity: | 50% | Smell: | Normal |
Whether it was the switch to 11/13 or just the time was ripe, Vanilla Kush finally started to fill out, albeit still slowly, and started to put on quite a thick coat of trichomes – tiny glands that contain THC and other cannabinoids as well as terpenes.
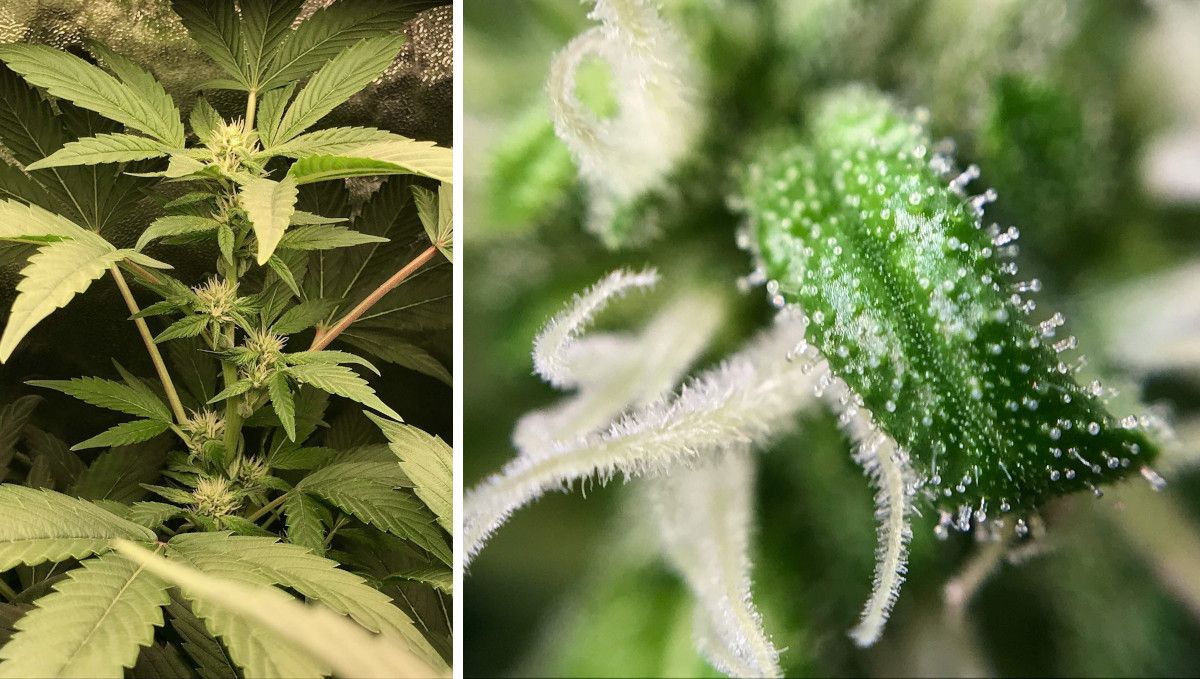
The budding accelerated by the 10th week of 12/12 as you can see in the pic below. However, please note the vivid green color on most of the leaves. It might be a sign that Vanilla Kush was getting more plant food, especially that rich in nitrogen, than it was good for her. It's better when cannabis is a bit starved for N in late flower – this accelerates the fade and promotes the fattening of the colas. As for phosphorus and potassium (P and K), the demand for those is at its peak now. Most growers use special PK-rich formulas during this phase. This grower chose General Hydroponics Ripen.
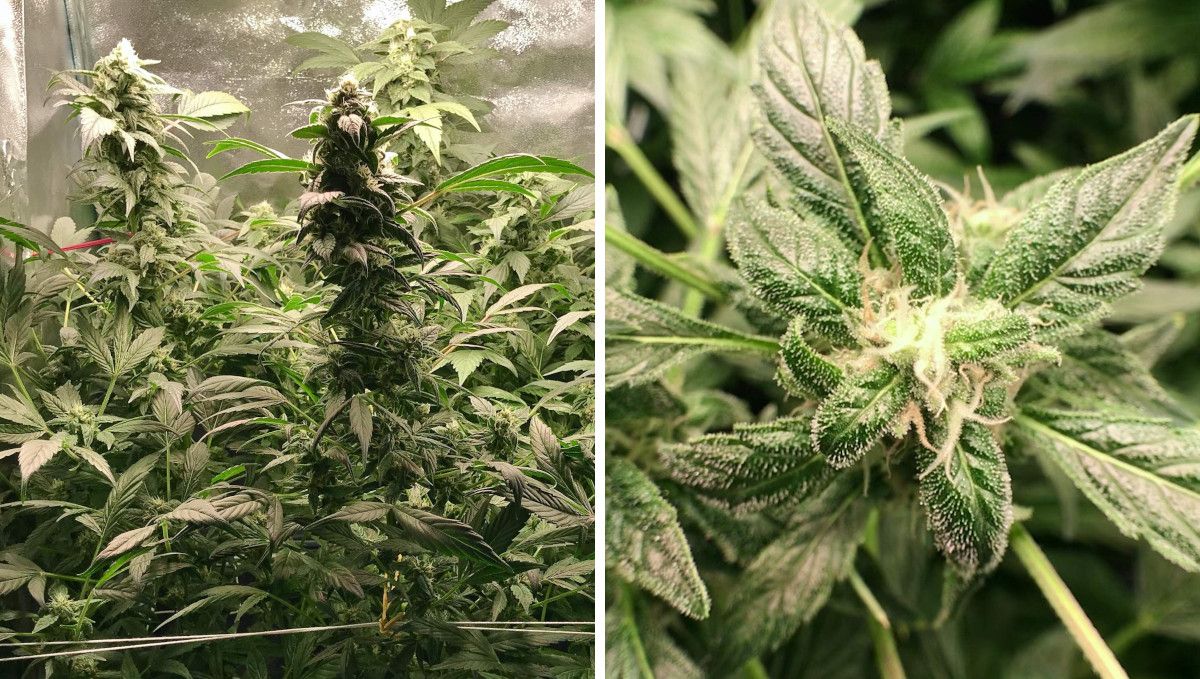
The buds looked more and more as if they'd be ready soon, but most of their pistils were still white. In hopes of making the flowers bulk up more, the grower gave them Advanced Nutrients Nirvana which offers a blend of kelp and alfalfa and promotes budding by strengthening the stalks (which transport nutrients where they're needed).
9. Ripening And Harvest | Weeks 15-16
When the buds start to fill out and you notice that some of the pistils that have been white before turn orange, it's time to prepare for the harvest. The main thing is not to miss the perfect window to start flushing your plants. The only way to know for sure is to watch the state of trichomes through a jeweler's loupe. Trichomes start out clear, then – as they store up more and more THC and other cannabinoids – they turn cloudy. Finally, they change their color to amber, which means that cannabinoids have begun to degrade. So, when most of the trichomes on your flowers are cloudy, with a few clears left, start with the final flush.
| Distance to Light: | 20 cm | Water per Day: | 5 L |
|---|---|---|---|
| Day Temp: | 23 | pH: | 6.0 |
| Night Temp: | 20 | TDS: | 800 ppm |
| Humidity: | 50% | Smell: | Normal |
For flushing, many growers use just plain water and give their plants regular amounts of it. Others increase the volume of watering several times and add special products, such as Advanced Nutrients Flawless Finish that this grower used. In any case, the purpose of flushing is to cleanse the medium of any built-up salts and make your weed utilize the remainder of nutrients stored in its tissues - roots, stalks, leaves, etc. This makes your smoke so much cleaner, smoother, and more flavorful and takes about two weeks in soil and one week in a hydro setup, including coco.
Despite the flush-induced starvation, cannabis keeps beefing up in the final weeks leading to harvest, so never rush it. Inexperienced gardeners often chop their weed plants too early and harvest less bud than they could have. In this case, Vanilla Kush colas didn't grow much toward the end – weak lights have their limitations.
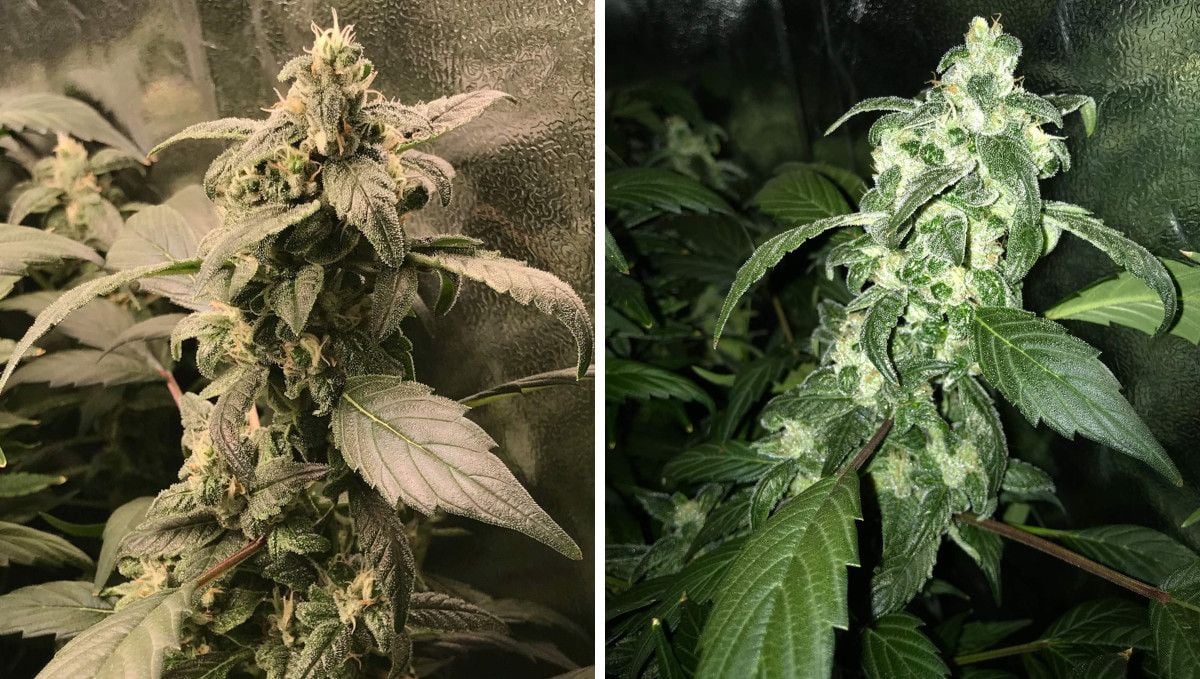
In the photo above, Vanilla Kush buds don't look especially ripe – with the intense green color of the leaves and the white color of some of the pistils – but the microscope says they're ready, so it's the best time to call it a day.
10. Yield and Smoke Report
Though not spectacular, the yield from this one Vanilla Kush wasn't bad – 50g (1.76 oz) of dry bud. With a 100W LED light, it means exactly 0.5 grams per watt. While the Holy Grail of experienced growers is 1 g/W, very few of us actually get such a result, and half of that is also quite good.
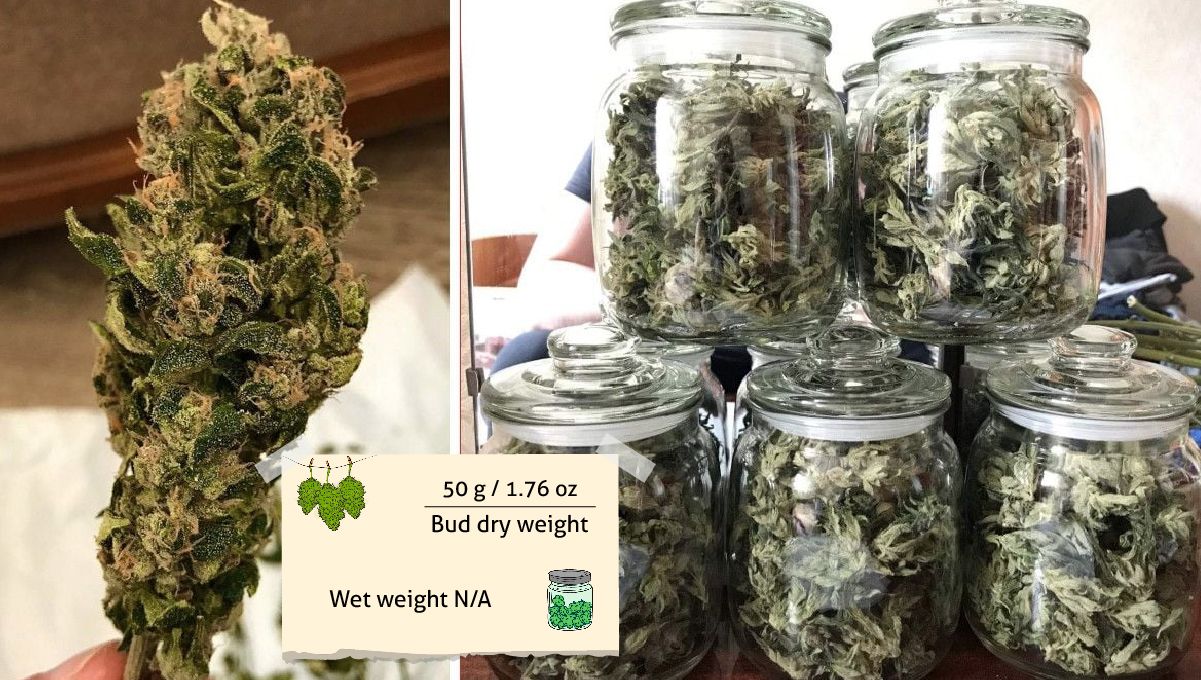
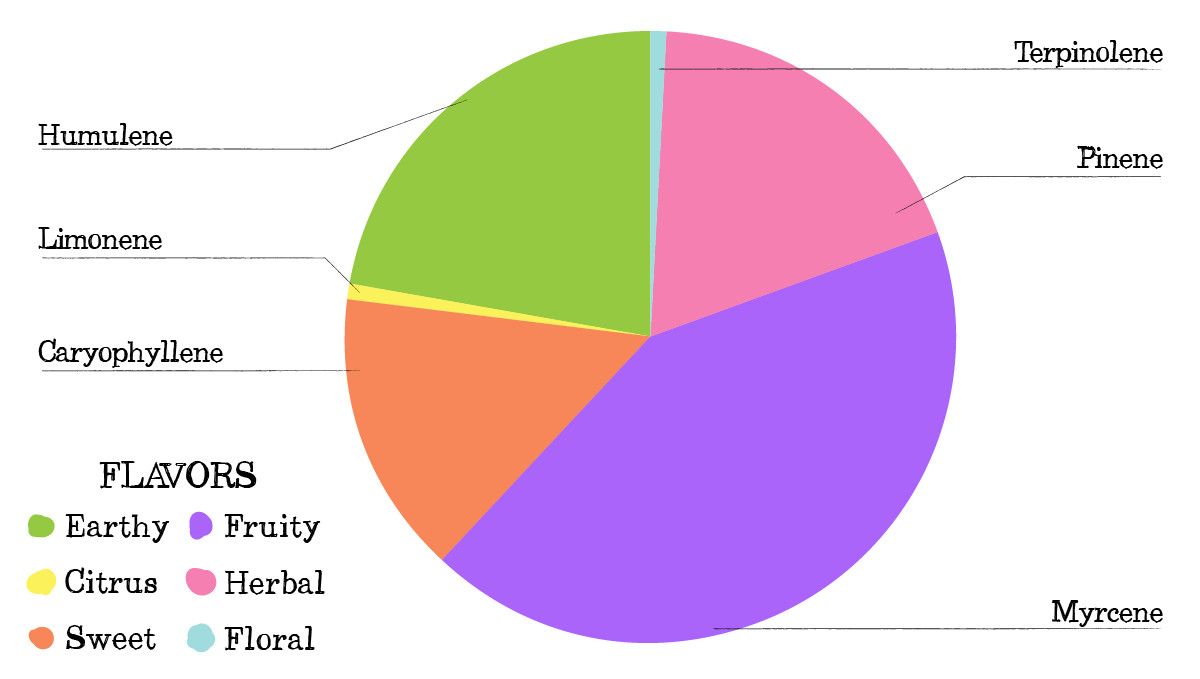
The buds weren't big or solid enough to trim them very closely – that would leave too little to smoke – so the grower kept more trim leaves than normal. He liked the final product enough to give it a 10/10 rating, noting its pleasant flavor of tropical fruit, pine, and herbs and a relaxing and euphoric 100% Indica stone. He admitted to making many rookie mistakes but wasn't too hard on himself since this was his very first grow cycle.
11. In Conclusion
As we witnessed in this grow report, Vanilla Kush is a strain of weed that is totally beginner-friendly. The plant was vigorous and strong right from the start and didn't skip a beat despite all the abuse that the grower exposed her to. She was exceptionally branchy which is a good thing indoors where you can get medium-size plants with a flat canopy and multiple tops exposed to the same amount of light. Use powerful lights if you want above-average results and don't let light leaks compromise the process of flowering. Happy growing!





Comments