Super Lemon Haze Auto Cannabis Strain Week-by-Week Guide
- 1. Grow specifications
- 2. Grow set up
- 3. Germination and seedling stage | week 1
- 4. Early veg | week 2
- 5. Mid veg | weeks 3-4
- 6. Transition (pre-flower) | week 5
- 7. Early flower | weeks 6-7
- 8. Mid flower (bulk phase) | weeks 8-9
- 9. Ripening and harvest | week 10 (and beyond)
- 10. Yield and smoke report
- 11. In conclusion
Super Lemon Haze Auto is a legendary strain celebrated in the cannabis world for good reason. Its blend of Lemon Skunk and Super Silver Haze genetics creates a harmonious union of strength and flavor. For growers, it's a robust, Christmas-tree-shaped plant with vigorous growth and resin-covered, compact flowers. Its taste is a delightful fusion of citrusy lemon and Haze, making it one of the finest-tasting Sativa strains ever. Smokers appreciate its immediate, powerful effects that combine the best of Indica and Sativa, delivering a long-lasting, creative high. All this makes Super Lemon Haze Auto a must-try for those seeking a premium cannabis experience.
Our Super Lemon Haze Auto week-by-week grow guide serves a simple purpose – to show you how easy it is to cultivate this autoflower if only you know its timeline and its various needs during different stages of growing.
1. Grow Specifications
The genetics of Super Lemon Haze Auto, this marvel in the world of cannabis, consists of 50% Sativa, 30% Indica, and a touch of Ruderalis, making it a truly balanced strain.
In terms of growth, it's a versatile delight. Indoors, it flowers in just 7 weeks, yielding up to 500 gr/m². Plus, you have flexibility in lighting with a photoperiod between 12 to 18 hours. The total crop time is a mere 9 weeks. Outdoors, it shines with a 7-week flowering period, producing 70-80 gr/plant. This medium-short plant, with its good branching, reaches a total height of 80-100 cm. And the best part is that it can be cultivated year-round, as long as the temperature remains above 10°C.
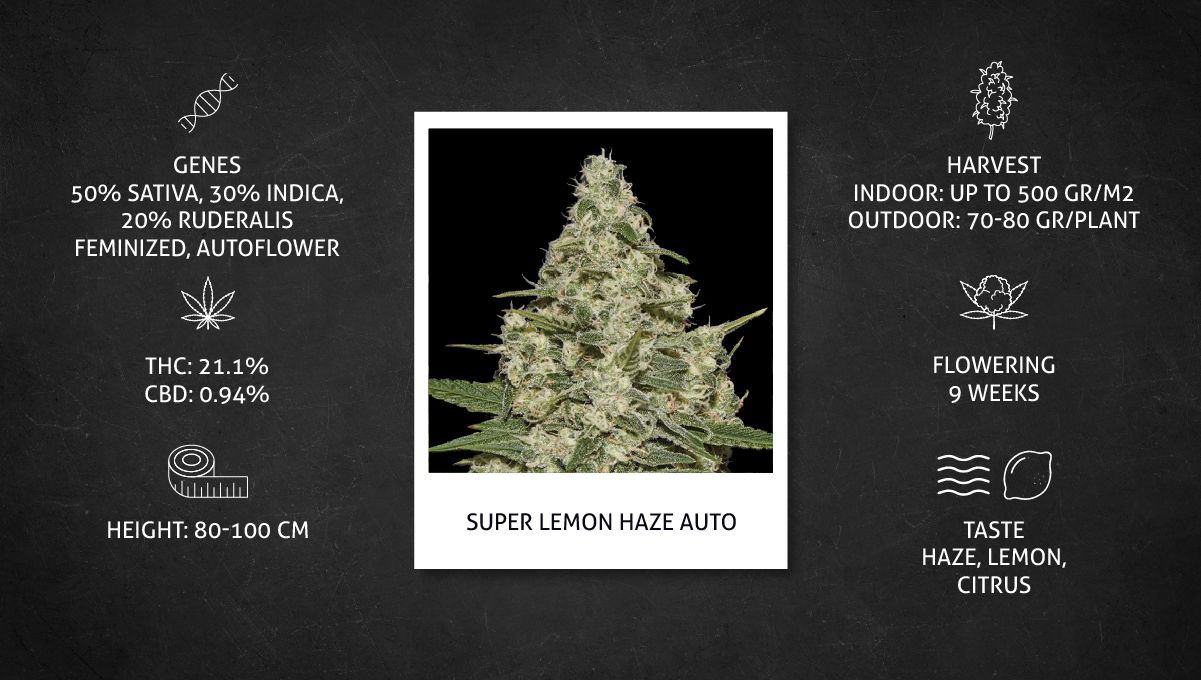
When the harvest is dried and cured, it offers a delightful blend of zesty lemon and the freshness of pine. It's an aromatic masterpiece, perfect for all-day enjoyment. For those who seek potency, Super Lemon Haze Auto boasts a THC content of 21.10%, complemented by 0.94% CBD and 0.31% CBN.
With Super Lemon Haze Auto, you're in for an extraordinary cannabis adventure as you’ll experience the complexity of its sativa effects – a light body stone paired with a clear cerebral high that hits fast.
2. Grow Set Up
To introduce the would-be grower to this strain, we’ve selected several grow diaries. In all of them, the size and the bush structure of Super Lemon Haze was remarkably similar despite the use of different training techniques. The setup details were also quite diverse. In the table below, you can find just one example.
| Grow Space: | 0.3 m2 (10.76 ft2) | Pot Size: | 12 l (3.17 gal) |
|---|---|---|---|
| Seed to Harvest: | 11 weeks | Medium: | Soil |
| Flowering: | 6 weeks | Nutrients: | Organic |
| Light Cycle: | 18/6 | pH Levels: | 6.2-6.4 |
| Light Type: | LED | Day Temperature: | 23-27°C (73-81°F) |
| Watts Used: | 90 | Humidity: | 45-66% |
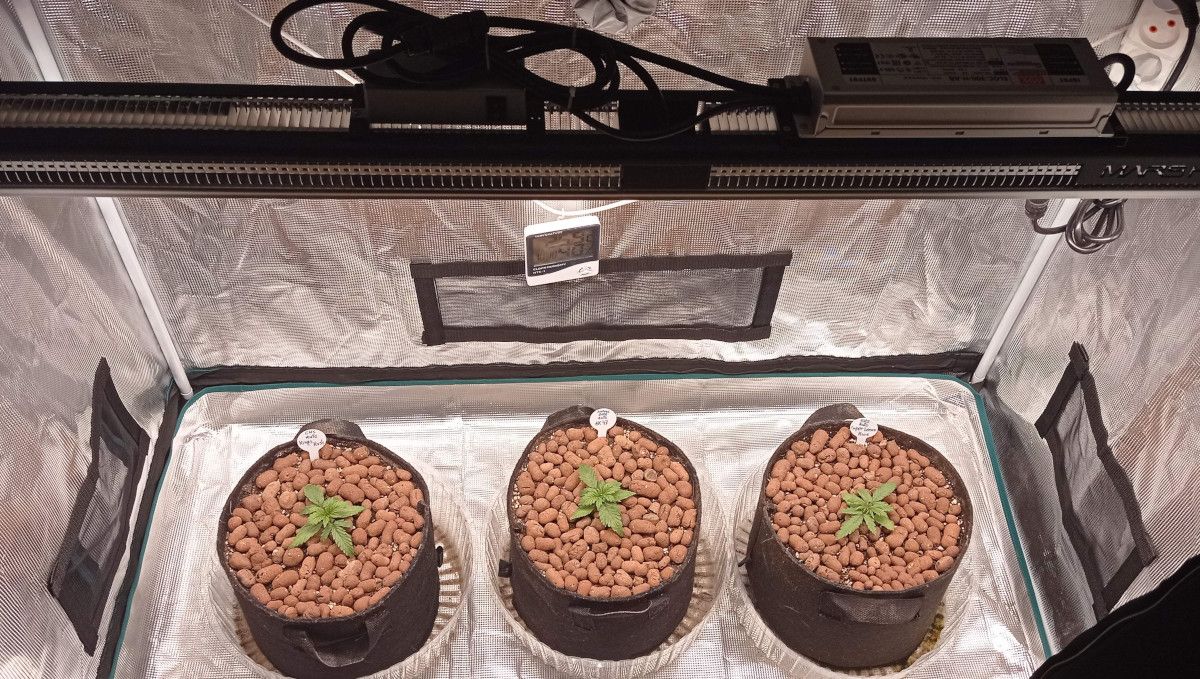
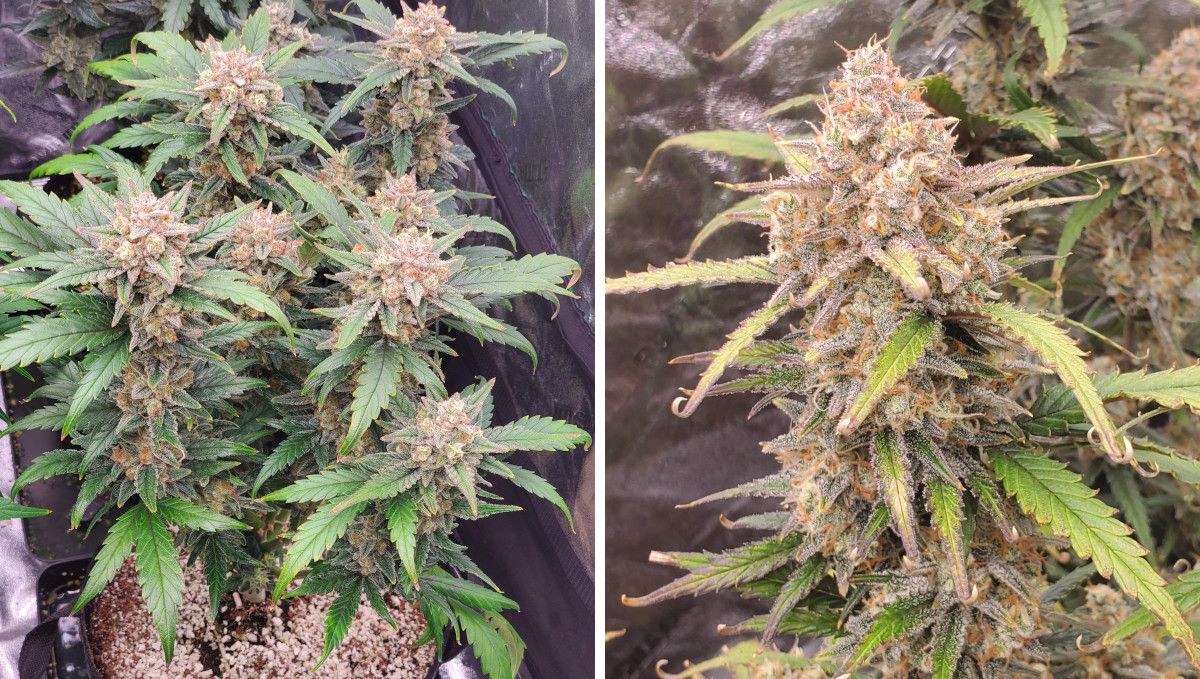
The beauty of stabilized genetics like Super Lemon Haze lies in their ability to produce consistent results across a wide range of growing conditions. Rest assured, in most cases, the plants will be very similar to what you see in the pictures below.
3. Germination And Seedling Stage | Week 1
Throughout our Super Lemon Haze grow guide, we’ll be using the week-by-week environment data from one of the grow journals we’ve been following. These data will provide a frame of reference (or even benchmark) for your own environment.
Temperature and humidity are the two most important conditions throughout the grow cycle and especially in the first week when the seedling is very weak and vulnerable. Of equal importance is the distance to light. Be very attentive to the optimal parameters for these three if you want to give your Super Lemon Haze the best possible start in life.
| Plant Height: | 3 cm | Day Temp: | 23°C (73°F) |
|---|---|---|---|
| Distance to Light: | 90 cm | Night Temp: | 19°C (66°F) |
| pH: | 6.2 | Humidity: | 66% |
Germinating cannabis seeds purchased from a reliable breeder is relatively easy. You should avoid serious rookie mistakes and provide basic conditions, such as warmth, moisture, and darkness. There are dozens of ways to create these conditions, and probably the most straightforward of them all is to keep the seeds between wet paper towels. Some growers precede this by letting the seeds float on the surface of water for several hours to pre-soak.
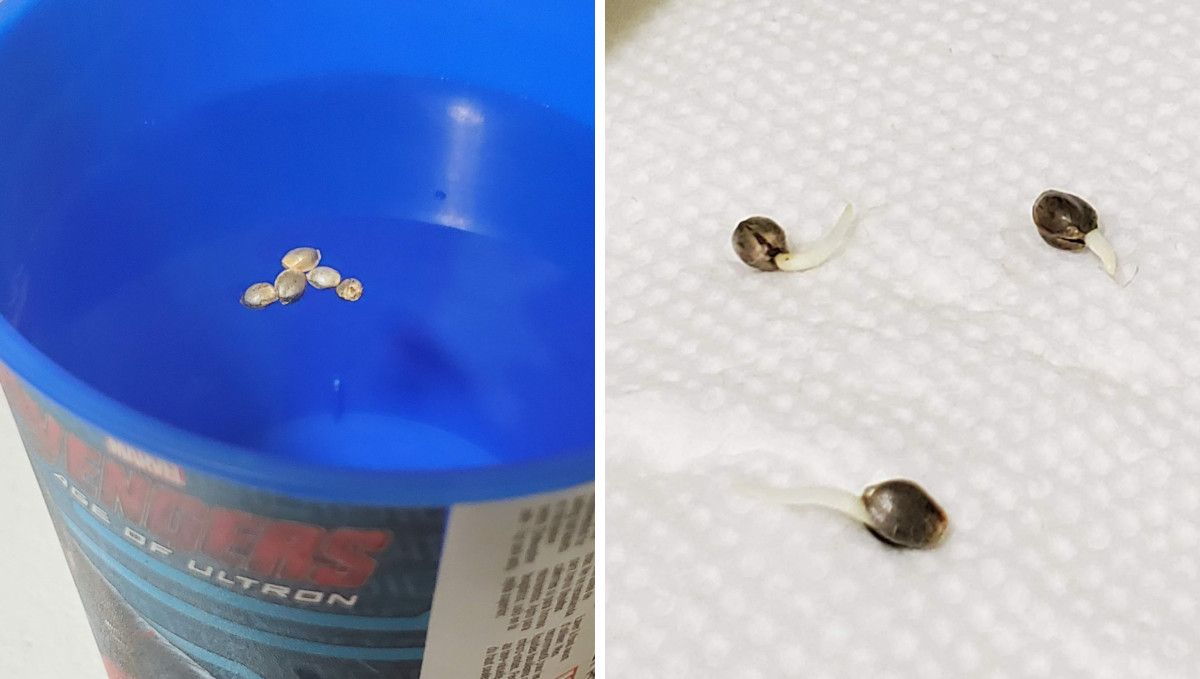
Some gardeners prefer to plant the sprouts as soon as they see the taproot, others wait till the taproot grows to some half-an-inch (1 cm). In our experience, the latter approach allows for a more vigorous start. The crack seed should be planted into moistened medium about 1 cm deep and gently covered with the same medium.
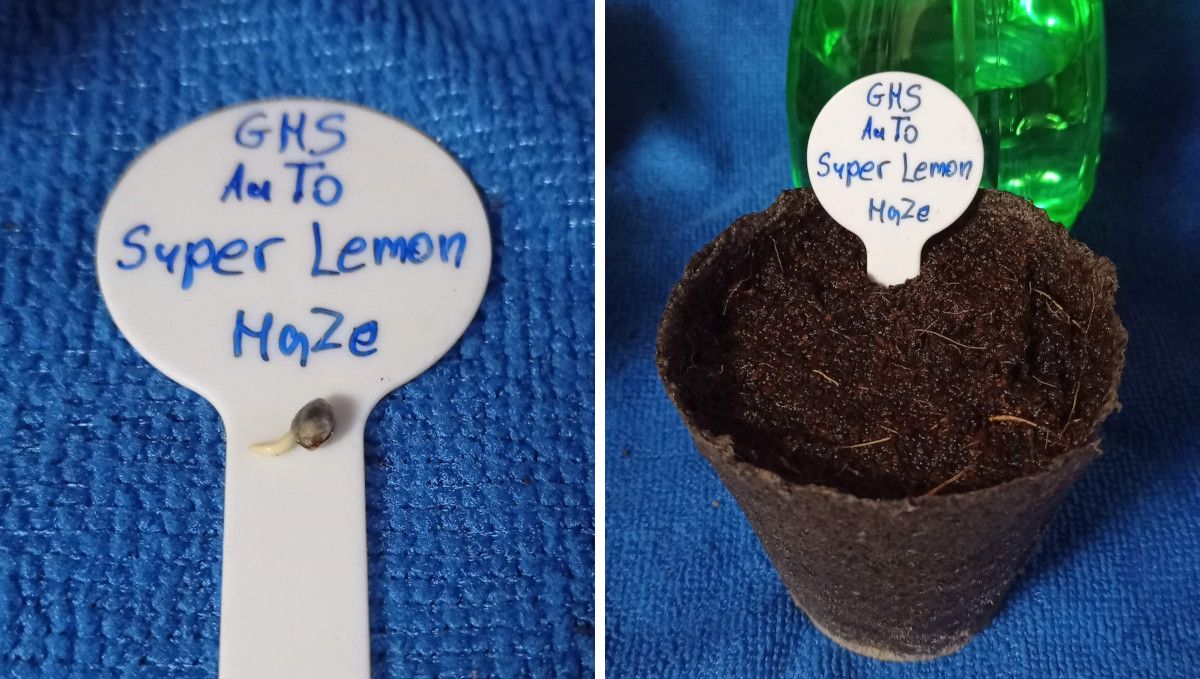
It usually takes a couple of days for the sprout to come up. if the medium was moist enough, the seed hull will become soft and mushy, and it will come off on its own during sprouting.
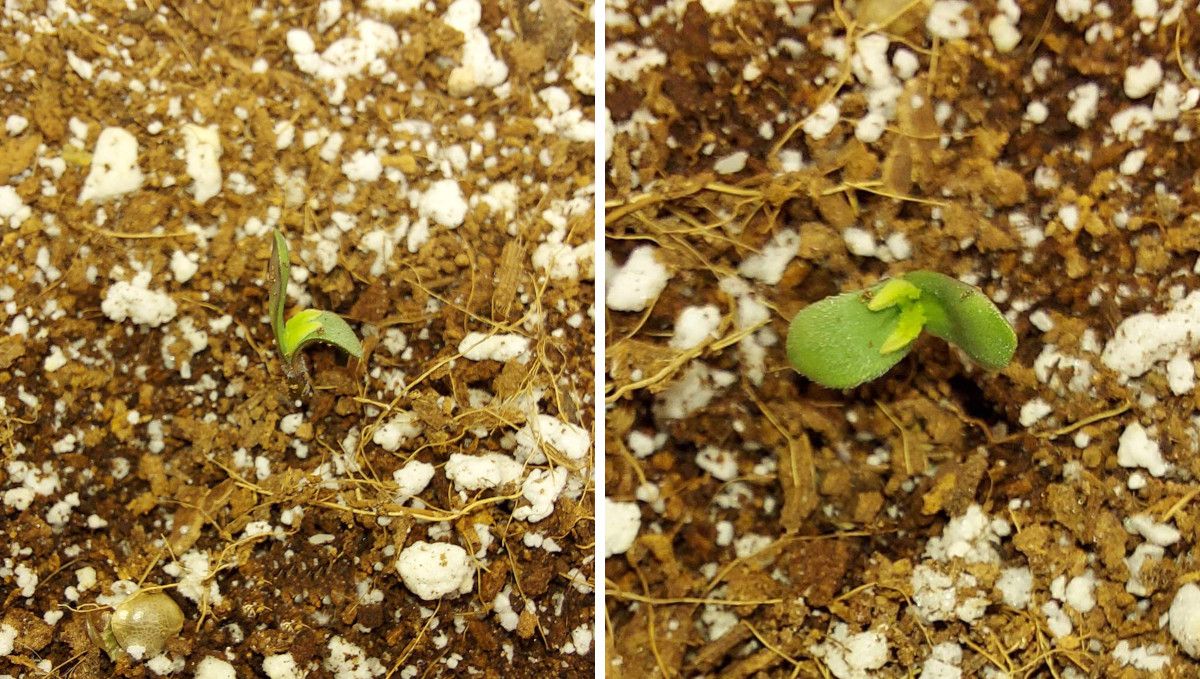
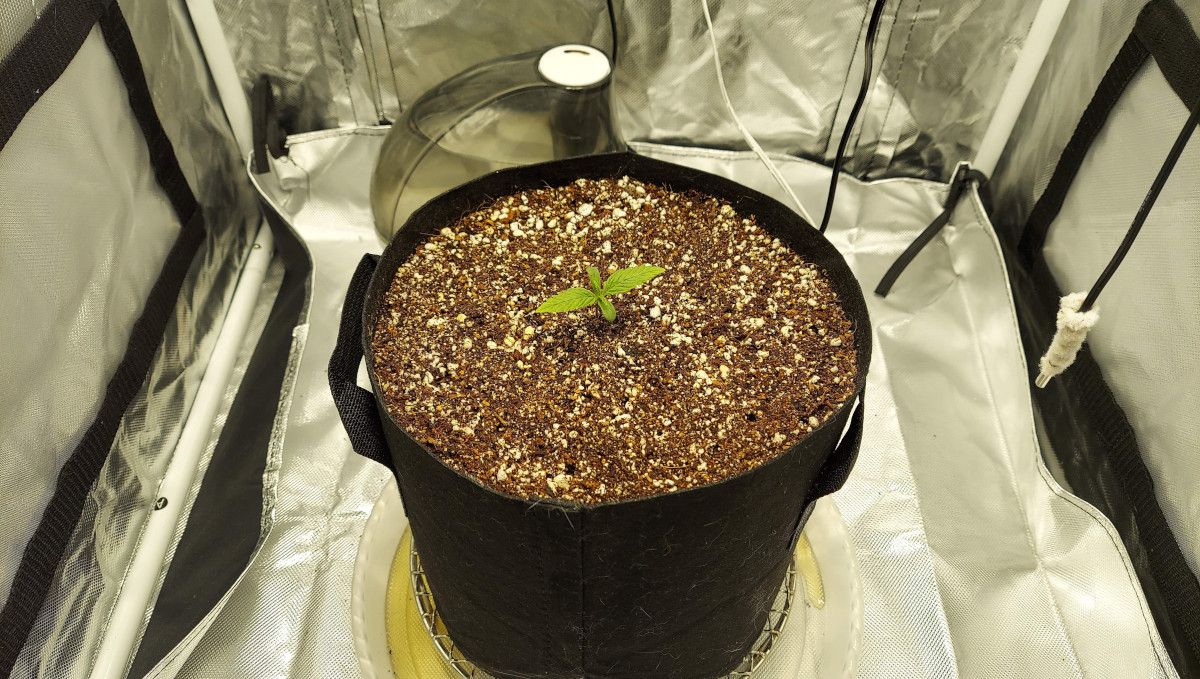
The question of whether to plant your autoflower into the final pot or use a starter container depends on a lot of considerations, but if you're a novice grower, we recommend using the final pot right from the start, as transplanting isn't the easiest procedure and you're likely to botch it if you lack experience.
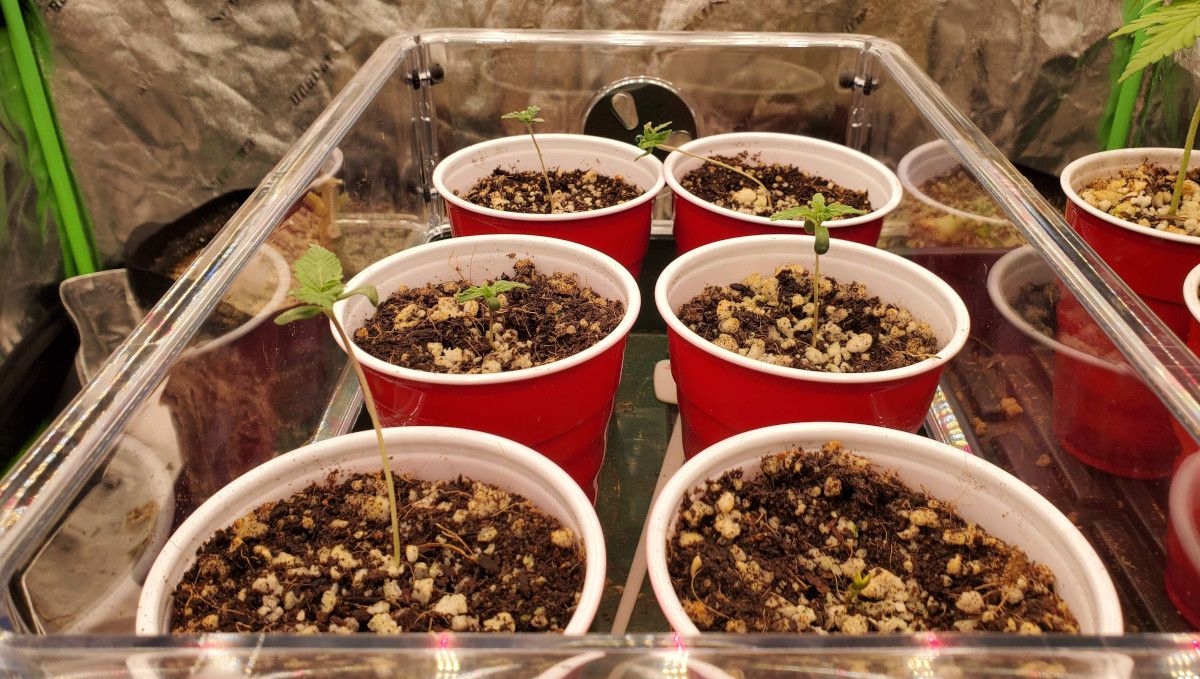
With more experience, you can be more flexible. Sometimes, it's convenient to have several seedlings in solo cups occupying a tiny portion of your grow tent and getting the light from a single CFL bulb. Watering also becomes much easier in a small pot or cup. After a few successful grows under your belt, you can experiment and see what works best for you.
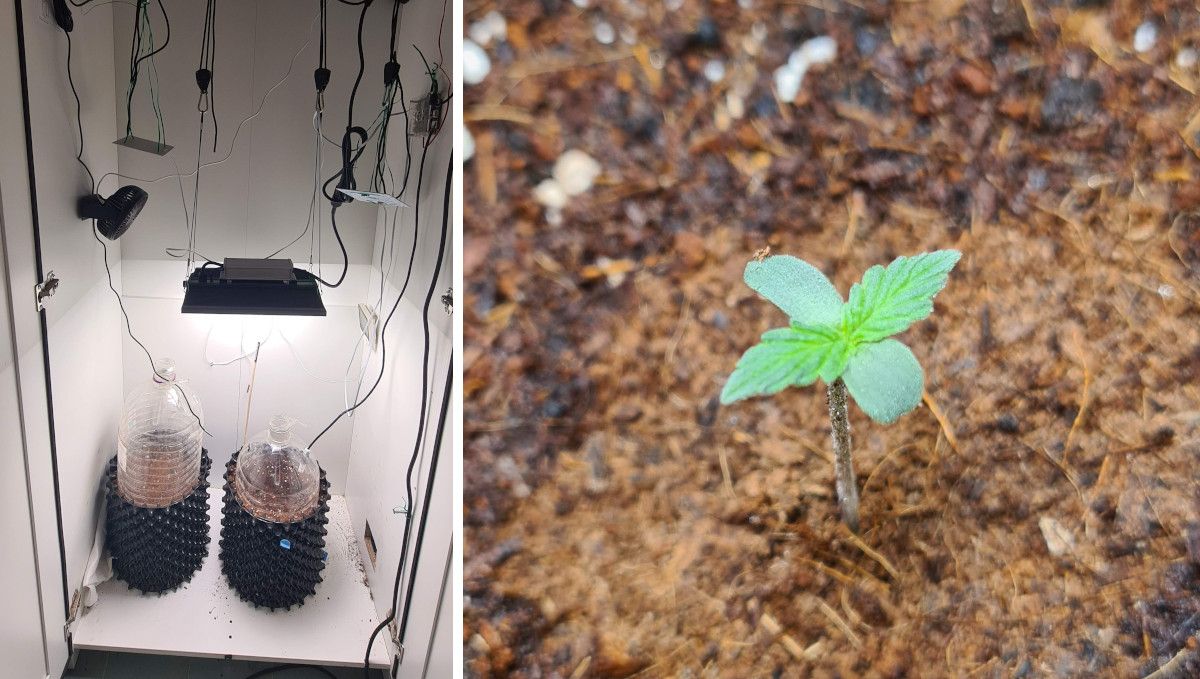
We've already mentioned the importance of mild and steady climate conditions for young weed plants. Try to keep the day temperatures within 25-28°C, with relative humidity as high as 80%. If you fail to raise the RH levels in the whole grow space, use "humidity domes" as you see in the pic below. The light distance should be enough to prevent excessive stretching – it's when the stem starts to bend or topple over. However, some 'normal' stretch should be allowed – if the seedling keeps close to the ground, maybe it gets more light than is good for it.
4. Early Veg | Week 2
In the second week from seeds, nothing really changes in the environmental requirements: it should be still warm and humid in your grow tent, so that your young ladies don't evaporate more moisture than their weak root balls can absorb.
| Plant Height: | 10 cm | Day Temp: | 26°C (79°F) |
|---|---|---|---|
| Distance to Light: | 70 cm | Night Temp: | 19°C (66°F) |
| pH: | 6.2 | Humidity: | 60% |
While in the previous week the growth migh have seemed frustratingly slow to you, now it quickens and the pairs of true leaves become visibly bigger and stronger. However, the main processes are still happening underground, where roots continue to grow at a fast rate. If you've been using nursery pots like in the pic below, you'll need to transplant your autoflower aound this time.
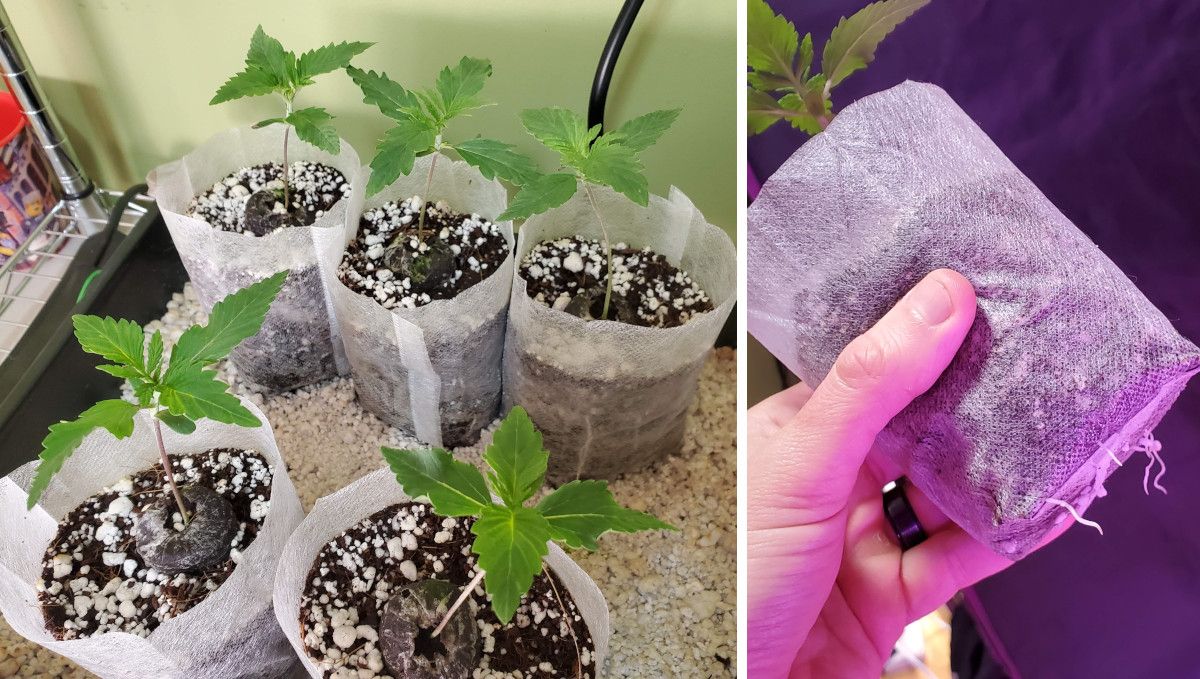
Around day 10, the second pair of true leaves will be as big as the first one and then overtake it. This means your Super Lemon Haze Auto is perfectly happy and healthy. By the end of the second week, you'll have a robust young plant with 3 pairs of true leaves and even tiny side branches starting to show.
Depending on the medium you use and the size of the container, you may still use pure water all the way to the end of the second week. In a large amount of pre-amended soil, a weed plant will find enough food to flourish. In soilless grows, extra nutrients will be needed from the very first watering. Some soil growers also use fertilizers from day one, but they start with very small doses – like 1/4 of what the manufacturer recommends. The most essential macronutrient now is nitrogen (N), with phosphorus and potassium playing only second fiddle.
Of course, don't forget about lesser nutrients, such as magnesium and calcium, and about a dozen of micronutrients. In good formulas specifically designed for cannabis, you'll find them all.
Another thing that is very important in indoor grows is training. It serves at least two purposes. First, it limits the vertical growth, which is very important in small indoor setups with very little headspace. Second, it helps achieve a flat canopy, meaning that a lot of plant tops will be at the same distance from the light, which will result in their being very uniform – having the same size and density.
It might seem counterintuitive to the beginner grower to start low-stress training early on – when the young plant has barely risen above ground. However, with autoflowers, which have a very short life cycle, it's best to start training as early as possible – before you know it, the vegetative stage will be over and it will already be too late to train.
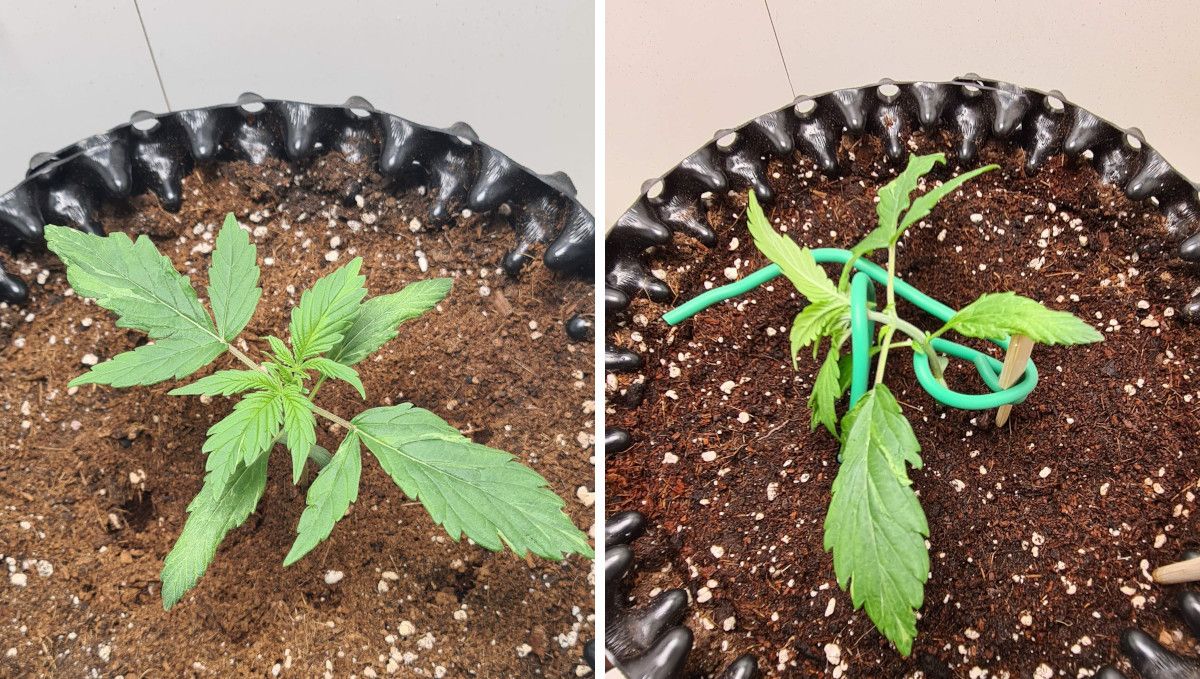
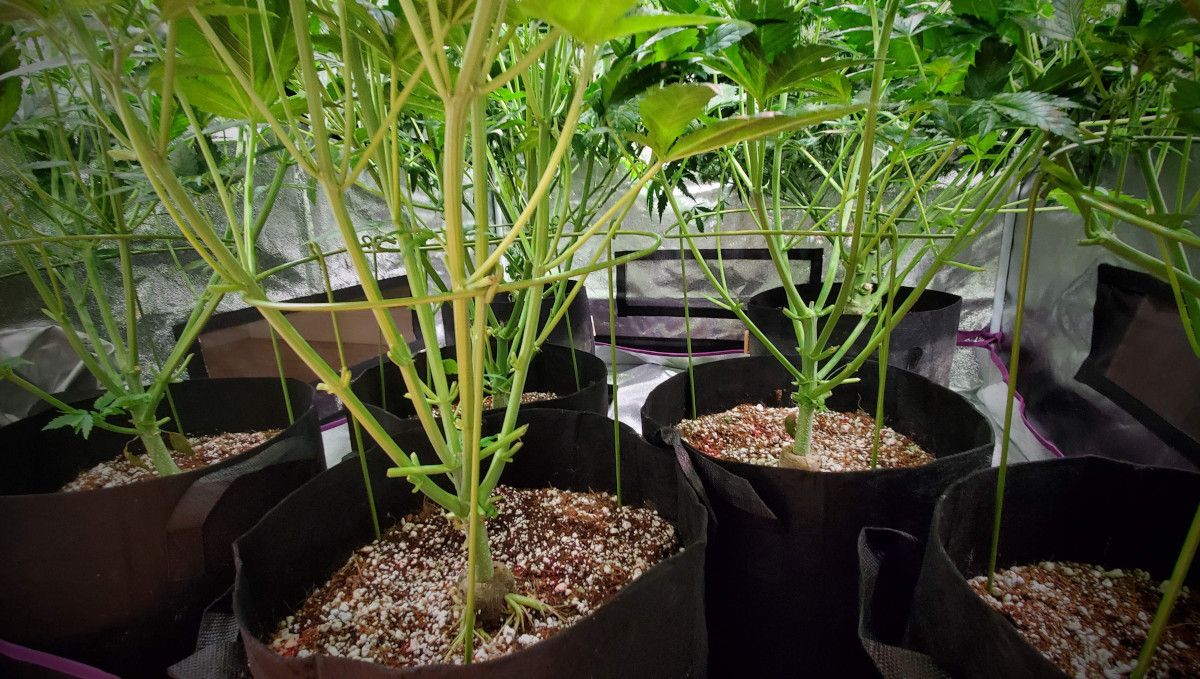
To train such a small plant, you need to bend its main stem almost all the way to the ground and secure it there. Of course, before doing that, you'll need to secure the stem at the very base (see the photos below and above). The tie-down procedure will break the so-called apical dominance and give side branches a boost.
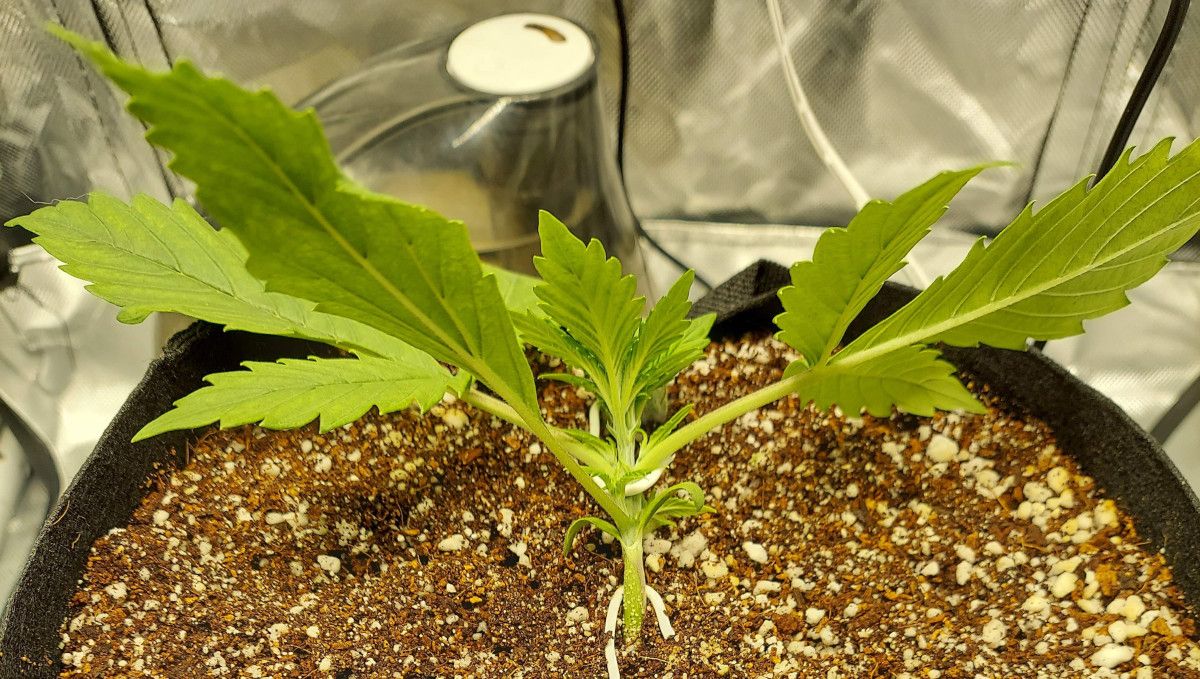
Low-stress training (LST) is an easy concept and a straightforward technique, wwhich requires more diligence than experience, but if you like to do it like a pro, read some articles on canopy management and watch relevant videos.
5. Mid Veg | Weeks 3-4
The rapid growth of your Super Lemon Haze autoflower in weeks 3 and 4 will signal to you that your young plant isn't s vulnerable anymore and can handle even adverse conditions like a champ. In practical terms, this means that you can stop fretting about keeping the conditions in just an optimal range. It's still advisable to give your plants only the best, but if you fail to do that, they will survive.
| Plant Height: | 10-15 cm | Day Temp: | 24-26°C (75-79°F) |
|---|---|---|---|
| Distance to Light: | 60-70 cm | Night Temp: | 19°C (66°F) |
| pH: | 6.2 | Humidity: | 50-60% |
The active growth of your autoflower – with new leaves and branches appearing overnight – gives you a great opportunity to continue training your plant, giving its canopy the perfect shape. The safest bet is still the low-stress training, as high-stress training is too risky for an autoflower.
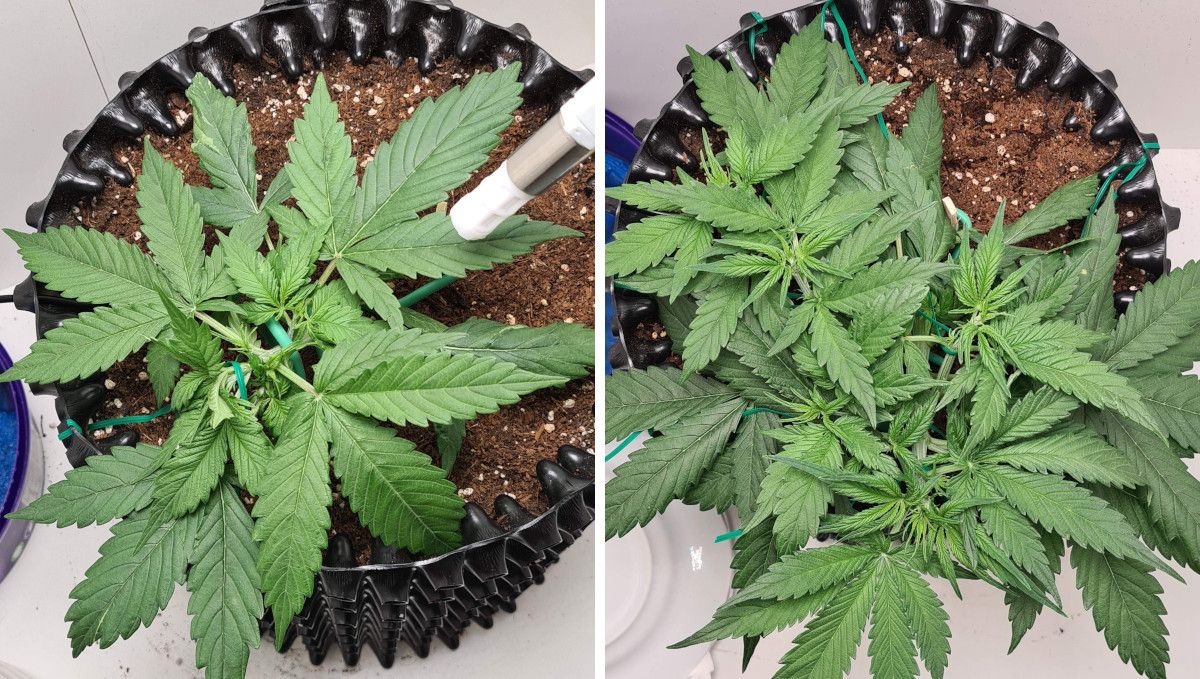
One of the forms of training is ScrOG, or Screen of Green. It's basically a way of keeping the canopy flat under the net. ScrOG also gives you the benefit of supporting the branches when they become very heavy with buds later on. The downside of ScrOG is that it makes watering difficult because it restricts your access to the container.
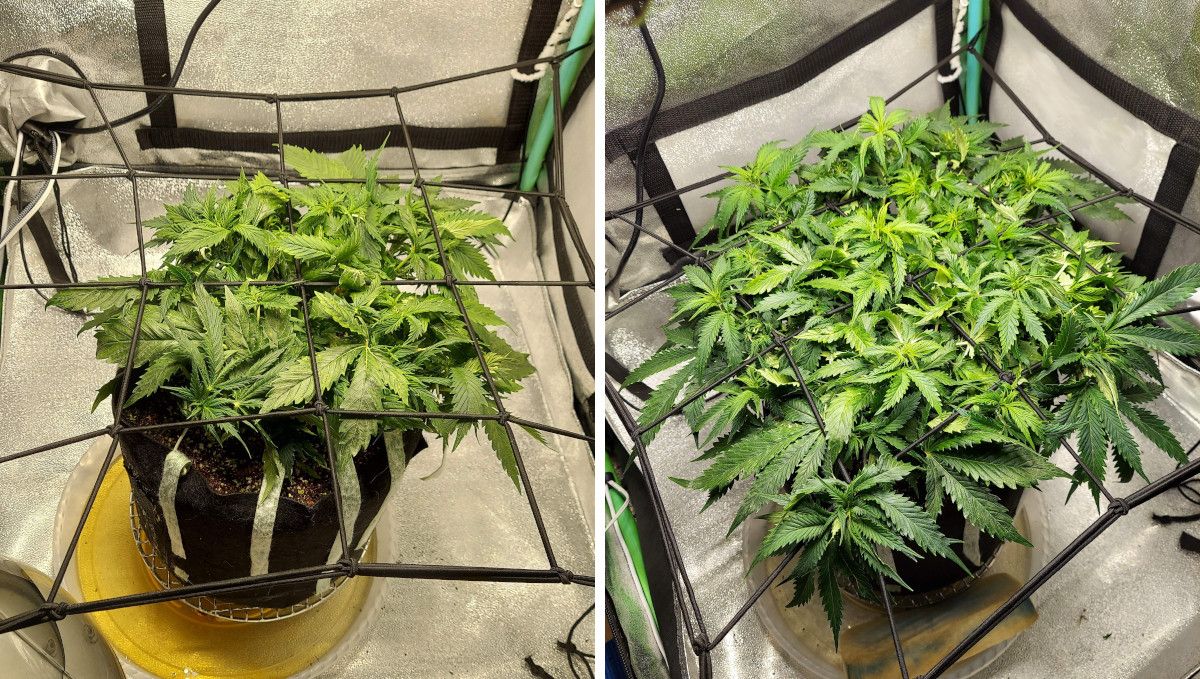
A much riskier training procedure is topping. It causes much stress, and while photoperiodic strains have enough time to recover, the life cycle of autoflowers is too short to waste any time on recovery. Only top or FIM your autos if they are healthy and vigorous and look like they could take the procedure in stride. Obviously, this method should only be used by experienced growers.
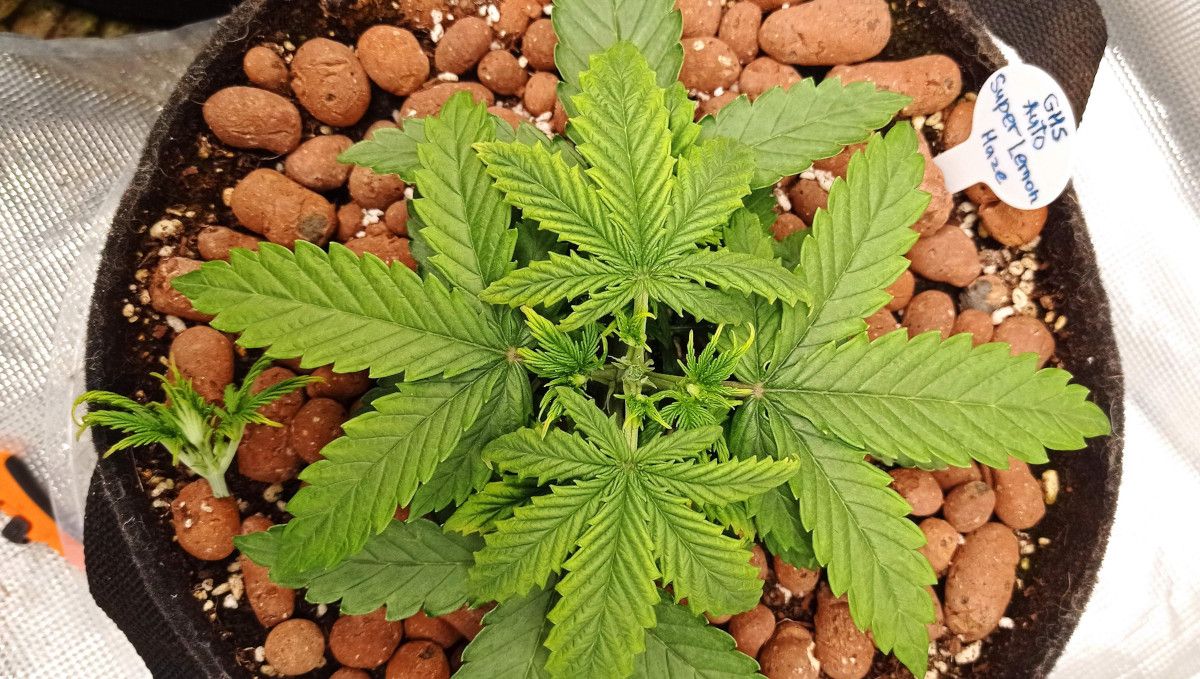
The purpose of topping is to stimulate lateral growth. Just be sure it doesn't stunt ANY growth – that would be the worst kind of scenario for an autoflower, as the time wasted on recovery would lead to small plant size at harvest and reduced yields.
6. Transition (Pre-Flower) | Week 5
When the flowering stage starts or is about to start, it's a good idea to keep the day temperature within a comfortable 25°C, with a drop or a few degrees during the night. It is also recommended to bring down relative humidity within 40 to 60%.
| Plant Height: | 22 cm | Day Temp: | 24°C (75°F) |
|---|---|---|---|
| Distance to Light: | 50 cm | Night Temp: | 19°C (66°F) |
| pH: | 6.2 | Humidity: | 50% |
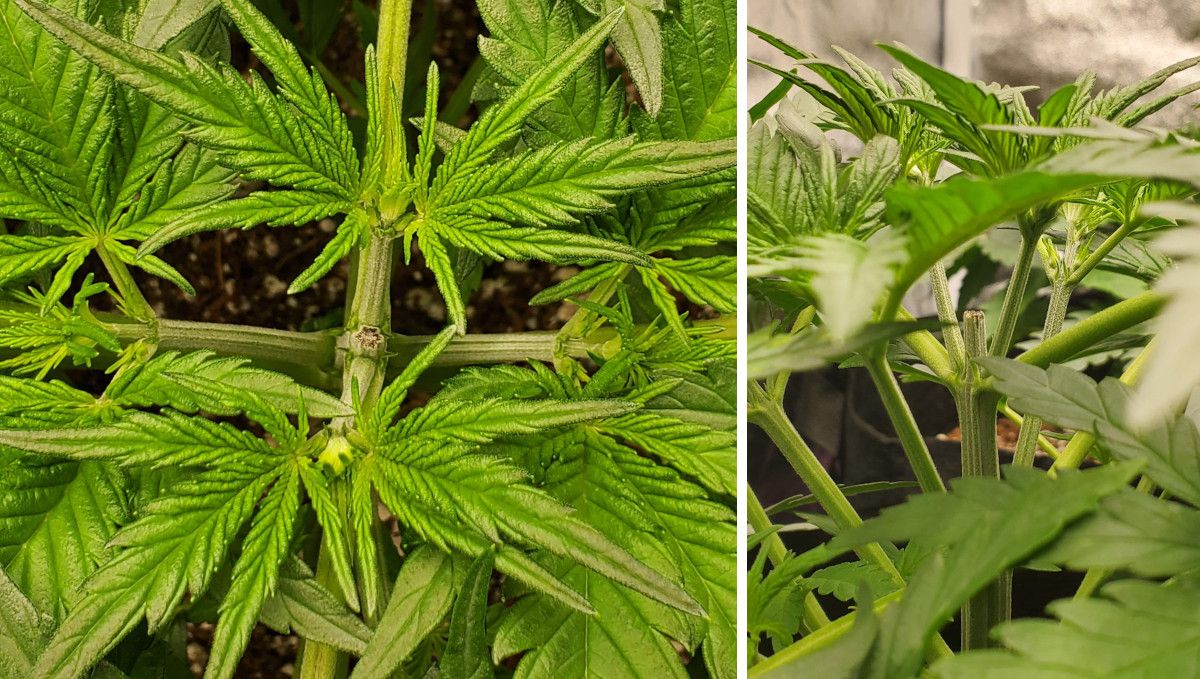
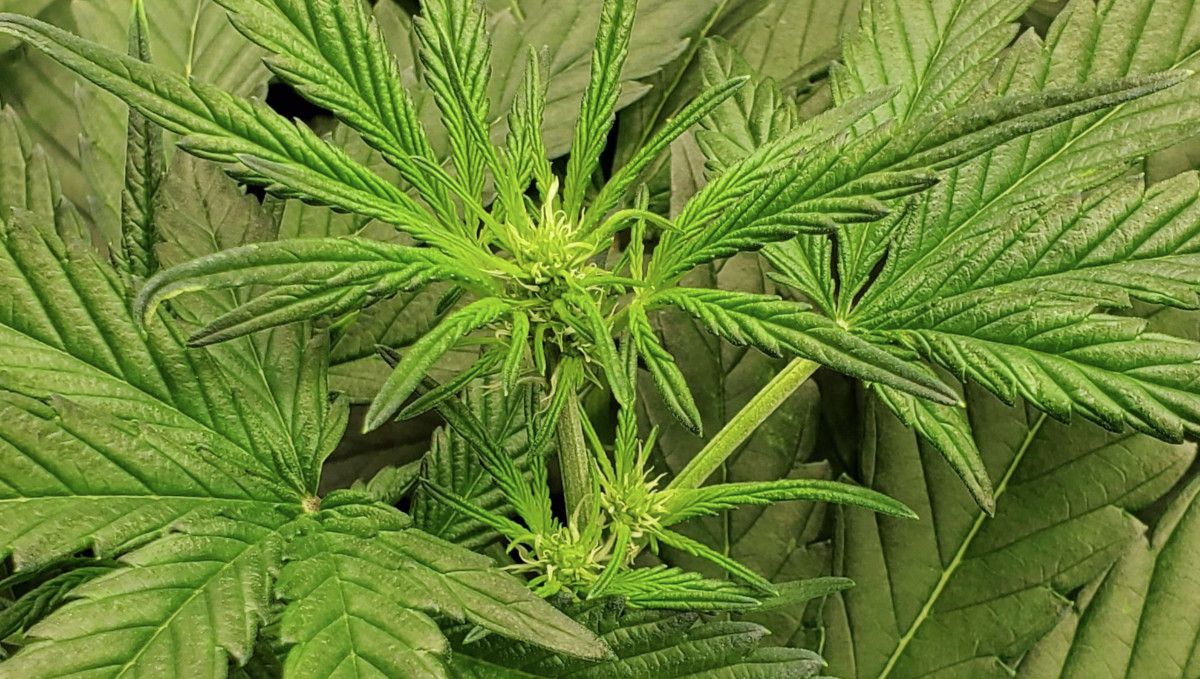
Initially, the change from the vegetative growth to flowering is subtle but noticeable. It's not like you'll see the emergence of flowers overnight. If you're attentive enough, you'll first notice tiny female hairs somewhere inside the canopy, at the middle nodes of the plant. At the same time, the tops will change their color to a slightly yellowish tint and the little leaves growing there will become very thin and curly.
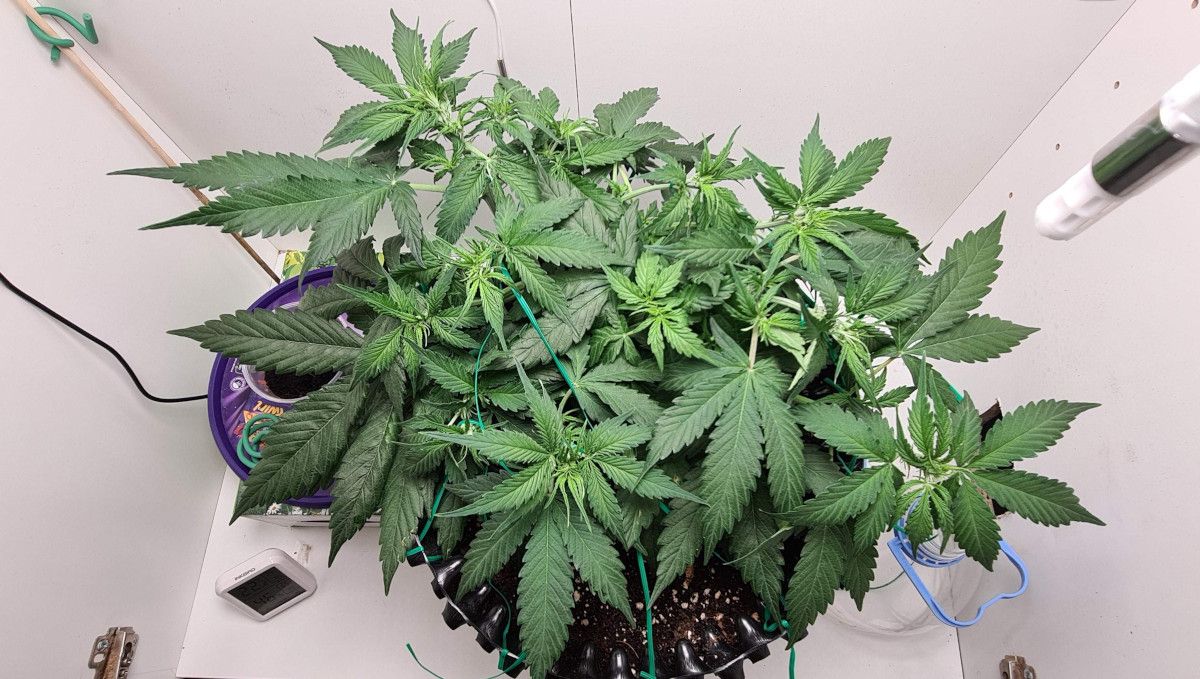
Once autoflowers start budding, everything happens very fast. In only a few days, you will notice greenish-white hairs on each top of the plant. This means the flowering proper has begun.
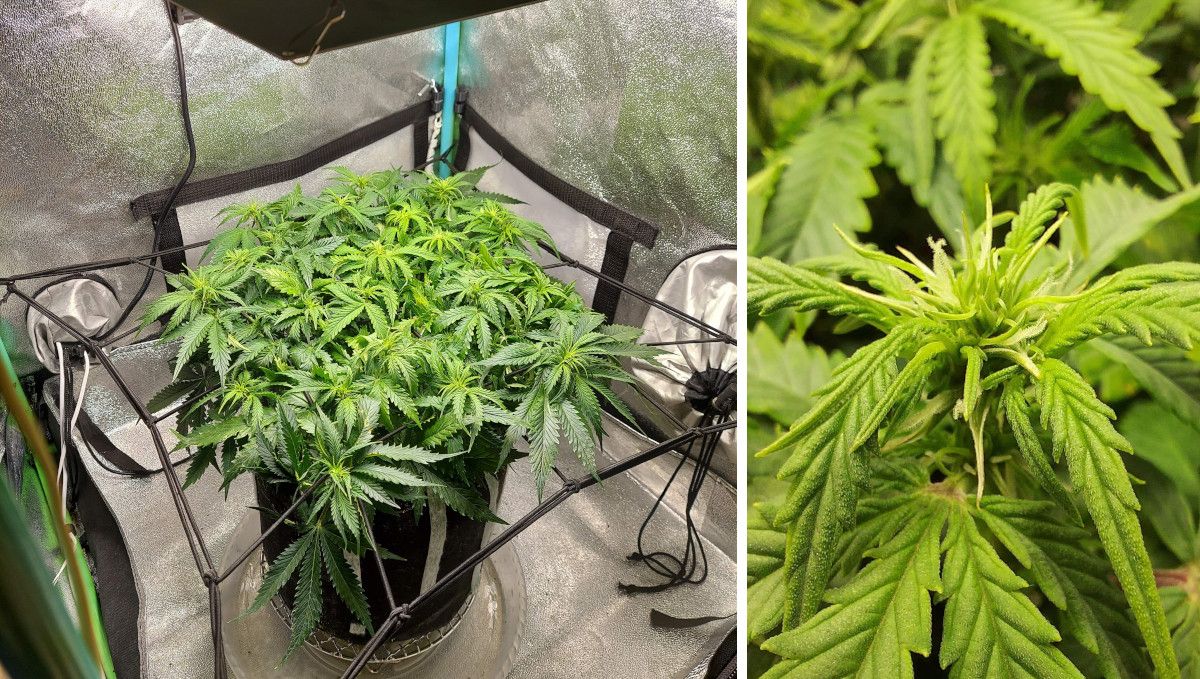
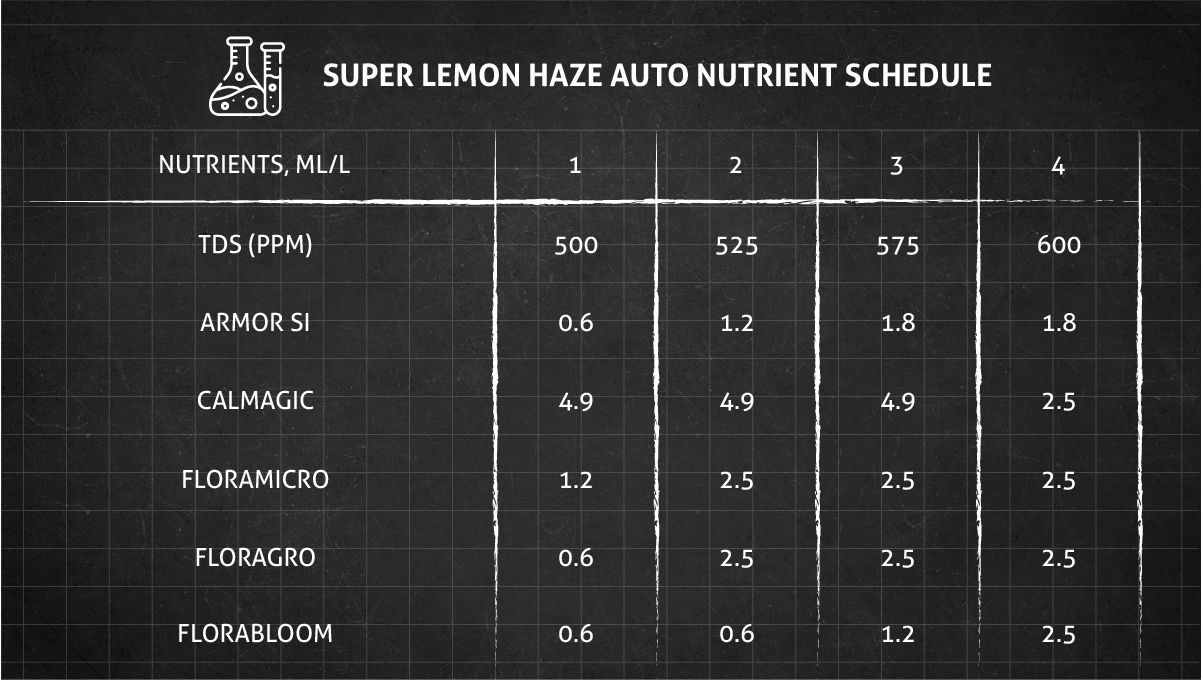
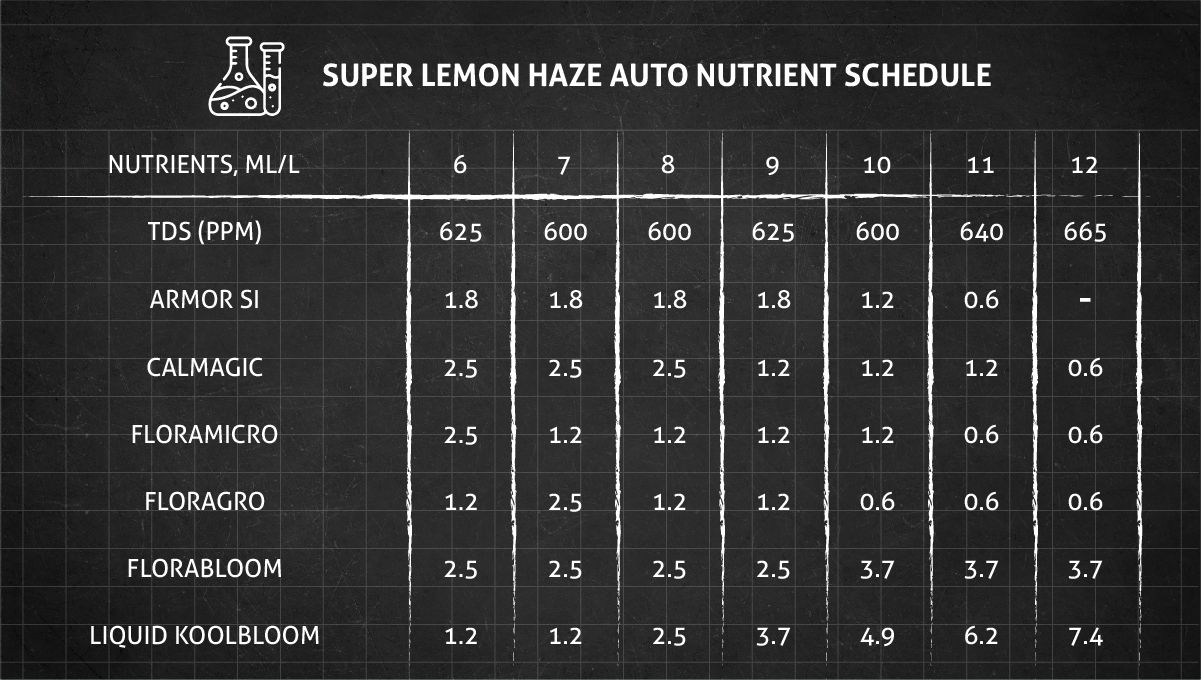
Obviously, your autoflower's need for nutrients changes dramatically now. While in the weeks before, the main nutrient fueling the vegetative growth was nitrogen, now the growing flower mass needs phosphorus and potassium for proper development. Your nutrient regimen needn't be very complicated. Take a look at the sample feeding schedule in the table below. It's safe for you to replicate it. However, there are dozens if not hundreds of great products specifically designed for cannabis on the market today. You can use any of those with great success.
If your Super Lemon Haze autoflower likes its environment, fertigation schedule, the light, and everything else, you will see flower formation not only on tops but on the middle nodes as well.
7. Early Flower | Weeks 6-7
When the flowering really kicks in, continue with your efforts to keep the temperatures and relative humidity in the comfortable range – where it's not too humid and not too hot. Also pay attention to pH as this parameter is really important for nutrient absorption. Keeping pH within an optimal range helps prevent deficiencies and nutrient lockouts.
| Plant Height: | 30-35 cm | Day Temp: | 24-26°C (75-79°F) |
|---|---|---|---|
| Distance to Light: | 35 cm | Night Temp: | 19-21°C (66-70°F) |
| pH: | 6.2 | Humidity: | 45-50% |
Generally, even with autoflowers, this is a period in the grow cycle when gardeners face a lot of headache dealing with the so-called flowering stretch. However, in many grow reports that we have seen online, Super Lemon Haze Auto plants where delightfully compact and didn't stretch much after the initiation of flowering.
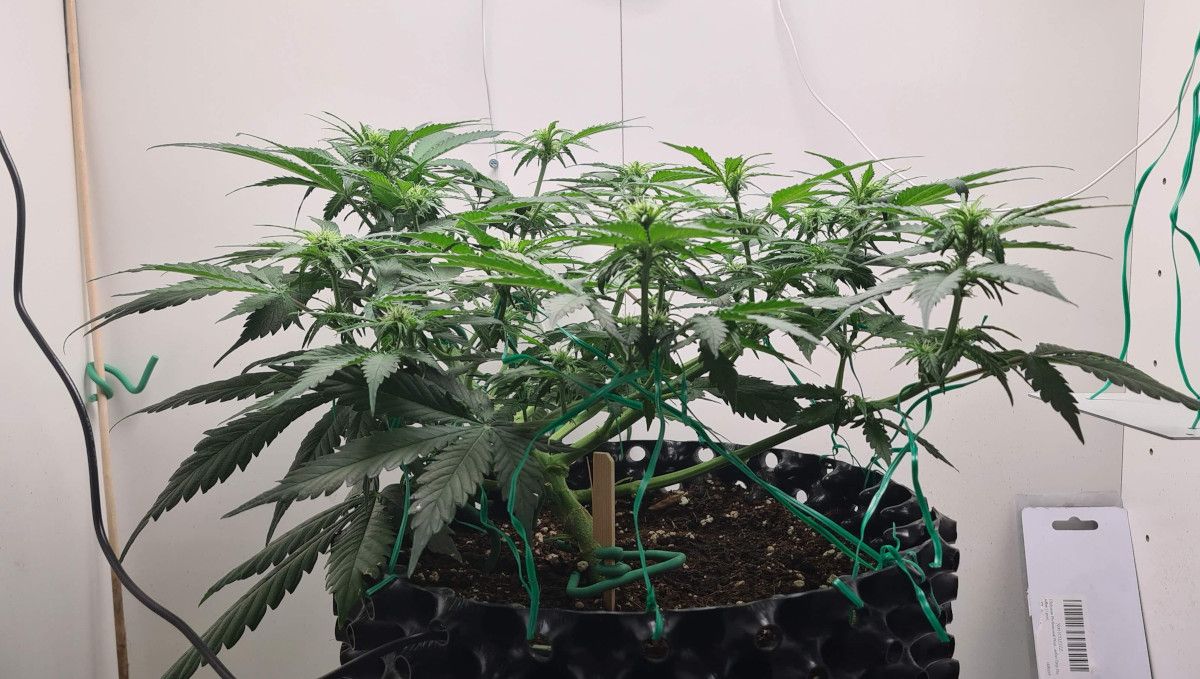
With a compact autoflower such as SLH, you can stop any training efforts and let the branches just grow upwards like so many short, thick candles. The stretch will stop almost as soon as it has begun, and all the energy of the plant will go to forming fat and dense colas.
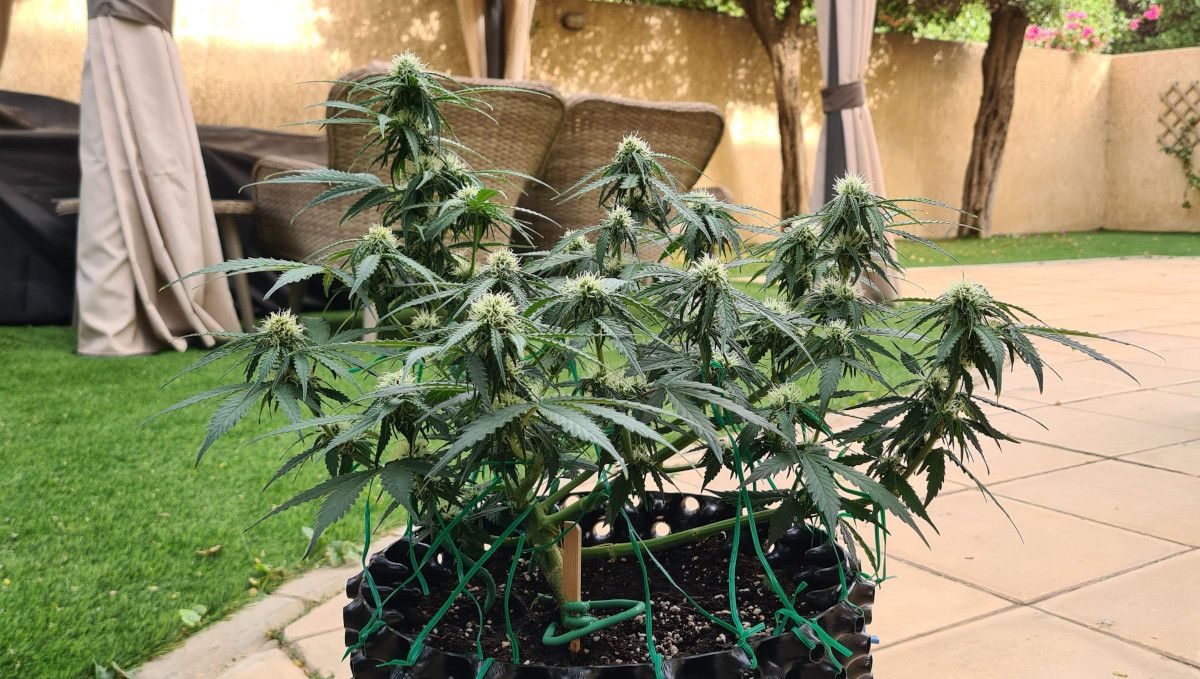
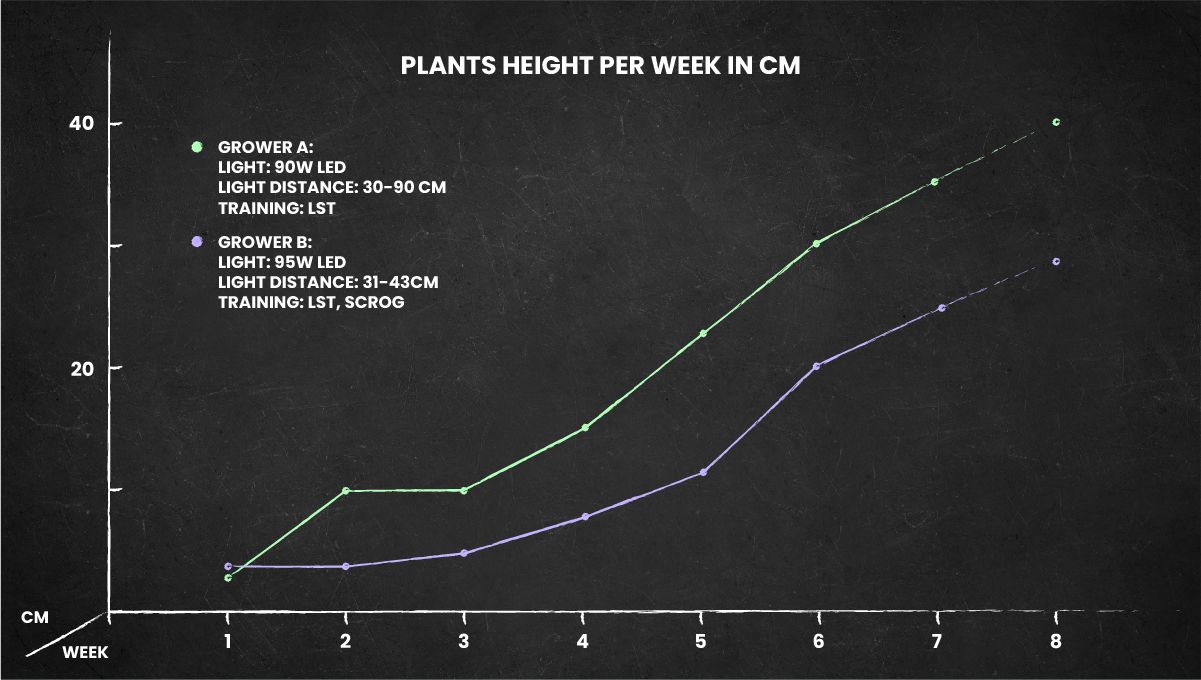
If simple LST was enough to form quite a few colas, ScrOG turned it into a real multi-branch monster. As all the buds are at more or less the same distance from the light, every bud will be of the same high-quality come harvest time.
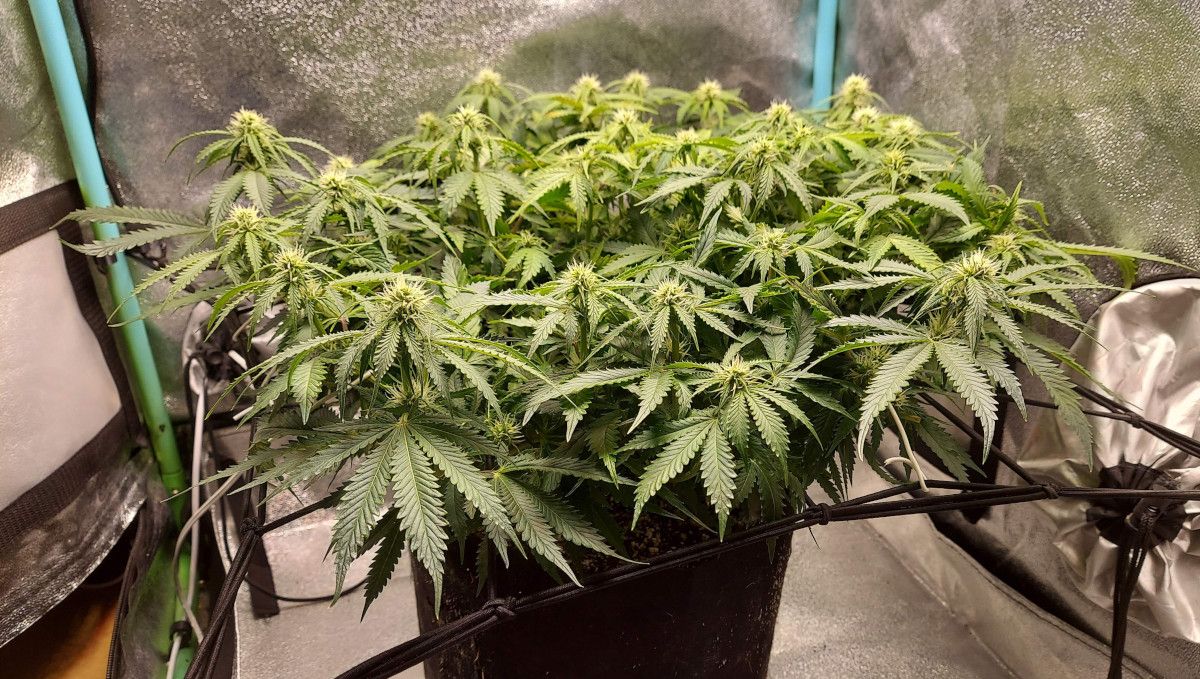
This height chart below gives you a good idea what you may expect of Super Lemon Haze Auto indoors in terms of size if you employ just a little bit of basic training.
Even with a compact autoflower like SLH, it doesn't make sense to keep those buds that are in deep shade below the canopy. Most growers remove something like the bottom third – leaves, small buds, and even some secondary branches – to redirect the energy to the more promising tops and to improve airflow. This procedure is called lollipopping. It involves some stress, but in most cases, it's worth it.
8. Mid Flower (Bulk Phase) | Weeks 8-9
By this time, the vertical growth of your Super Lemon Haze Auto will stop. Even in smaller grow spaces, you're likely to have enough headroom left. Keep monitoring the relative humidity as the buds bulk up – the risk of mold, bud rot, powdery mildew, or other fungal infections is at the highest now.
| Plant Height: | 40 cm | Day Temp: | 27°C (81°F) |
|---|---|---|---|
| Distance to Light: | 30-35 cm | Night Temp: | 23°C (73°F) |
| pH: | 6.4 | Humidity: | 45% |
By weeks six and seven, most growers have long figured out what their plants like and how they respond to different conditions. So now, comes the most uneventful period in the lifecycle of your autoflower. Just keep doing what has worked for you before, and you'll be fine.
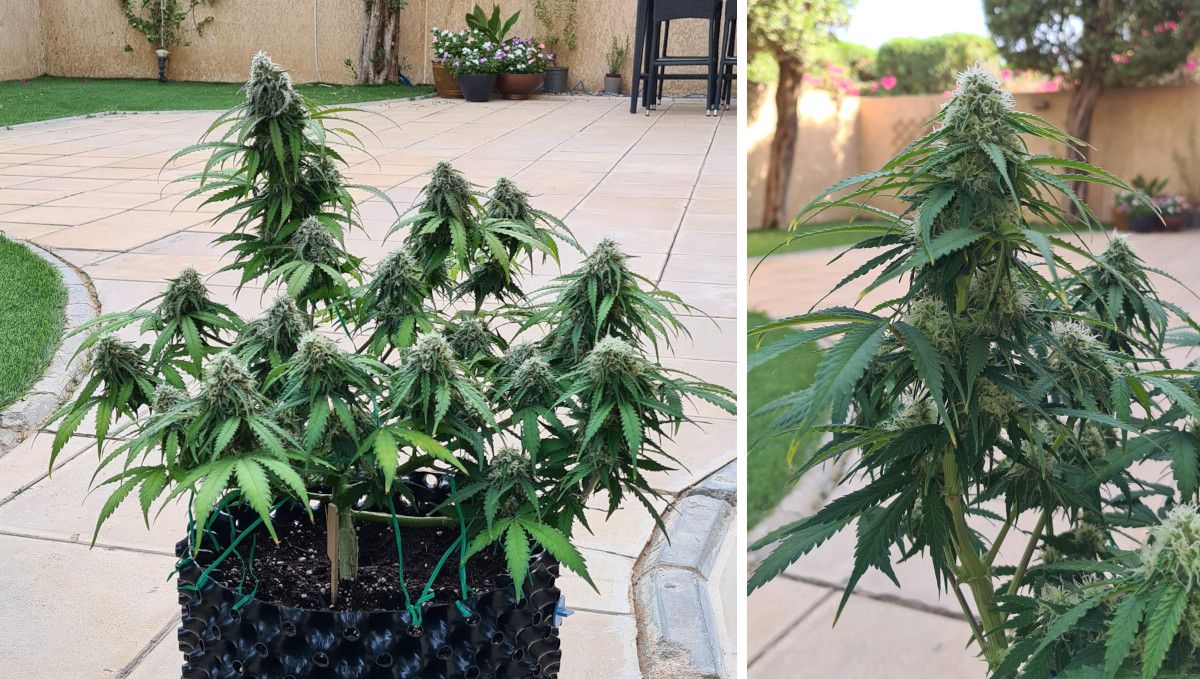
Although the flowers might get quite big now and even reach their final size, most growers, even the first timers, wouldn't think that their plants are anywhere near maturity. It's obvious even to an inexperienced eye that the pistils (female hairs) are still too white and immature looking, so the harvest is probably still far off.
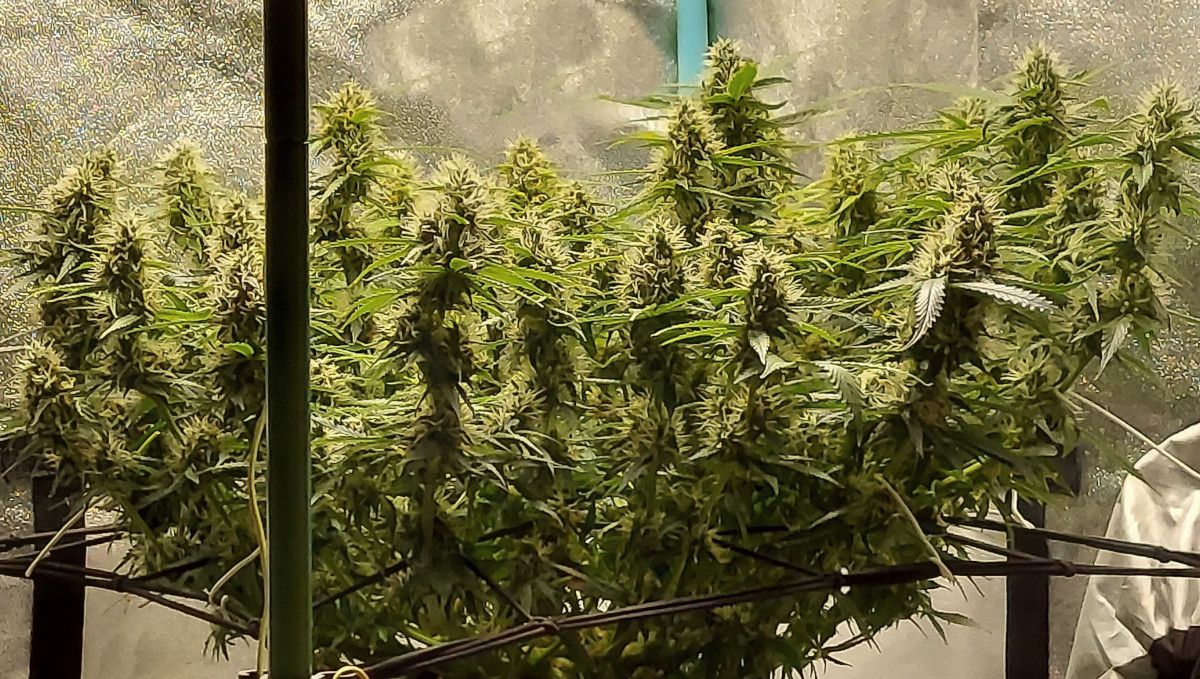
However, toward the end of this period, the fastest cultivars may look almost ready for harvest. You'll probably stop noticing any changes in the size of the buds, but it doesn't mean that your yield numbers are set – the flowers still continue to gain mass as they become denser on the inside.
9. Ripening And Harvest | Week 10 (And Beyond)
In the weeks leading up to harvest, it's more important than ever to keep the relative humidity low and thus protect the almost mature buds from rotting on the inside. Also, lower the day and night temps if you can – this will help conserve precious terpenes, cannabis' aromatic compounds. Moderate temperatures are probably also conducive to the preservation of THC and other cannabinoids.
| Plant Height: | 40 cm | Day Temp: | 27°C (81°F) |
|---|---|---|---|
| Distance to Light: | 30 cm | Night Temp: | 23°C (73°F) |
| pH: | 6.4 | Humidity: | 45% |
As your autoflower visibly matures, monitor it everyday to figure out how much time you have left till harvest. It's very important because sometime before that – about 2 weeks in soil grows – you'll need to stop giving your plants any nutrients and give them only plenty of water to drink. Being starved like this, your weed will quickly consume all minerals left in the medium and the plant tissues themselves and arrive at the finish line perfectly clean.
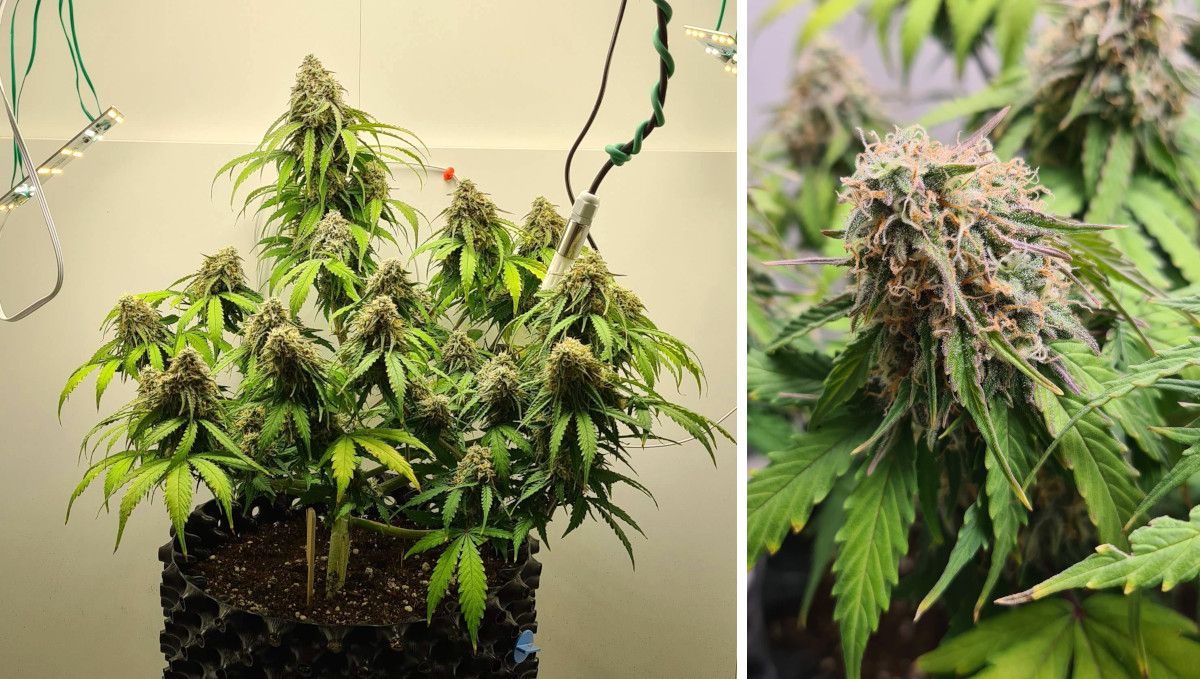
The method of giving you plants nothing but pure water is called final flush. When you start performing it, the fading of the leaves and the appearance of other visible signs of maturity will accelerate. The most important change, however, is the improvement in the aroma and taste of the smoke.
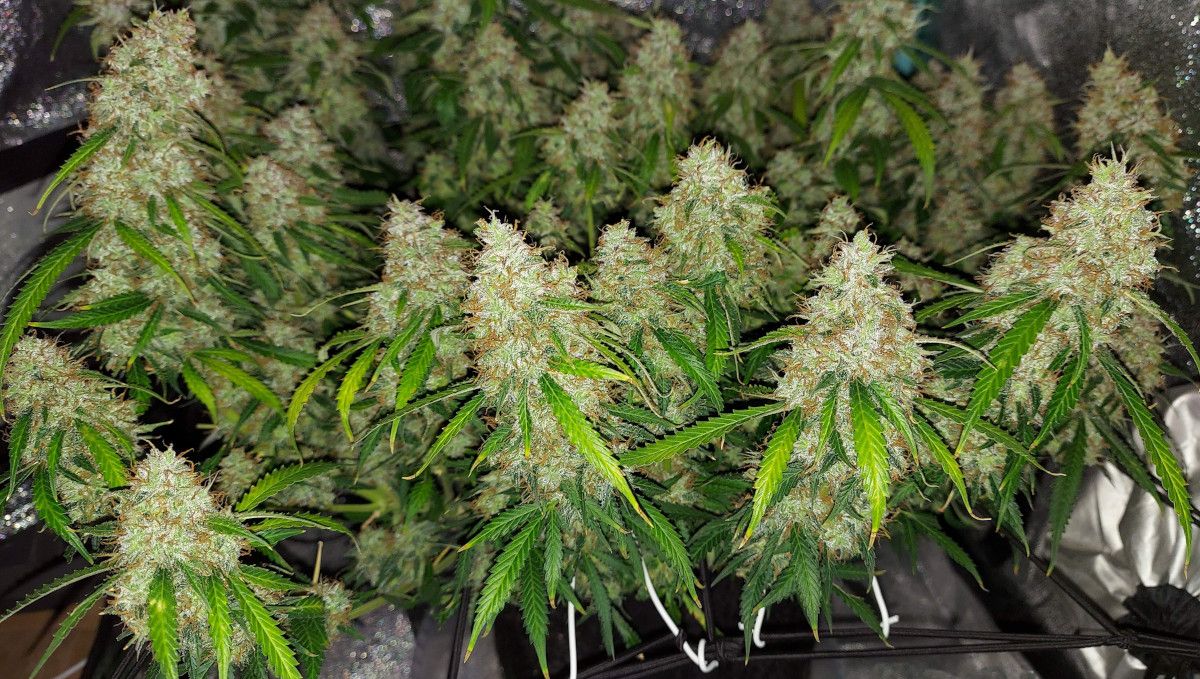
You can't tell with any confidence if the plant is ready to be chopped or not unless you take a hand microscope and look at the color of trichomes. These tiny mushroom-like structures frosting up the buds and the little leaves sticking out of them start as clear and turn cloudy at peak potency. When THC in them starts to degrade, cloudy turns to amber.
Most growers prefer to cut down their plants as soon as they see the first ambers, others prefer a deeper, darker kind of stone, less mind-altering and more sedating, and wait until the ambers make up 10-30% of all trichomes.
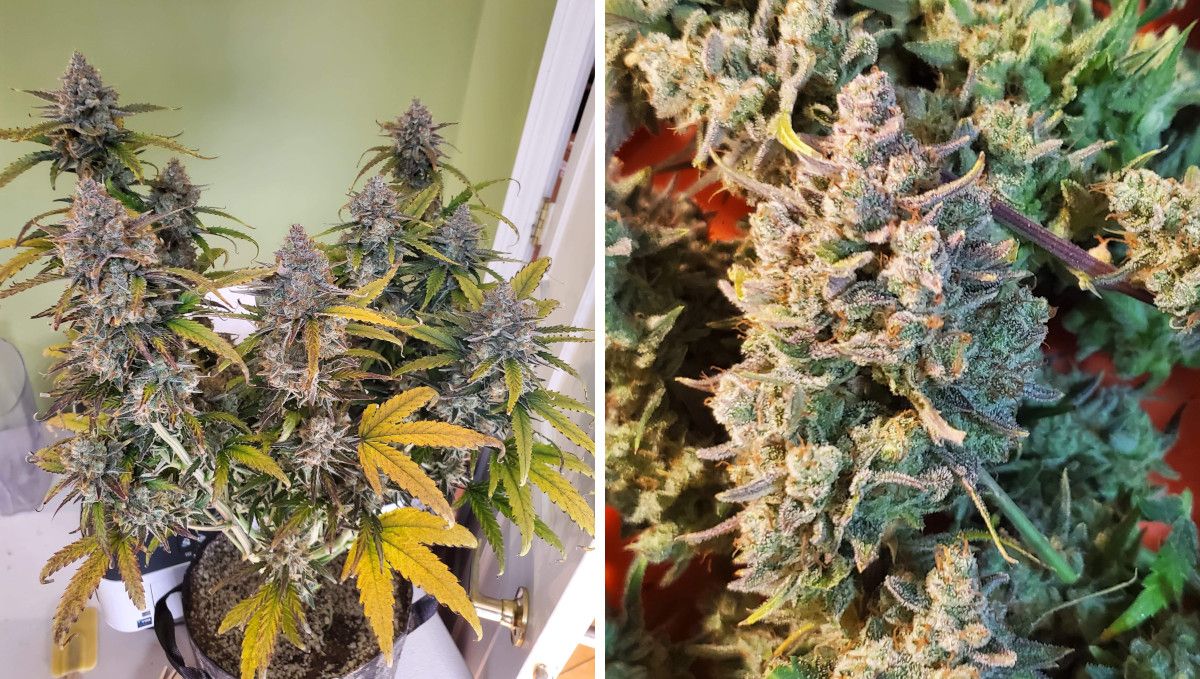
When you decide it's the perfect harvest window, turn off the lights and keep the plant in total darkness for 48 hours. For many growers, it's a standard trick to increase the potency of their harvest. A less controversial approach to making your buds as potent and flavorful as the genetics allows is to give them a proper drying an curing.
10. Yield and Smoke Report
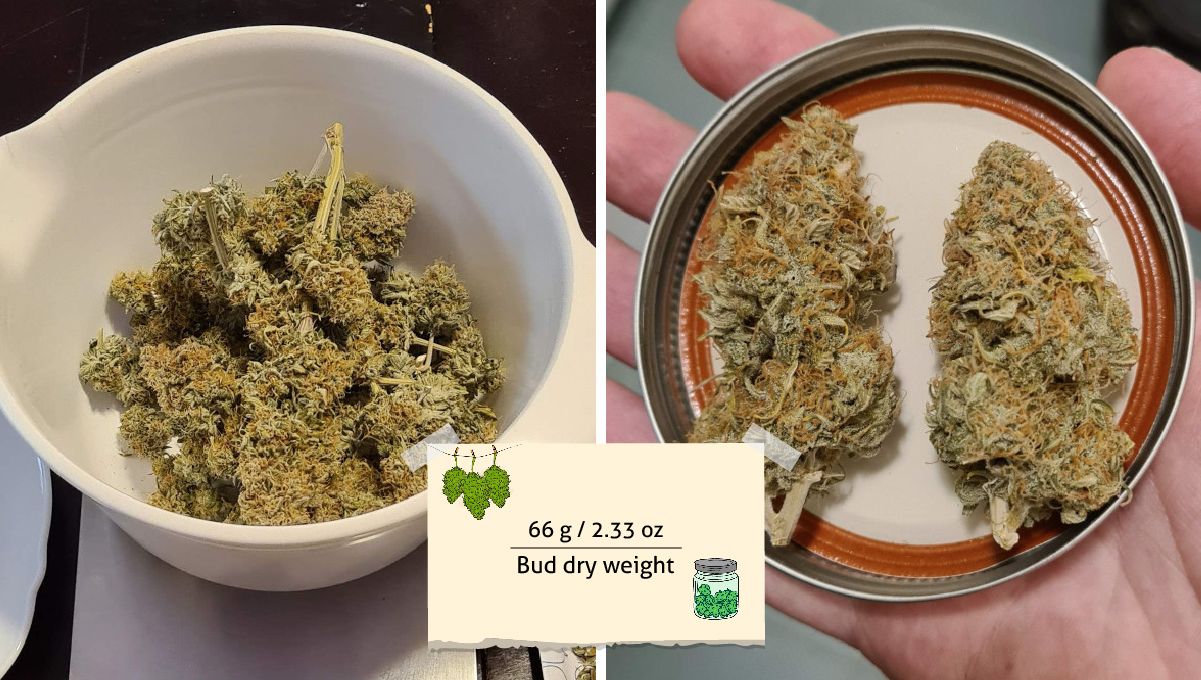
The first of the growers whose efforts we've been following from seed to harvest got 66g (2.33 oz) of medium-sized, moderately dense buds.
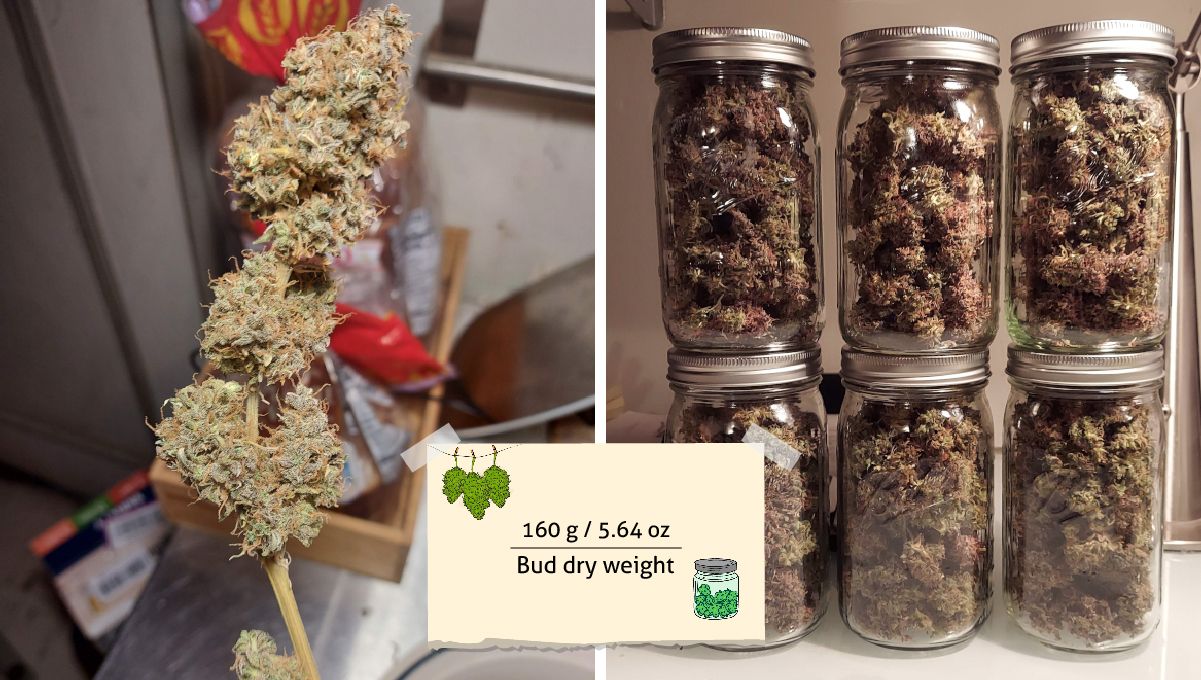
The second grower's plant was as short as the first but had a greater number of colas, so the harvest was more generous – 160g (5.64 oz) of dry trimmed bud from one plant.
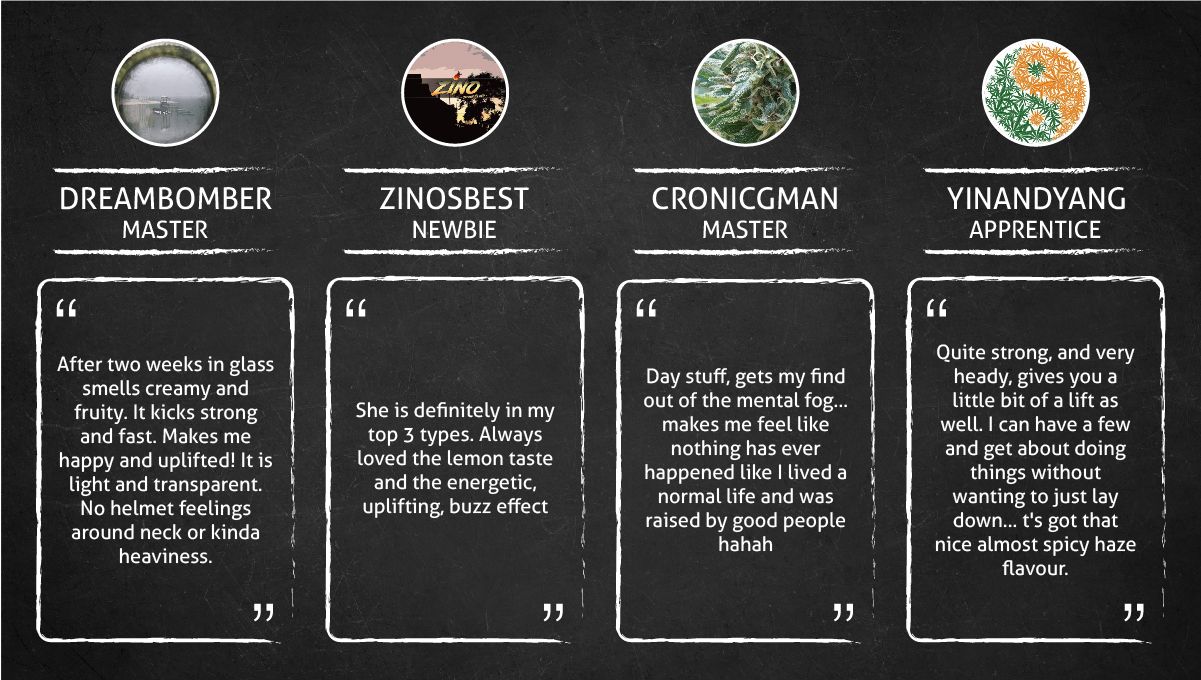
Reviews for Super Lemon Haze Auto consistently highlight its exceptional potency and uplifting, energetic effects. Smokers appreciate its suitability for daytime use, especially when seeking mental clarity and relief from conditions like PTSD and ADD. The strain is lauded for its delightful aroma and taste, characterized by zesty lemon notes with surprising hints of pine and sweetness.
Users describe it as a perfect choice to combat cramps and stress, offering a euphoric, long-lasting high that allows them to stay active and engaged throughout the day. Whether it's for focusing on tasks or simply enjoying the world around them, Super Lemon Haze Auto's smooth smoke and refreshing lemon flavor make it a top choice for various occasions.
11. In Conclusion
The first thing we want to note about Super Lemon Haze Auto is its incredible uniformity. All the plants we saw were the same – small and very bushy. Granted, all growers were using some training technique or other, but frankly, we believe the plants wouldn't be much taller if left alone.
The strain also seems to be very resilient because a few gardeners topped their plants and never saw them skip a beat. All in all, SLH Auto is the perfect indoor variety, and for anyone trying it, the experience will be smooth and rewarding. Happy growing!


Comments