




From Seedling to Coco: How We Prepare Our Growing Medium
Introduction: Where Every Growing Cycle Begins
Hey everyone!
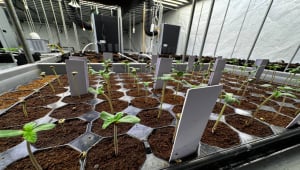
Today, we want to take you behind the scenes and show you how we transplant our already germinated seeds into coco substrate.
It might seem like a simple process, but there are quite a few important details behind every successful start. From choosing the right growing medium to preparing the pots and carefully handling young seedlings, every step deserves attention.
Over the years, we have developed a routine that works well for our team, and today we want to share exactly how we approach it.
Choosing Our Coco Substrate
The first step is choosing the coco substrate.
For many years, our personal favorite has been BioBizz. We have worked with this brand for a long time, and its products have become a familiar part of our daily routine.
Does that mean BioBizz is the only good option? Absolutely not!
There are plenty of quality coco substrates available, and every grower eventually finds something that works best for their own setup. We simply prefer working with materials we know well and have experience with.
Consistency is important to us, especially when working with multiple genetic projects at the same time.
Our Coco and Humus Mix
We don't use pure coco as our final growing medium.
Instead, our standard mixture consists of:
85% coco substrate
15% humus
Coco provides a lightweight structure with good aeration and moisture retention, while humus contributes organic matter and can support microbial activity in the growing medium.
We combine both components and mix them thoroughly to create a uniform substrate.
Our goal is to maintain consistency across all the pots so that the plants begin their development under comparable conditions.
Preparing the Fabric Pots
Once the substrate is ready, we begin filling our fabric pots.
We exclusively use fabric containers because we appreciate their breathable structure and the aeration they provide around the root zone.
In our setup, we work with 1-gallon pots.
This choice is closely connected to our automated irrigation system, which allows us to control water delivery throughout the cycle. Because irrigation is carefully managed, we can work with relatively small containers without regularly allowing the substrate to dry out.
For growers who water manually at home, we would personally consider larger containers, around 2 to 3 gallons, because they generally provide a greater moisture reserve between watering sessions.
Of course, every setup is different, and pot size should always match the growing environment and irrigation method.
Preparing the Planting Holes
After filling the required number of pots, we move everything into the grow room.
Now it's time to prepare the planting holes for our young seedlings.
At this stage, we also introduce MYKOS from Xtreme Gardening into our growing medium.
MYKOS contains beneficial mycorrhizal fungi that can form a symbiotic relationship with plant roots. These fungi may help extend the effective reach of the root system, supporting access to water and certain nutrients, particularly phosphorus.
A healthy relationship between roots and beneficial microorganisms can also contribute to overall root-zone resilience.
However, mycorrhizal products are not magic solutions. Their effectiveness depends on the growing medium, environmental conditions, and whether the fungi successfully establish themselves.
For us, this is one more component of our established substrate preparation routine.
Preparing the First Irrigation Water
Before transplanting, we prepare the water for the first irrigation.
For this initial stage, we use a slightly lower EC than during later development, while keeping the pH within our intended range.
We also include AZOS from Xtreme Gardening in our preparation process.
AZOS is a product containing beneficial bacteria associated with nitrogen fixation. These bacteria are intended to support the microbial environment around developing roots.
MYKOS and AZOS serve different biological roles. One involves beneficial fungi, while the other involves bacteria. Their combined use is intended to support the root-zone environment, although the actual benefits depend on growing conditions.
We like to pay attention to these details from the beginning because early root development is an important part of establishing healthy young plants.
Transplanting Our Seedlings
Now comes one of our favorite moments: bringing in the seedlings!
By this point, our seeds have already germinated and developed inside peat starter plugs.
We carefully transfer each seedling into its prepared container, taking care not to damage the young roots.
One interesting detail is that our approach differs depending on the type of genetics we are working with.
With autoflowering varieties, we prefer to transplant early, as soon as the first root becomes visible beneath the starter plug. We try to avoid leaving the seedlings in their plugs long enough for the roots to become tightly bound.
With photoperiod varieties, we are generally more comfortable allowing the roots to develop further around the peat plug before transplanting.
These are methods based on our own working experience rather than universal rules. Different growers may use different approaches successfully.
The First Watering and Early Observation
Once every seedling has been transplanted, we move on to the first watering.
In our 1-gallon containers, the initial watering is usually around 250 ml per plant.
Even though our facility uses automated irrigation, we prefer to handle watering manually during approximately the first two weeks.
This gives our team the opportunity to observe the young plants closely and follow their early development before transitioning to the automated system.
During this period, we pay particular attention to how the seedlings establish themselves and respond to their new environment.
A New Cycle Begins
And that's it!
This is the preparation process we follow before every new planting cycle.
From choosing the substrate and preparing the growing medium to transplanting the seedlings and carrying out the first watering, each stage is part of a routine that our team has developed through years of practical experience.
There is something special about seeing a room full of freshly transplanted seedlings. Everything is still ahead of them, and every new cycle brings another opportunity to learn, observe, and improve.
Now all that's left is to watch our little girls grow!
Thanks for following our journey, stay tuned for more behind-the-scenes updates, and happy growing, everyone!
Comments